For earlier posts, please find them here: Passwordless journey with FIDO2 – Part 1 – Getting started with Security keys In the last part of this blog post I wrote about the beginning of my passwordless journey and which keys I had available. In this second part I will conclude with the overall experiences that […]
At Ignite 2019 Microsoft announced BitLocker key rotation for Intune managed Windows 10 devices. It is a long awaited feature and closes the feature gaps in the cloud managed BitLocker solution. In this article we have a look how this actually works. First of all we need to configure our devices to actually perform client-driven […]
With the release of WIM Witch v1.3.0, she now has new capabilities that were requested by the community. While there have been plenty of functional updates to WIM Witch since its release, this version brings enough change to warrant documentation. The features introduced in this release are all from user requests, and I want to […]
Another blog post on the subject of Hybrid Azure AD joined devices that have been provisioned using Windows Autopilot. As you may have figured by now, this scenario even though it’s not in preview any longer, it sure feels like it some times. A while back I wrote a blog post that demonstrated how you […]
Internet browsers have become more than just a means of accessing lines of HTML, JavaScript and CSS over the years. Today we use browsers to control core functions of our business, through portals into technologies including Azure, Office 365, AWS, Google Gsuite and many, many more. The one thing that has become apparent though over […]
So a couple of days ago I posted a post on how to bulk rename devices in Intune using the Graph API (https://www.scconfigmgr.com/2020/03/02/how-to-rename-windows-10-devices-in-intune-using-powershell/), today though marks the availability of something very cleaver indeed, with the addition of bulk actions from within the Endpoint Manager portal. This is a feature that Intune admins around the globe […]
With over 44 million active users, Microsoft Teams is not going away anytime soon. It’s rise in popularity also means that old issues arise a new for a lot of tenants that have not fully utilized the Teams client in the past or have just begun the transition to Office 365 ProPlus that includes Teams. […]
WIM Witch is a utility that can be used to update and modify WIM files for Windows deployment scenarios. It allows the WIM to be patched, drivers to be applied, in-box applications to be removed, and .Net 3.5 binaries to be injected. It also supports the ability to inject an Autopilot configuration file into the WIM file to support “Autopilot For Existing Device” deployments. It accomplishes this by providing the user with a GUI to setup the desired configuration. Once the parameters have been configured, the image can be created, or the configuration saved for use with command line functionality.
Installing WIM Witch
WIM Witch can now be installed from the PowerShell gallery. Use the following command to get it:
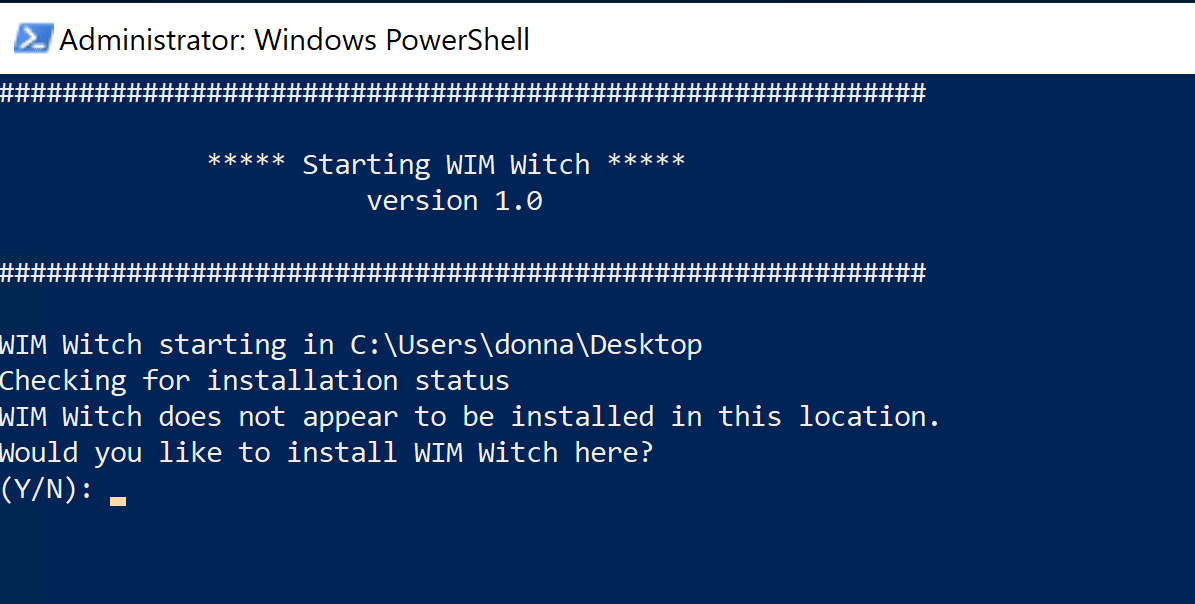
To get started, simply run the script with Administrative rights. WIM Witch will start a pre-flight check to see if its folders exist in the folder that the script was run. If it doesn’t detect any of its folders, it will start the installation routine.
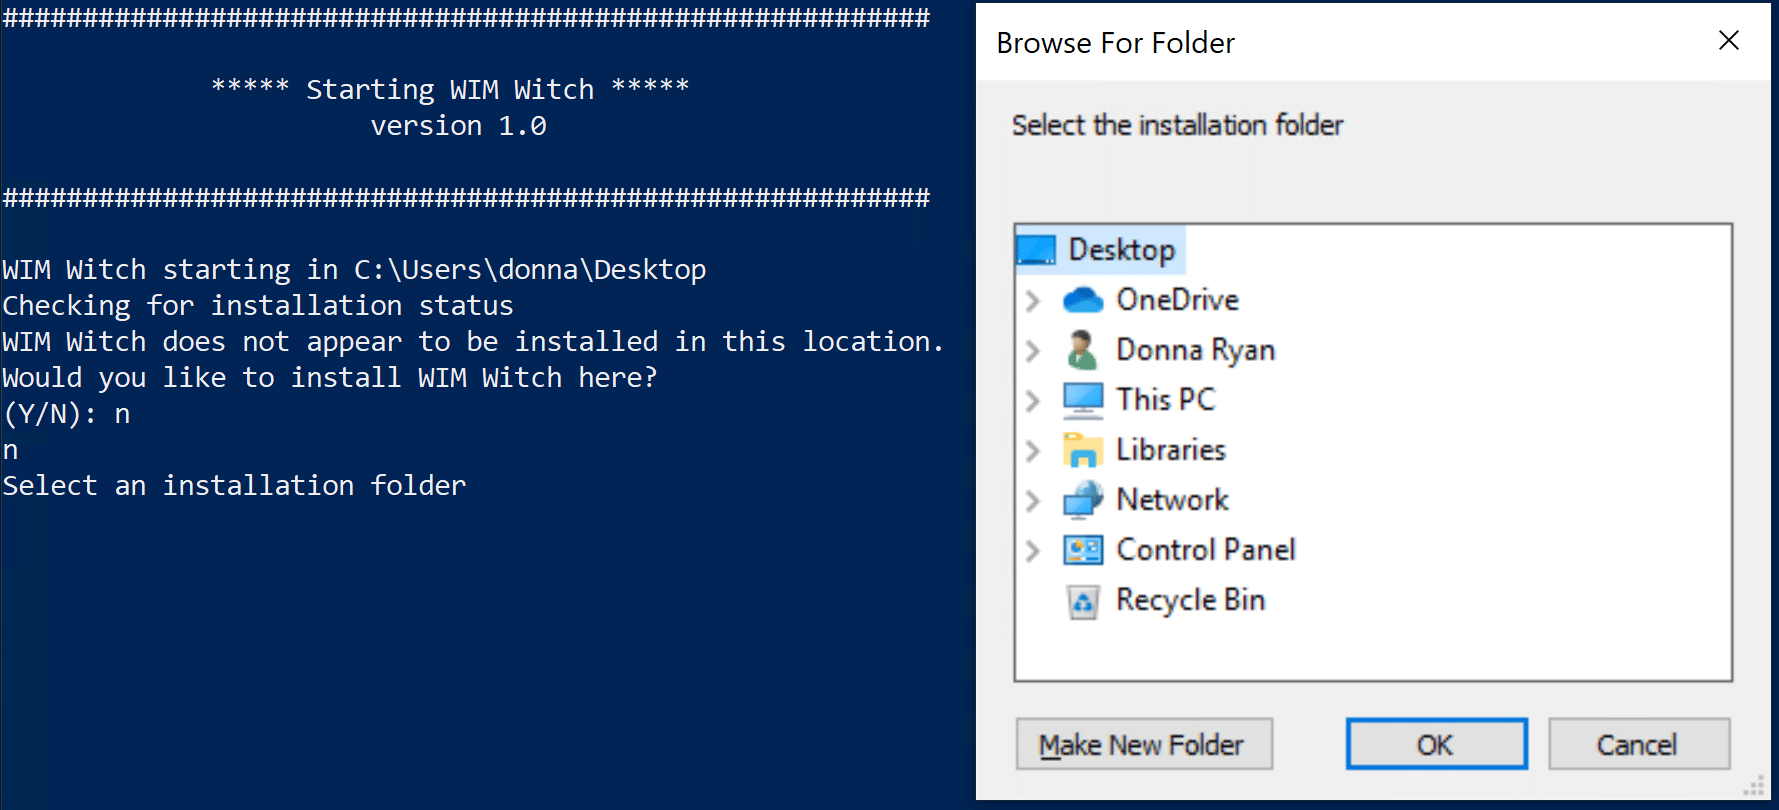
At the prompt, select “Y” for “yes” or “N” for “no”. If “N” is selected, WIM Witch will then ask for the folder that it should install to.
Sometimes the browse window loses the focus and becomes “hidden” behind active screens. If the window doesn’t spawn, minimize all windows to find it.
Select the folder to continue.
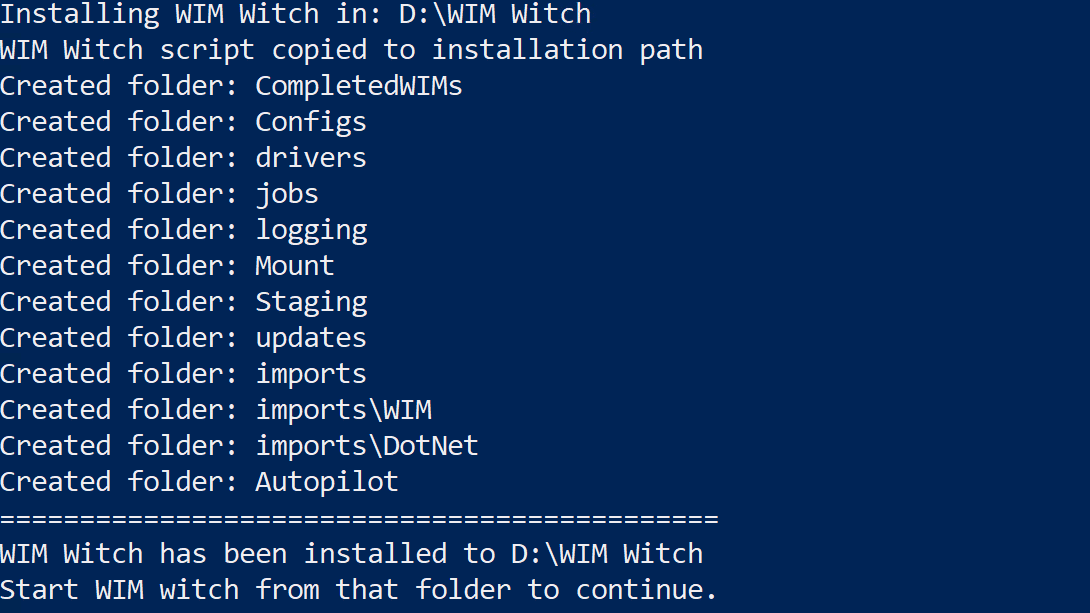
WIM Witch will create several folders and will copy itself to the path specified. Once this operation is complete, WIM Witch will exit. Please then run WIM Witch from the newly installed location.
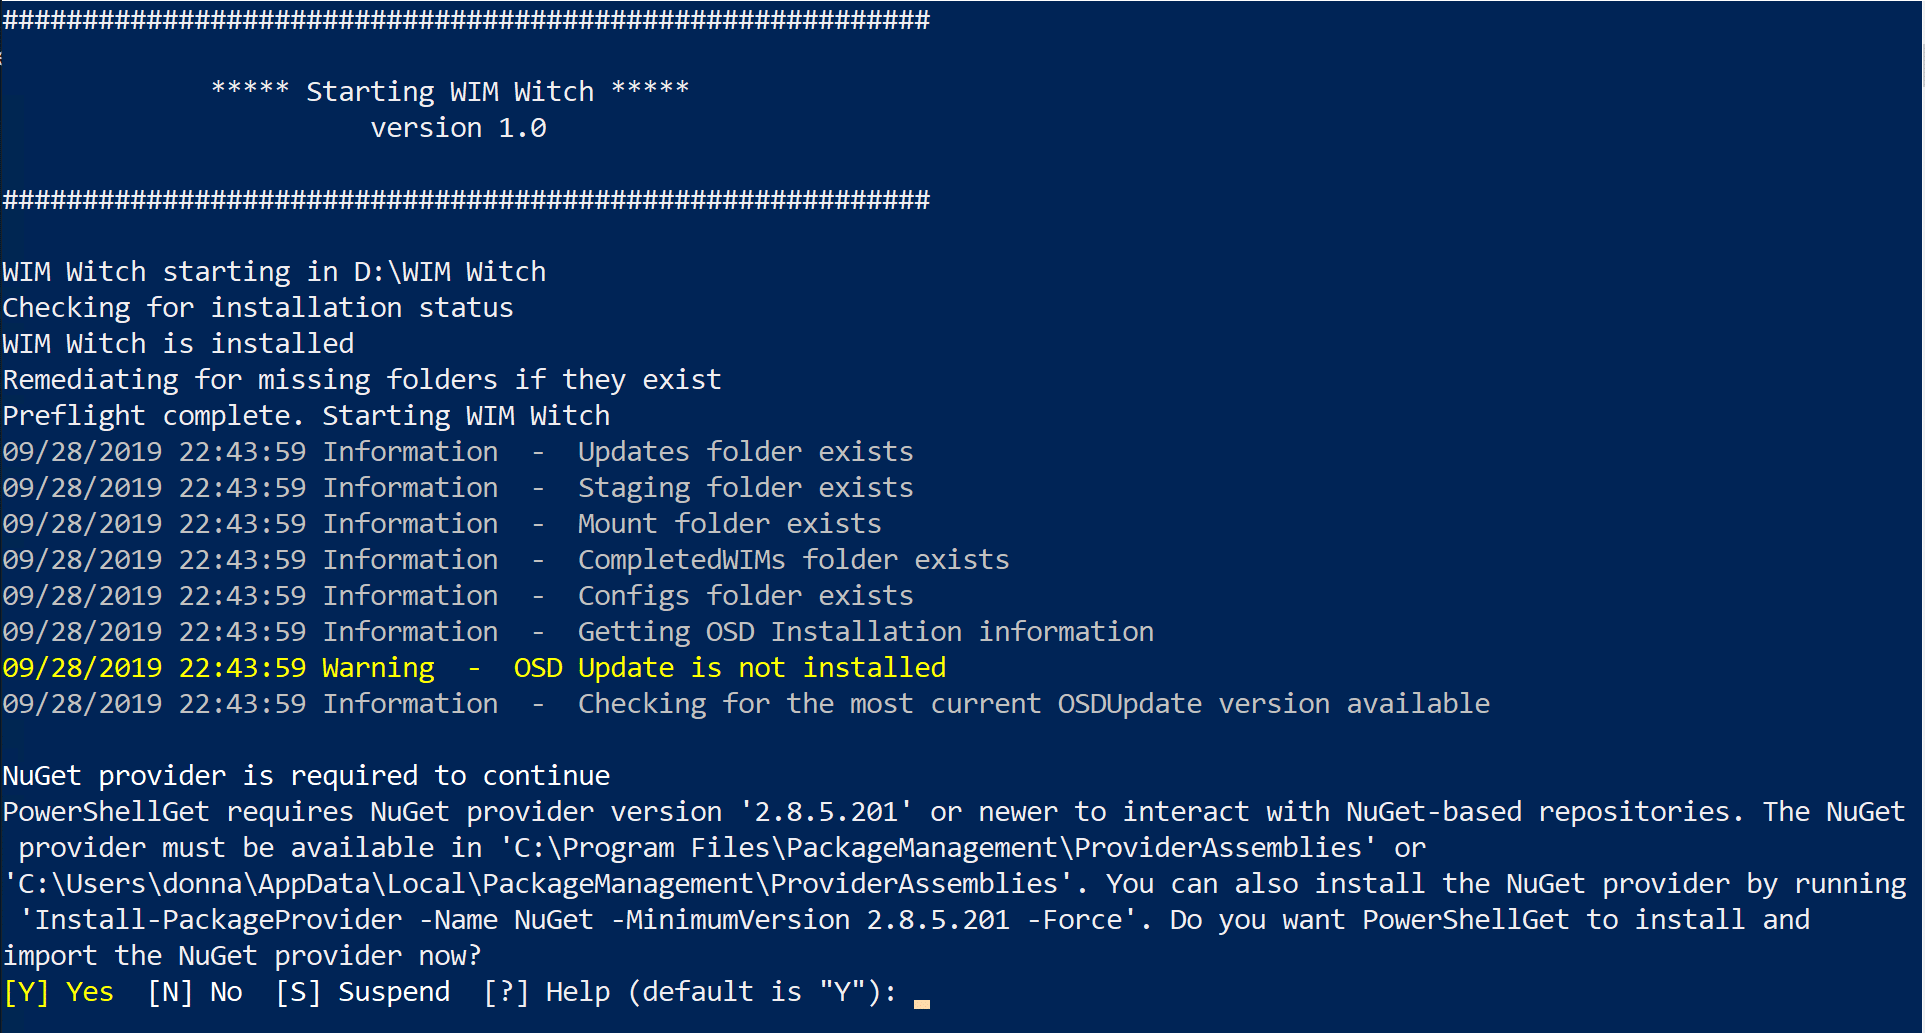
Upon starting, WIM Witch will always check to see if its folder structure is present and will replace any folder that is missing.
If this is the first time WIM Witch is being run on the computer, it may prompt to install NuGet. This is required to check the latest version of OSDUpdate and OSDSUS, which are the core of the update mechanism. If prompted, please allow it.
Importing Content into WIM Witch
WIM Witch provides a mechanism to import Install.wim and .Net 3.5 files into its folder structure. When applying .Net 3.5 to an image, prior importation will be required as WIM Witch cannot download the .Net files Microsoft directly. Importing Install.wim files is optional, but may be beneficial.
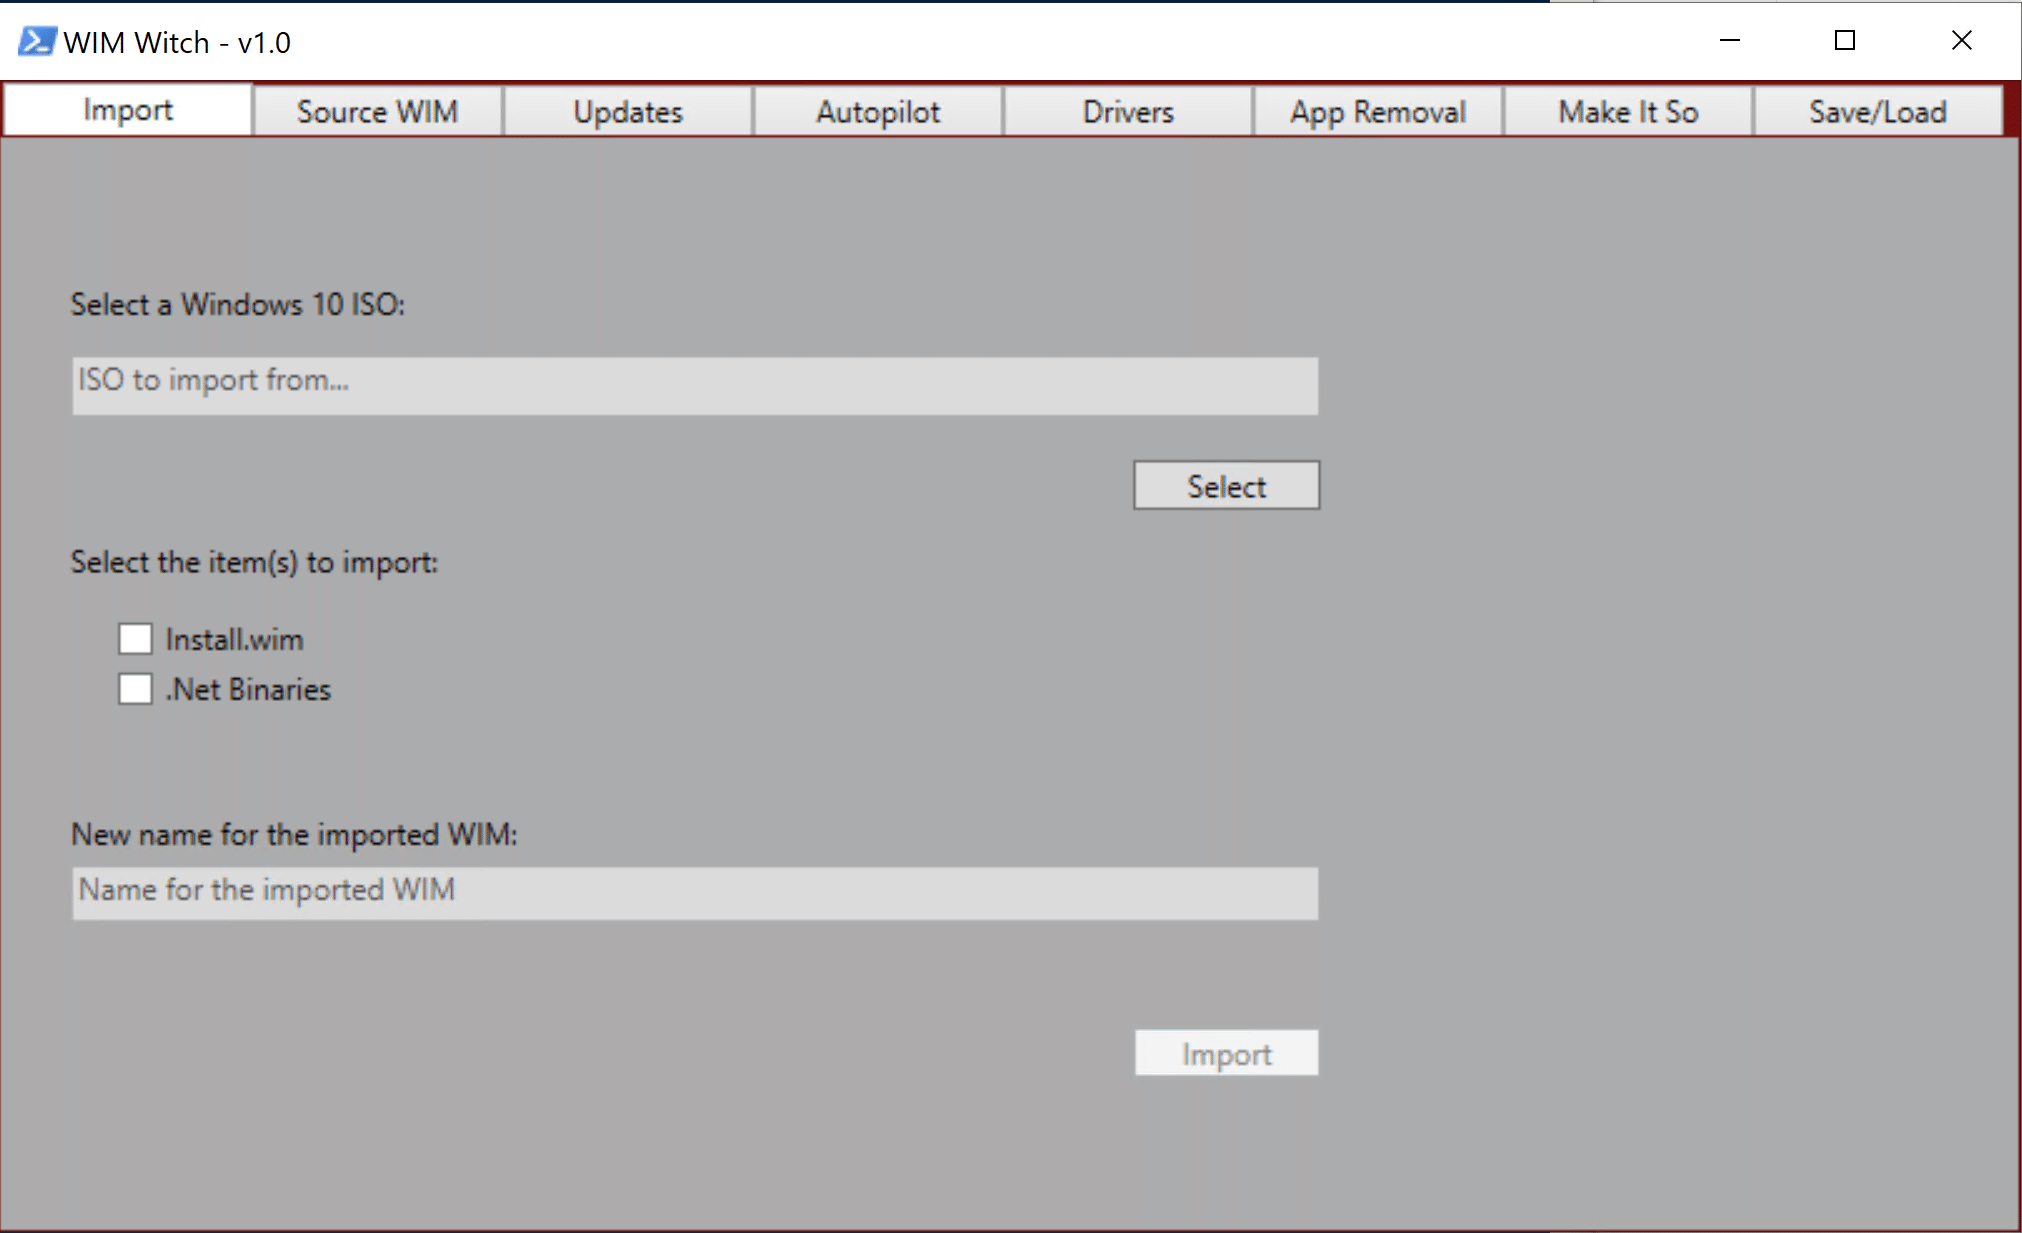
To import, start on the “Import Tab”
Press the “Select” button and browse to the ISO file that contains the files that should be imported. It should be noted that WIM Witch cannot import from an already mounted image; only ISOs. Once the ISO file is selected, check the box for the items that should be imported. If “Install.wim” is checked, the field to supply the name for the imported “Install.wim” file will now be accessible. Provide a unique name for the file. .Net 3.5 Binaries do not require any additional configuration.
Once the proper check boxes and fields have been completed, click “Import” to start the process.
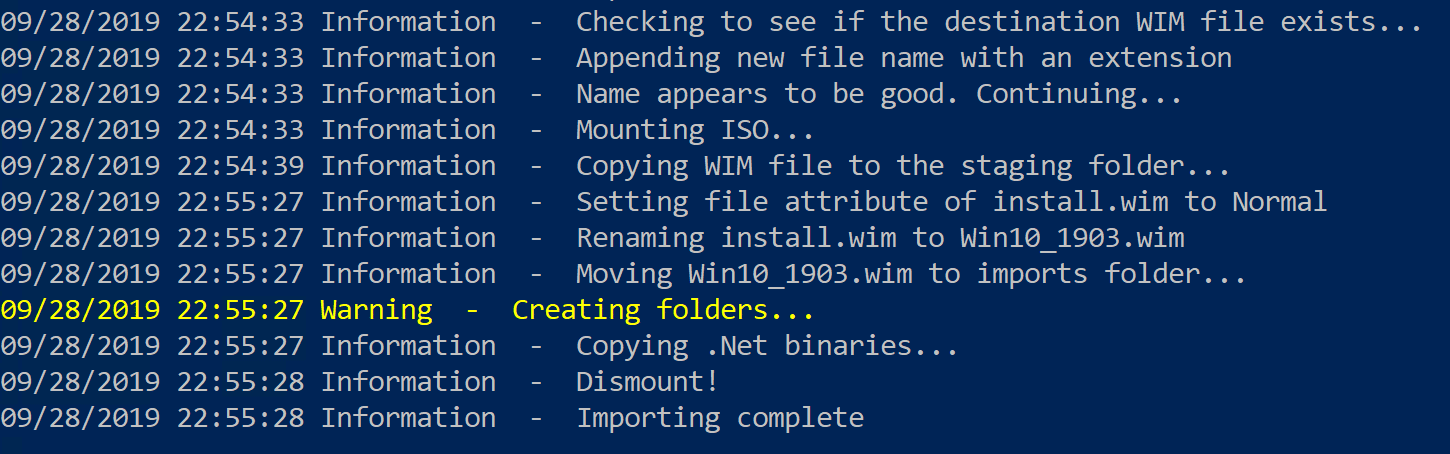
During the importation of the .Net binaries, if the required subfolders do not exist, WIM Witch will create them automatically.
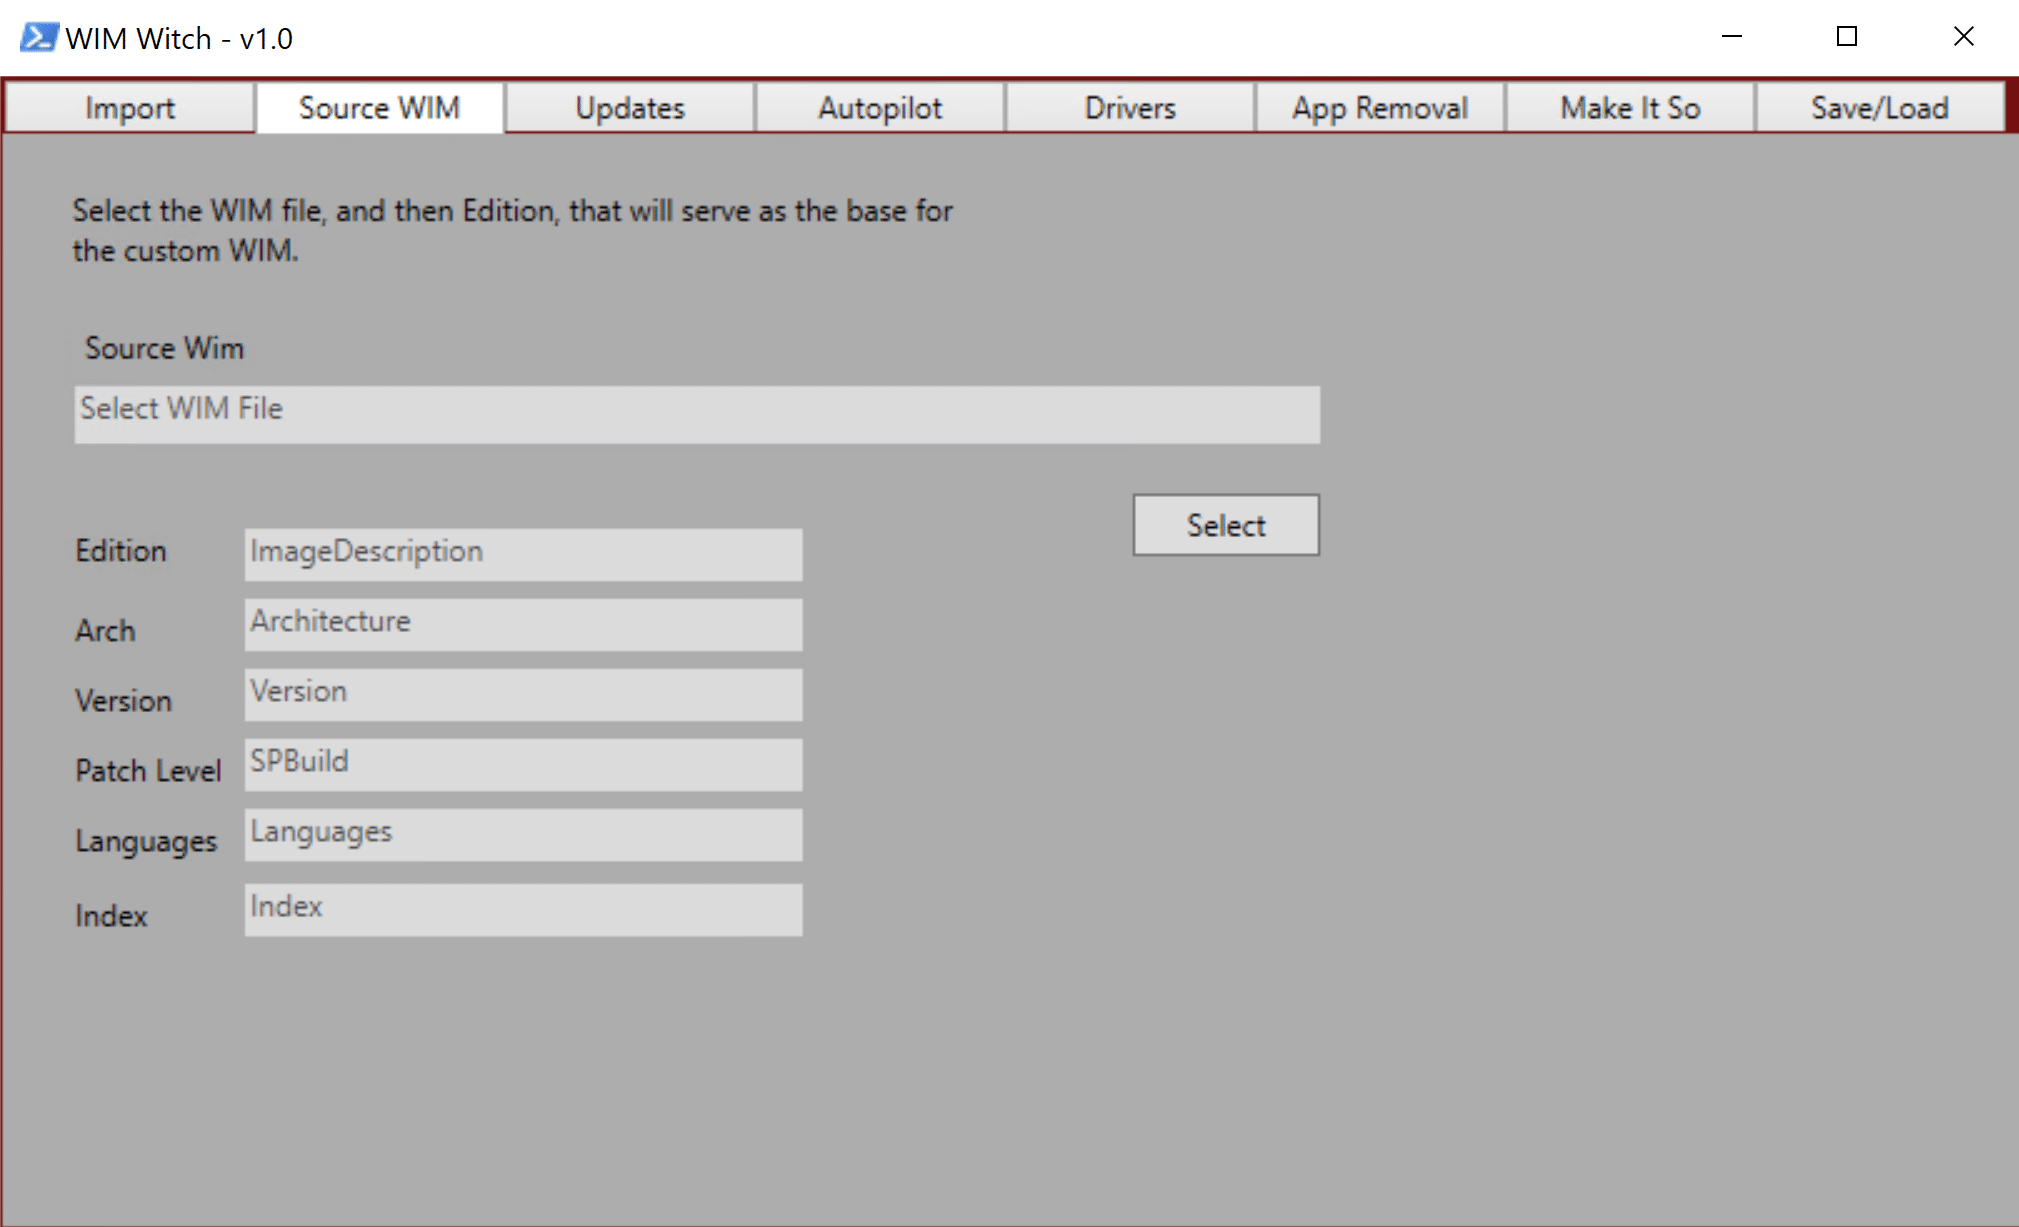
Selecting a WIM file for Customization
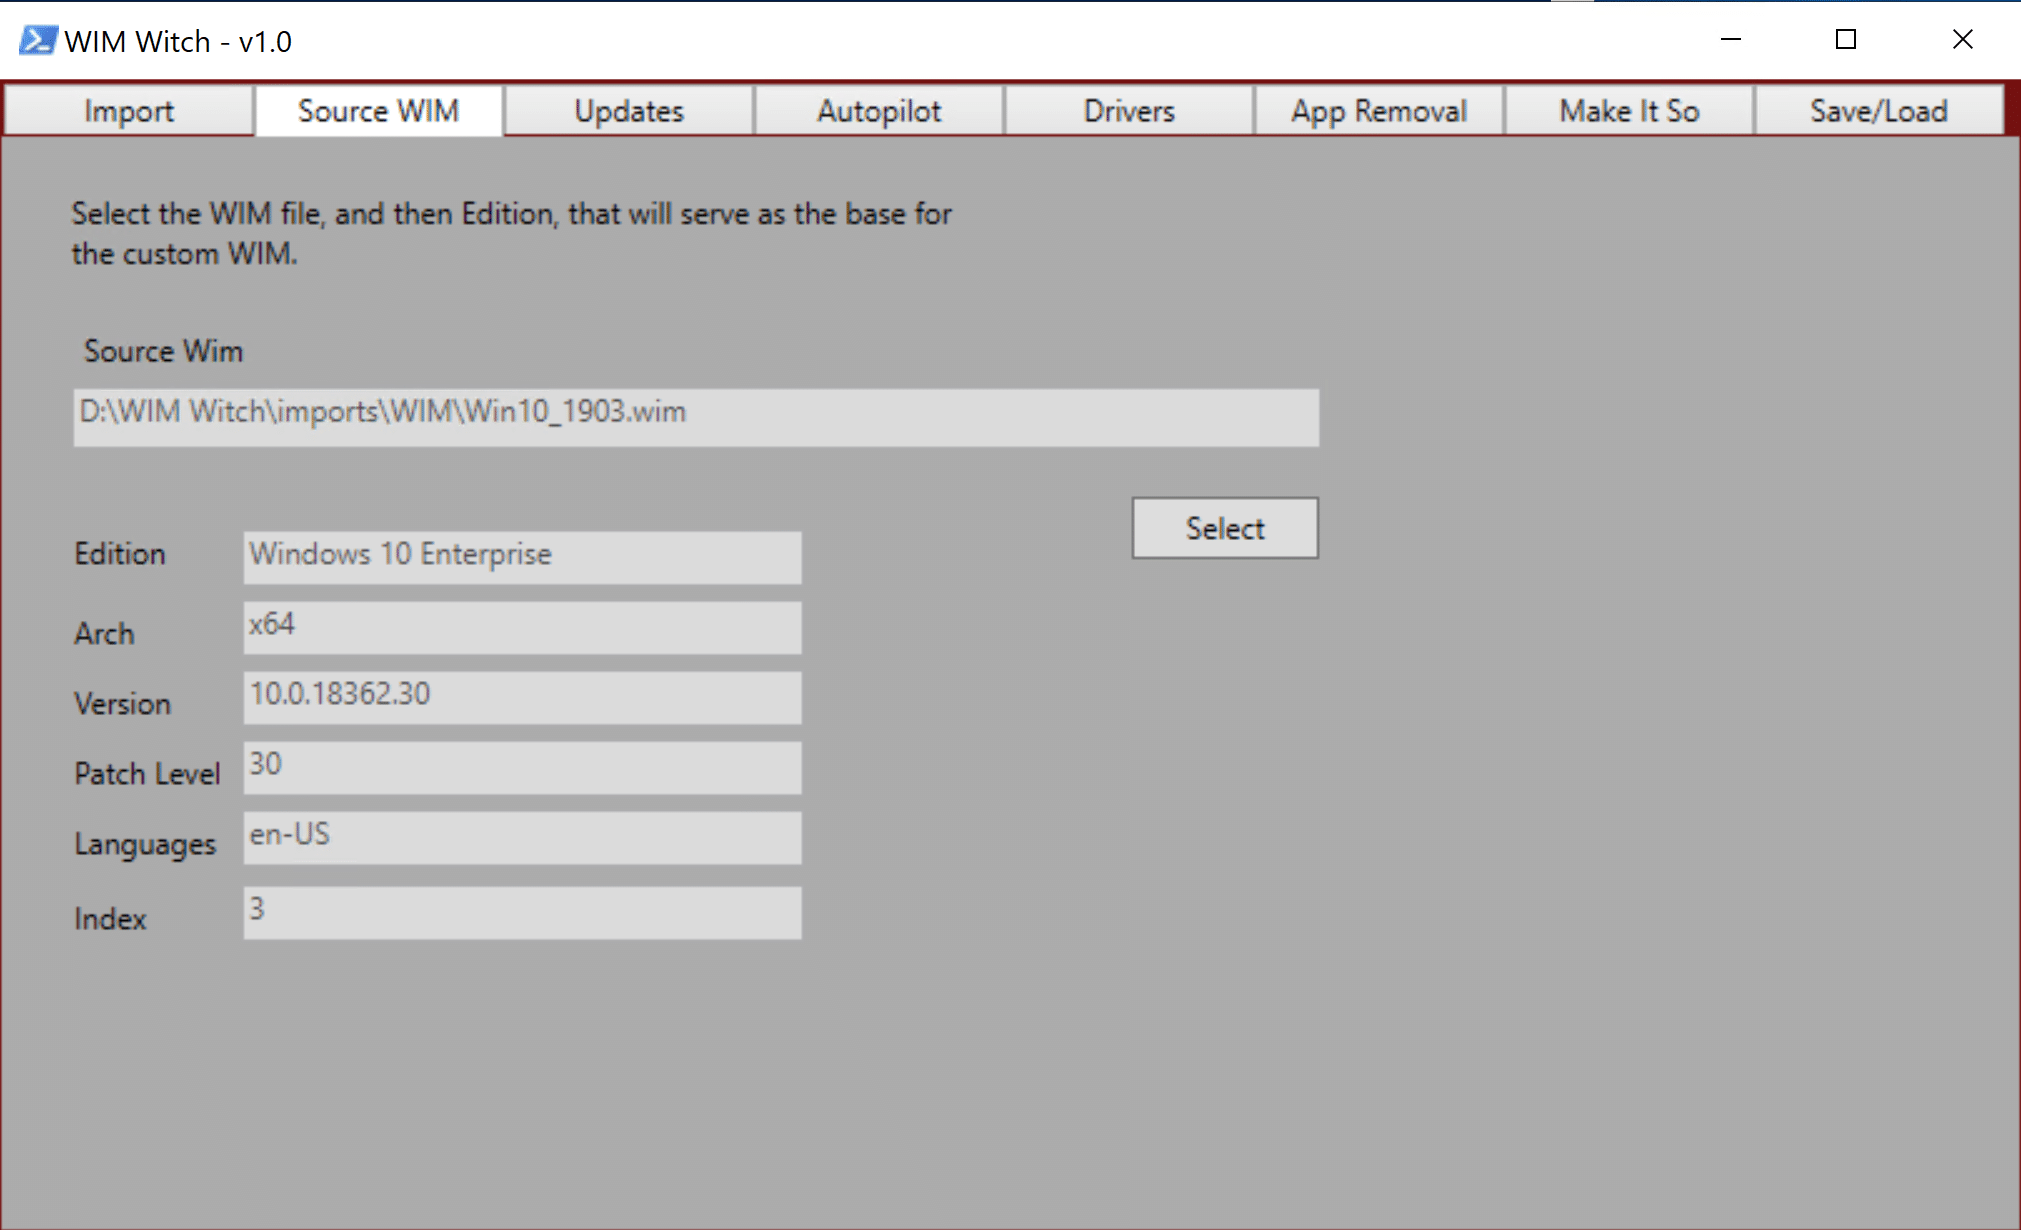
Starting at the “Source WIM” tab, click the “Select” button. Browse to the WIM file that will serve as the base for the image build.
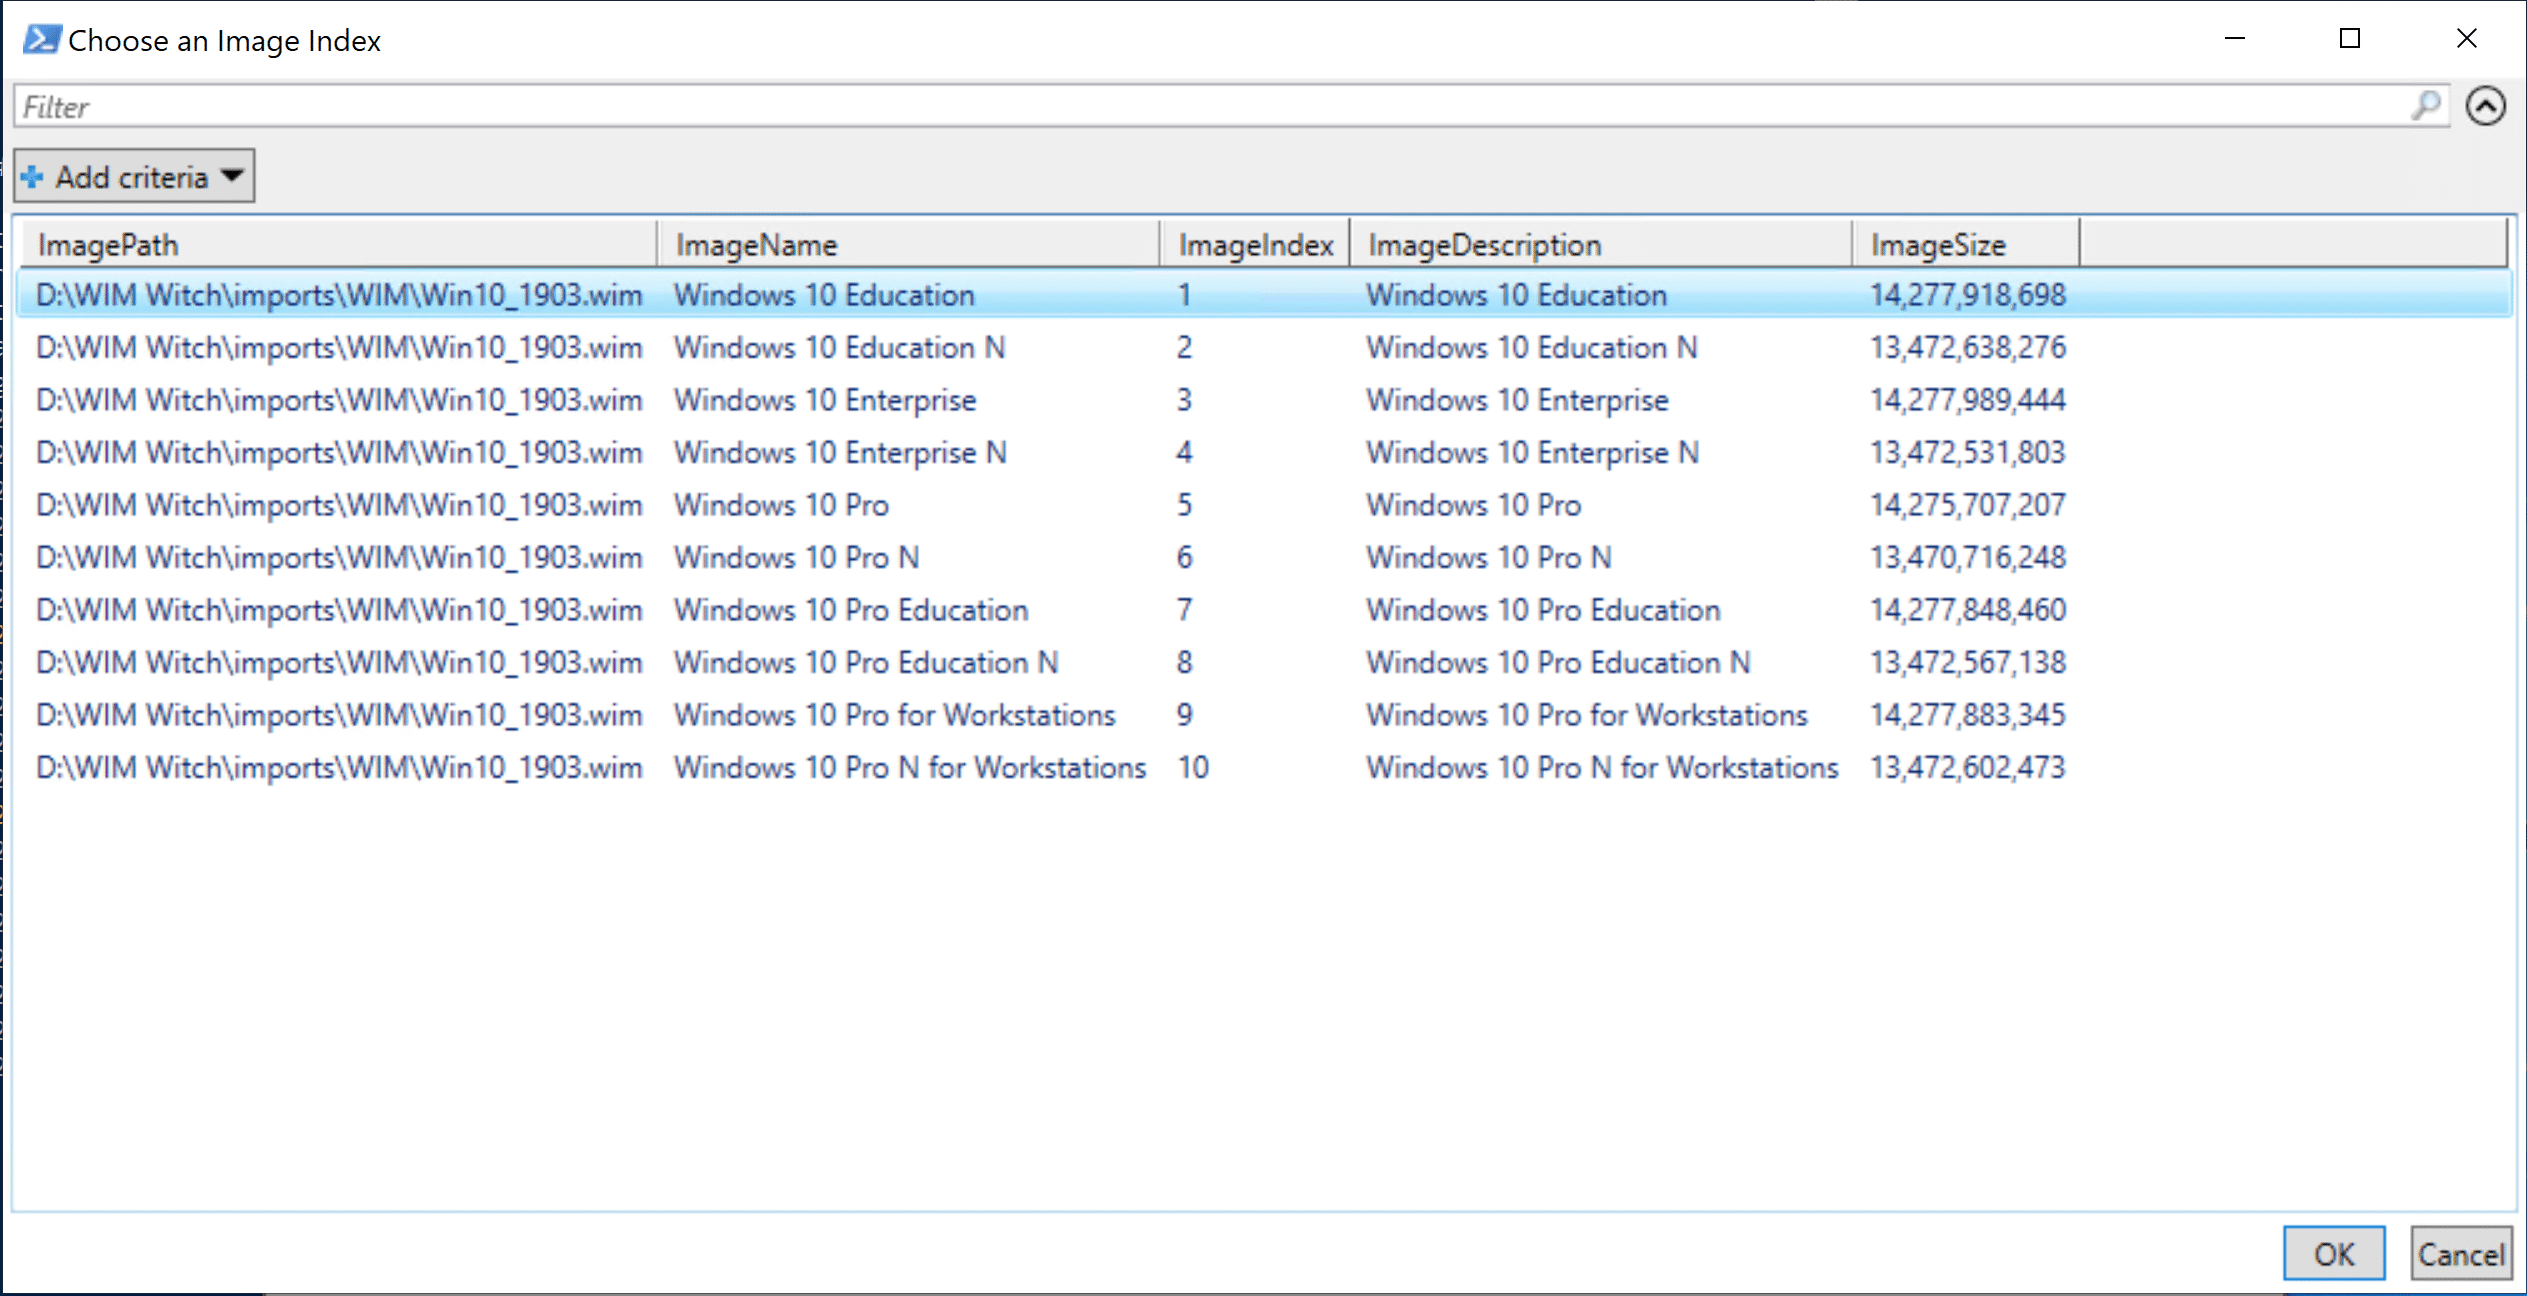
After selecting the WIM file, a Grid View window should appear:
Select the edition / index of Windows 10 that will be used. Click “OK”.
WIM Witch will take a small amount of time to analyze the selection and extract relevant information. When the processing is complete, the fields will be populated.
Applying Updates
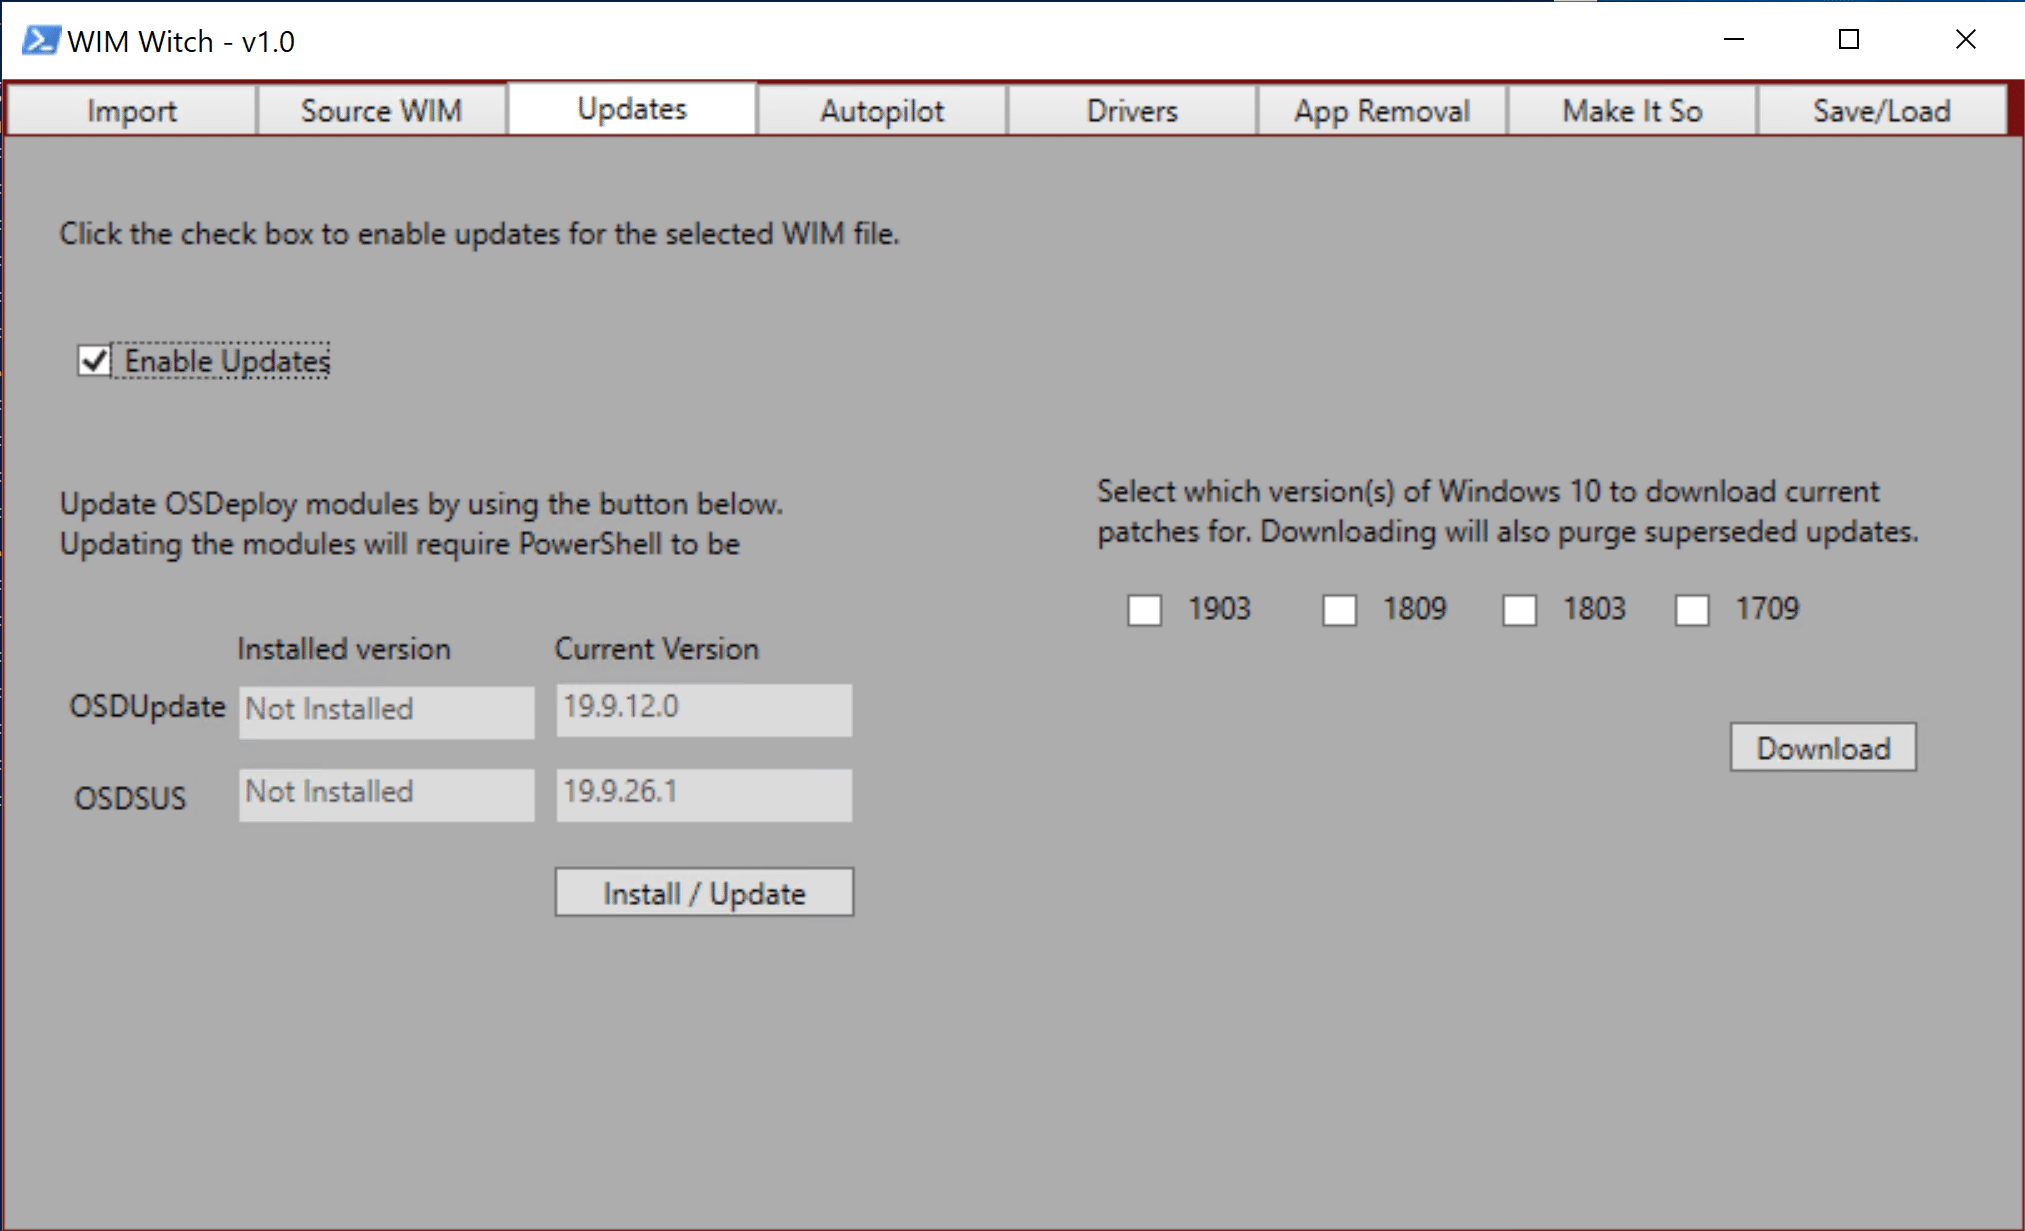
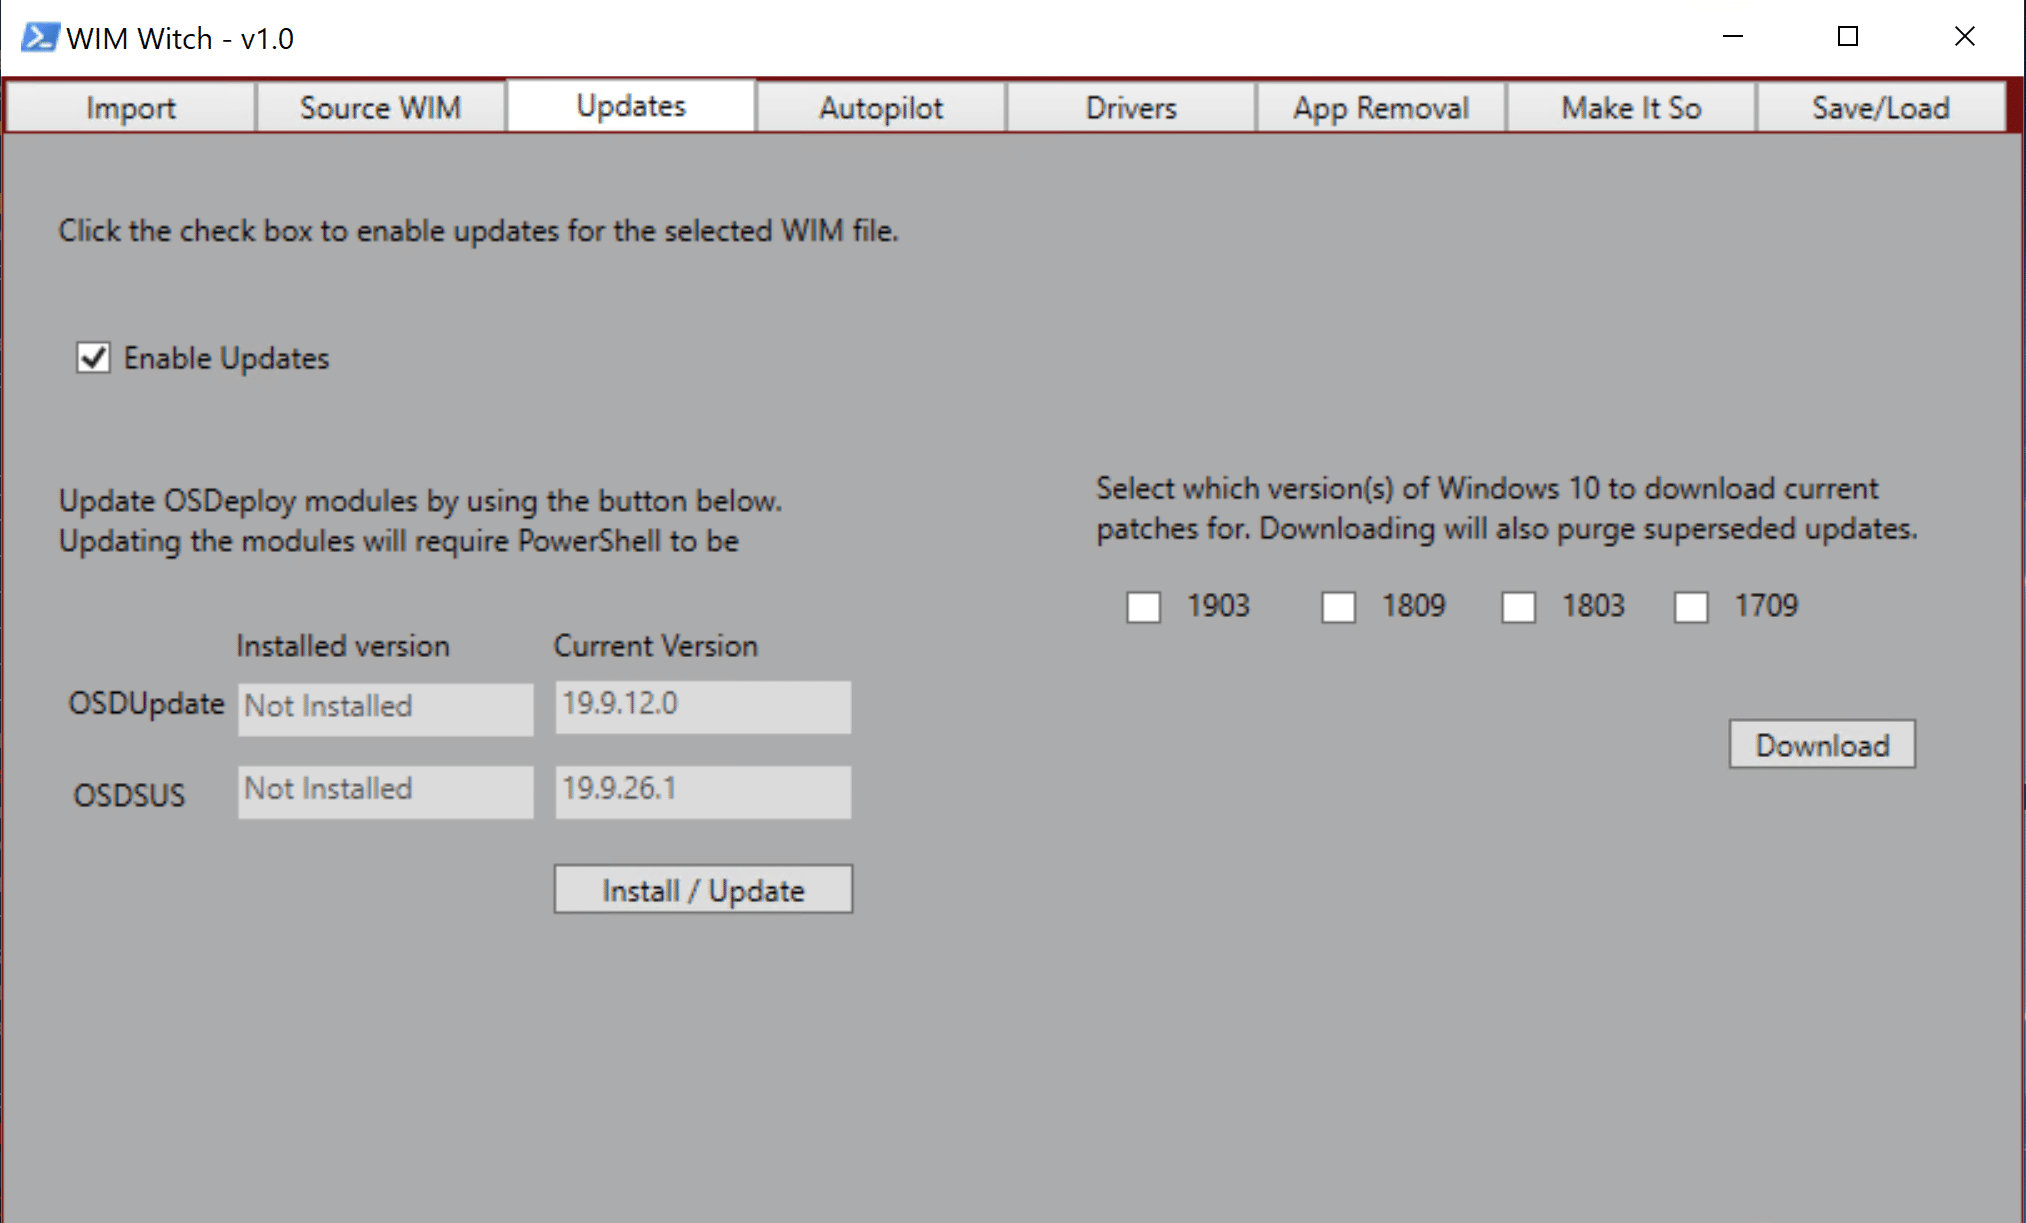
If the WIM file should have updates applied, on the Updates tab, tick the checkbox for “Enable Updates”:
The other options on this tab, including software update maintenance, will be discussed later in the documentation.
Applying Autopilot Profile
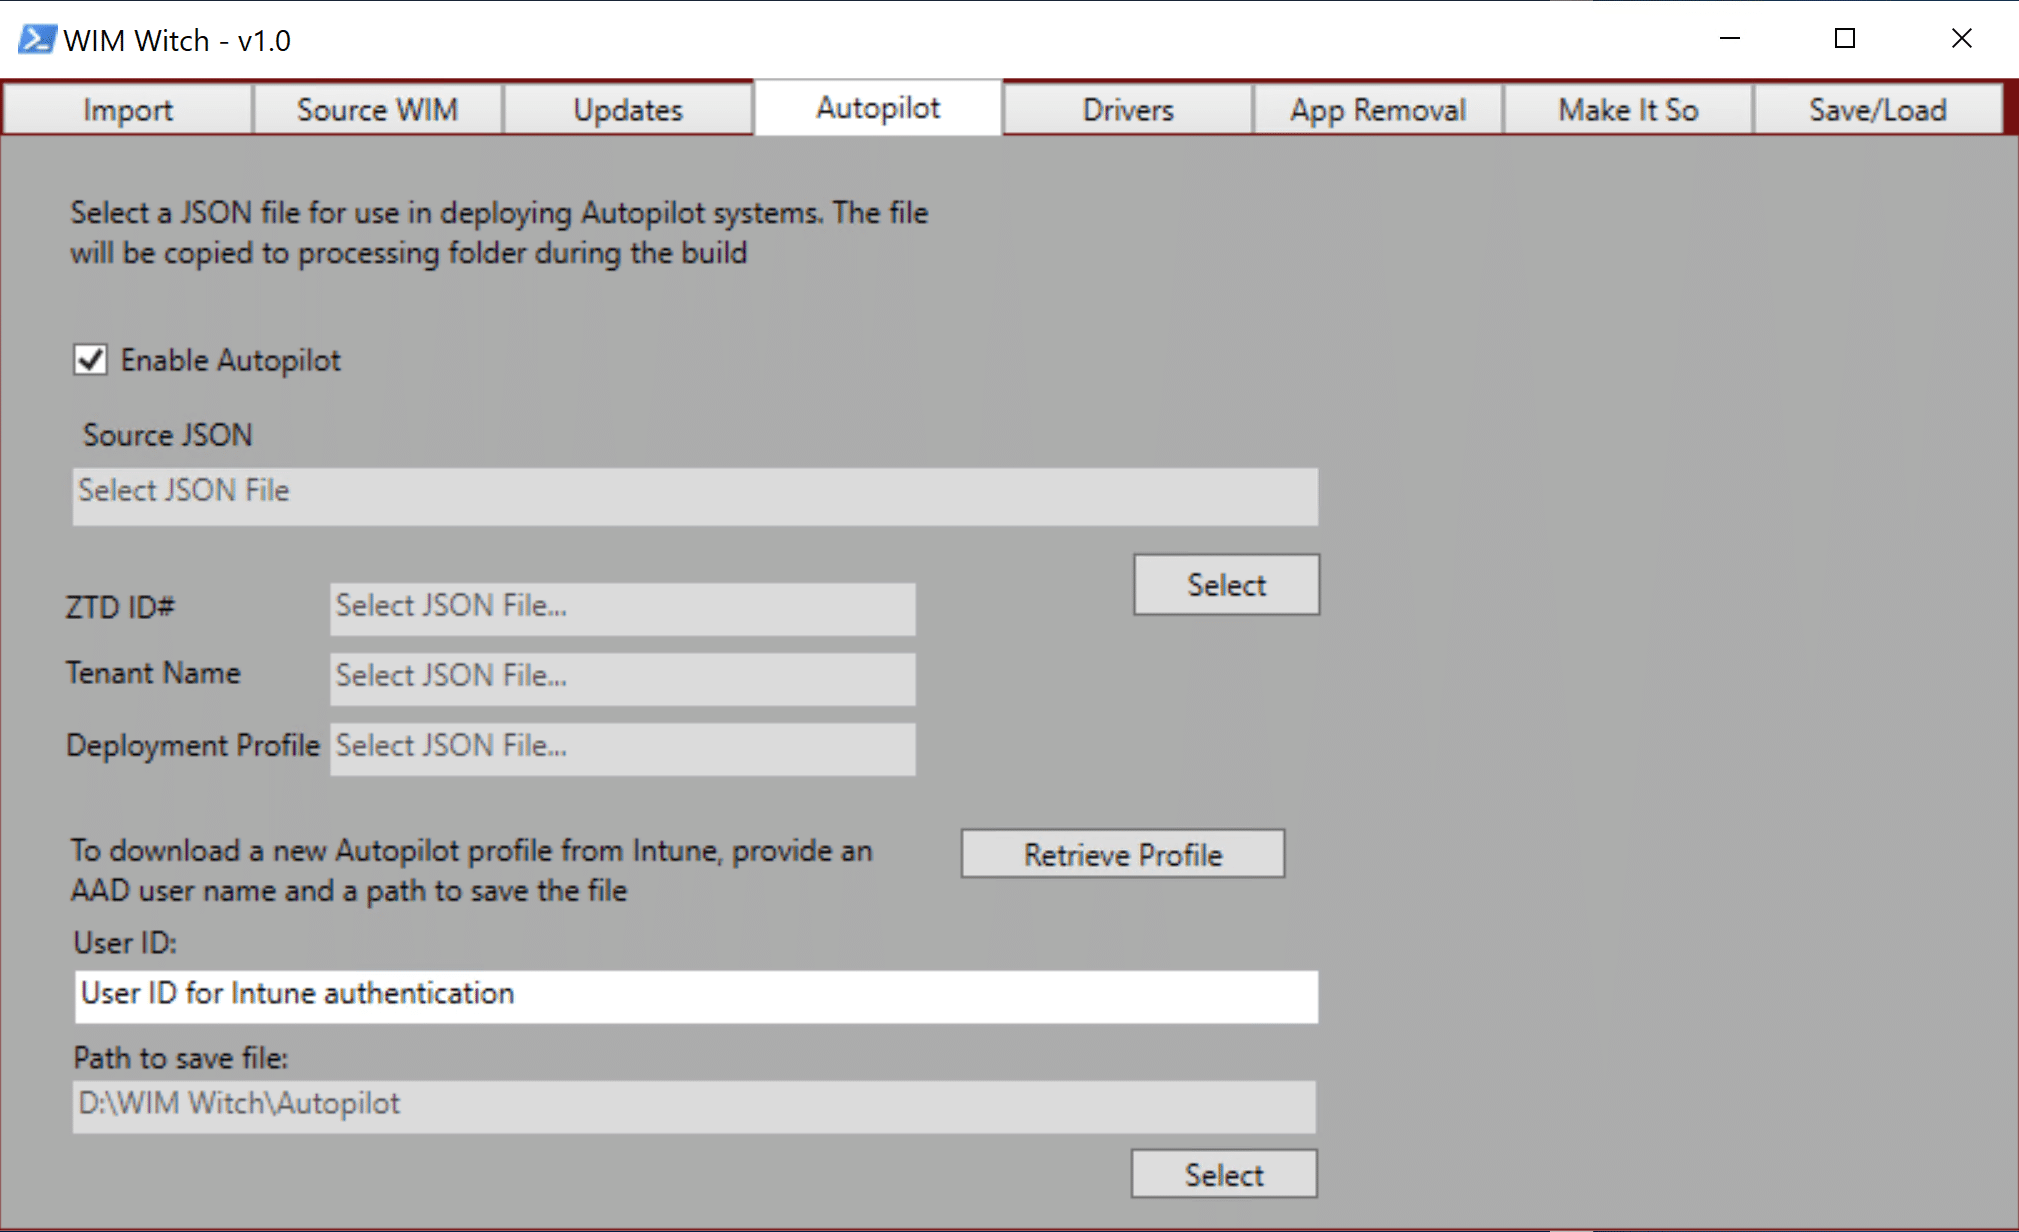
To apply an Autopilot configuration file for use in an “Autopilot for Existing Devices” deployment, check the checkbox “Enable Autopilot”
Once selected, click the “Select Button” under “Source JSON” file. This will allow the desired configuration file to be browsed to and selected. Once the process has been completed, the ZTD ID#, Tenant Name, and Deployment Profile fields will be populated.
If a new file needs to be downloaded from the cloud, simply enter the Azure AD User ID name into the User ID field, and then select a path to save the file to. Once completed, click the “Retrieve Profile” button.
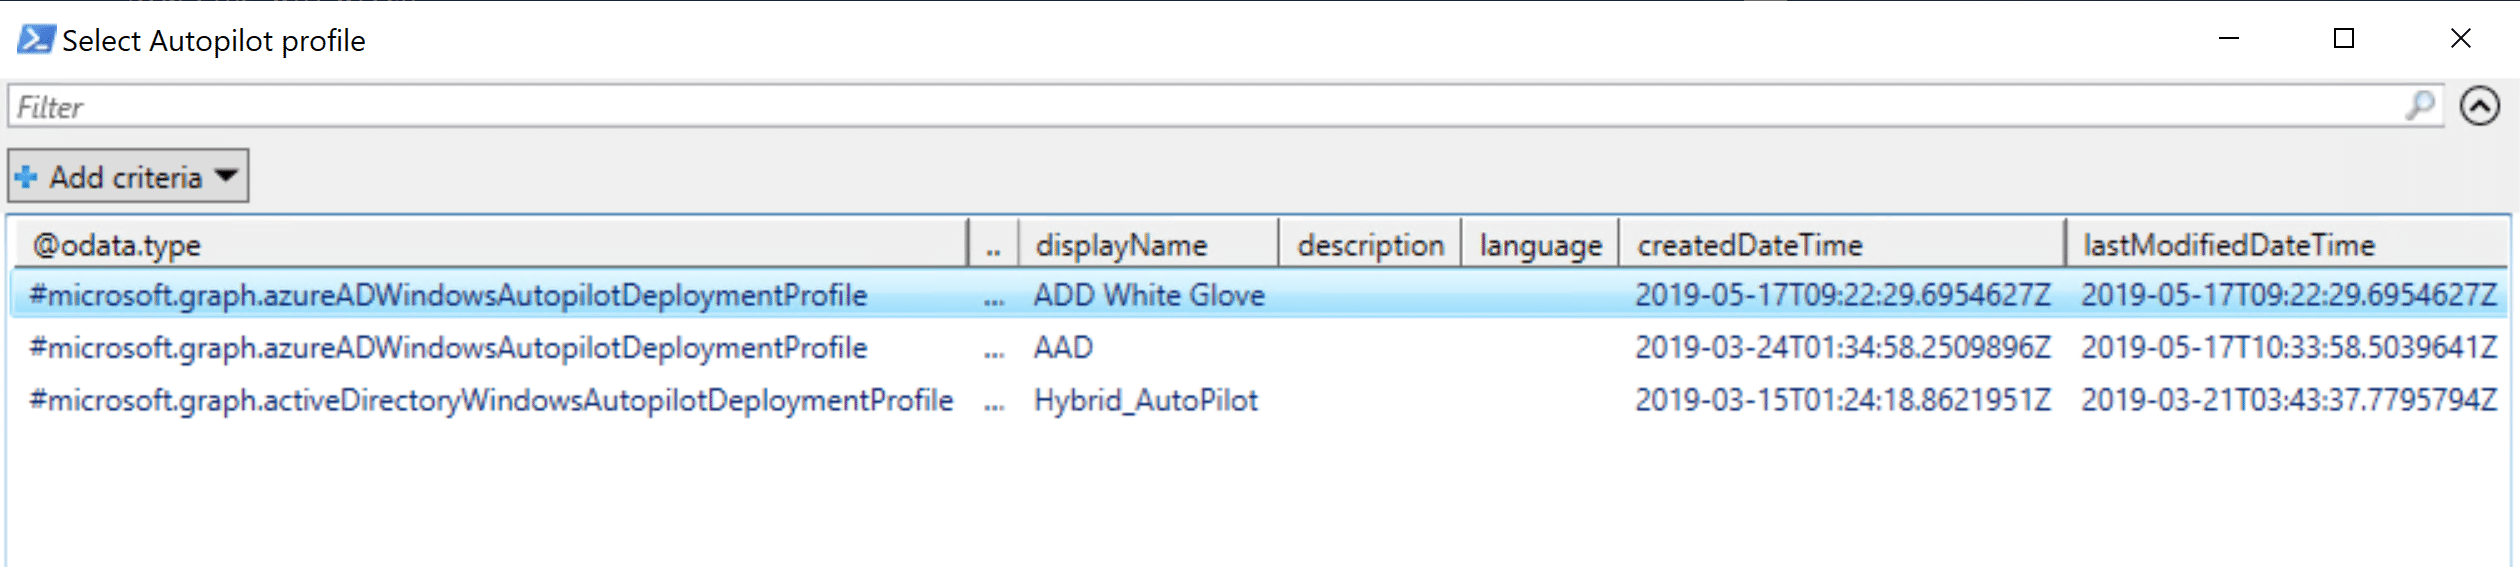
WIM Witch will check to see if the required PowerShell modules are installed in order to connect to Intune and will install them if they are missing. Once all of the prerequisites have been installed, you will be prompted to provide a password.
Once authentication is complete, a screen will display a list of Autopilot deployment profiles. Select the one that is required. Click OK. The file will be created in the folder specified.
The file will be created in the folder specified and now can be selected in WIM Witch for injection.
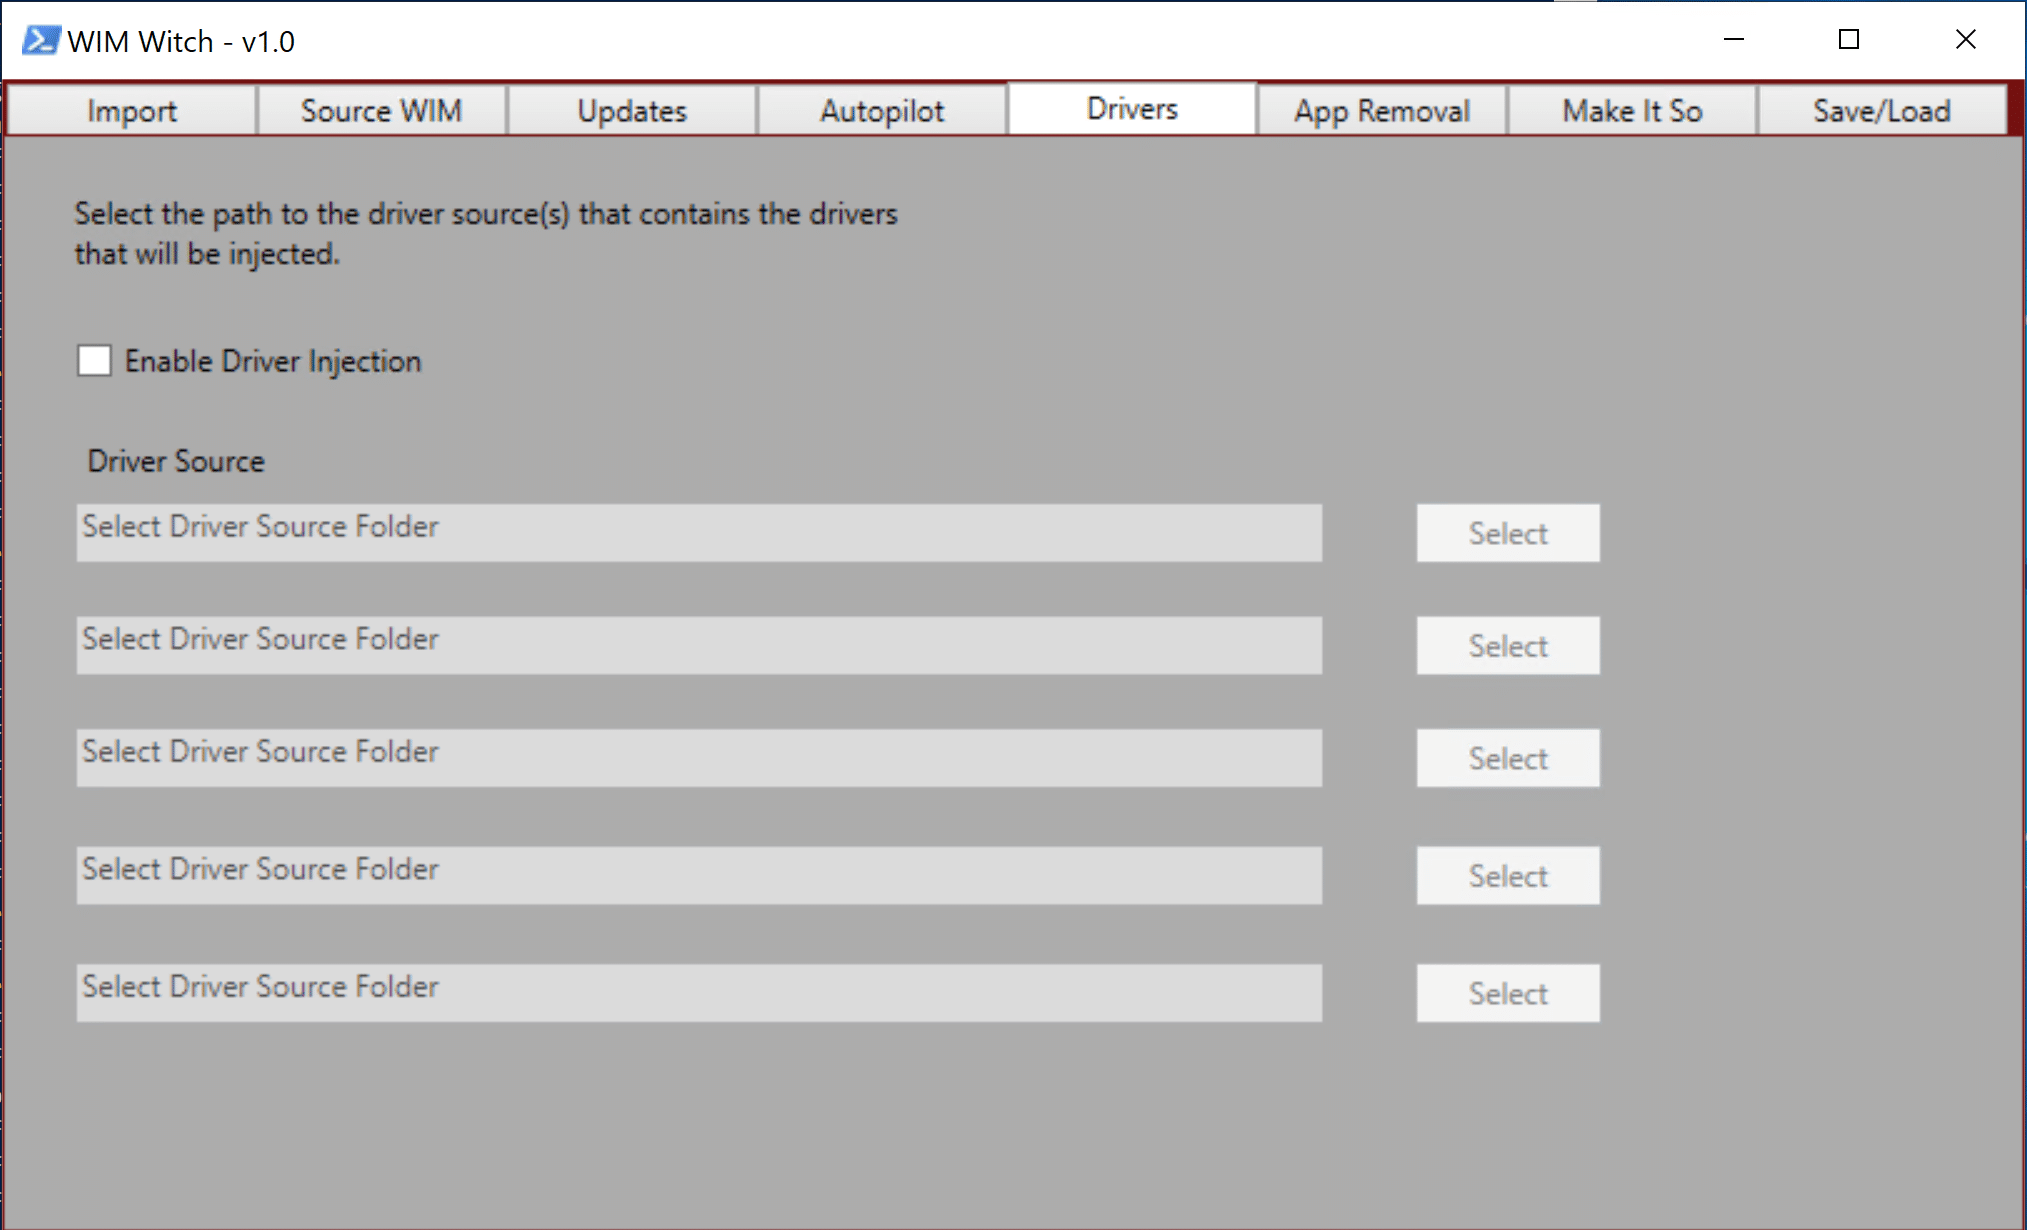
Driver Injection
To select drivers for injection, check the box “Enable Driver Injection”.
WIM Witch provides five paths that can be searched recursively for drivers. Not all fields are required to be populated as this just provides the ability to supply multiple folders if needed. Simply click the “Select” button at the end of each line and browse to the required folder.
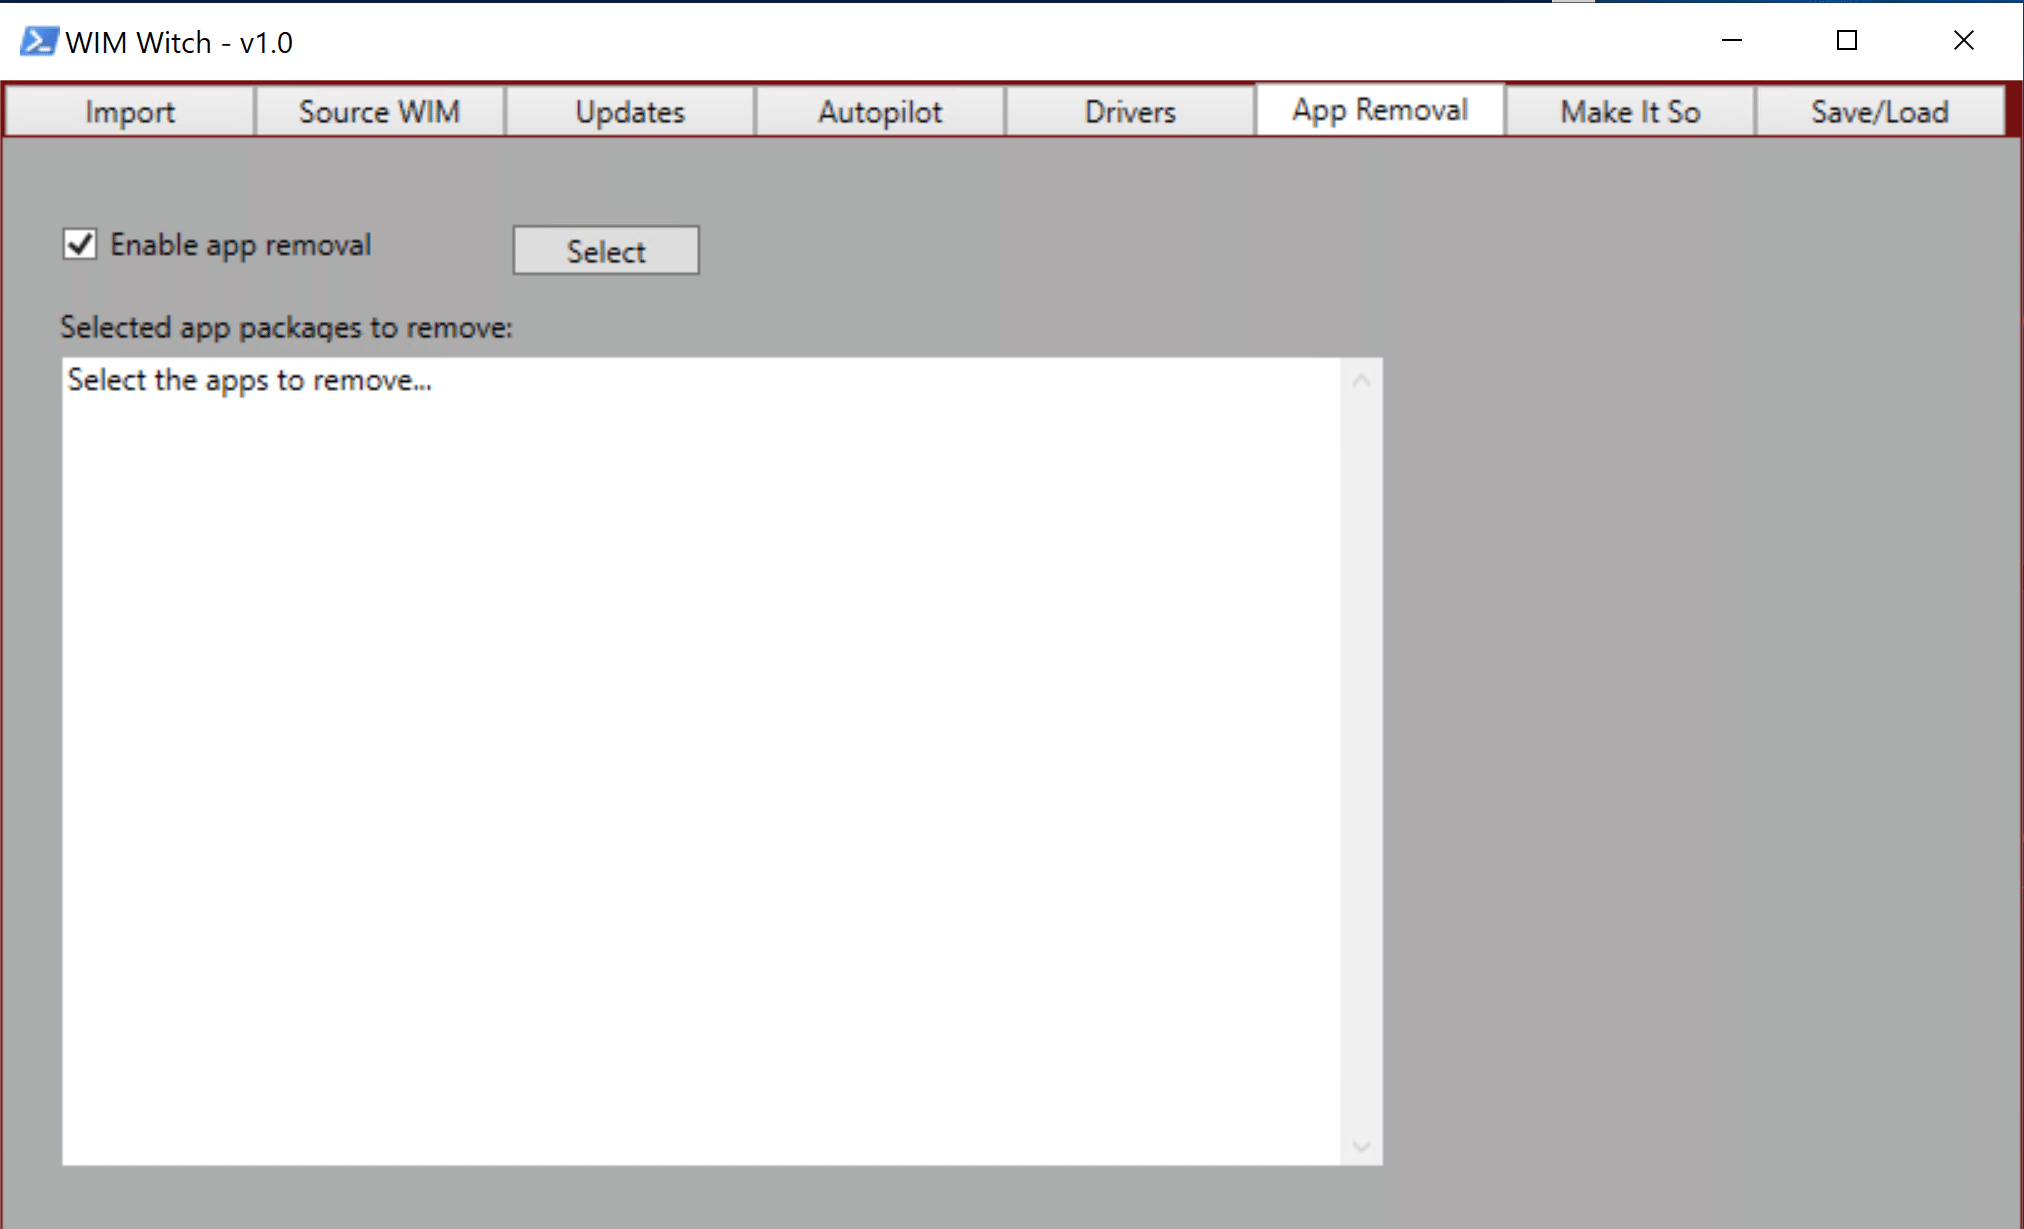
Removing In-Box (Pre-Provisioned) Apps
To enable removing the pre-provisioned apps (store apps) from the WIM, on the App Removal tab, check the box “Enable app removal”.
Next, click the Select button. Ensure that a WIM file has been selected in the Source WIM tab or this function will not work. WIM Witch requires a WIM to be selected as each version of Windows 10 has different apps and it needs to know which version is being modified so it can display the proper app list.
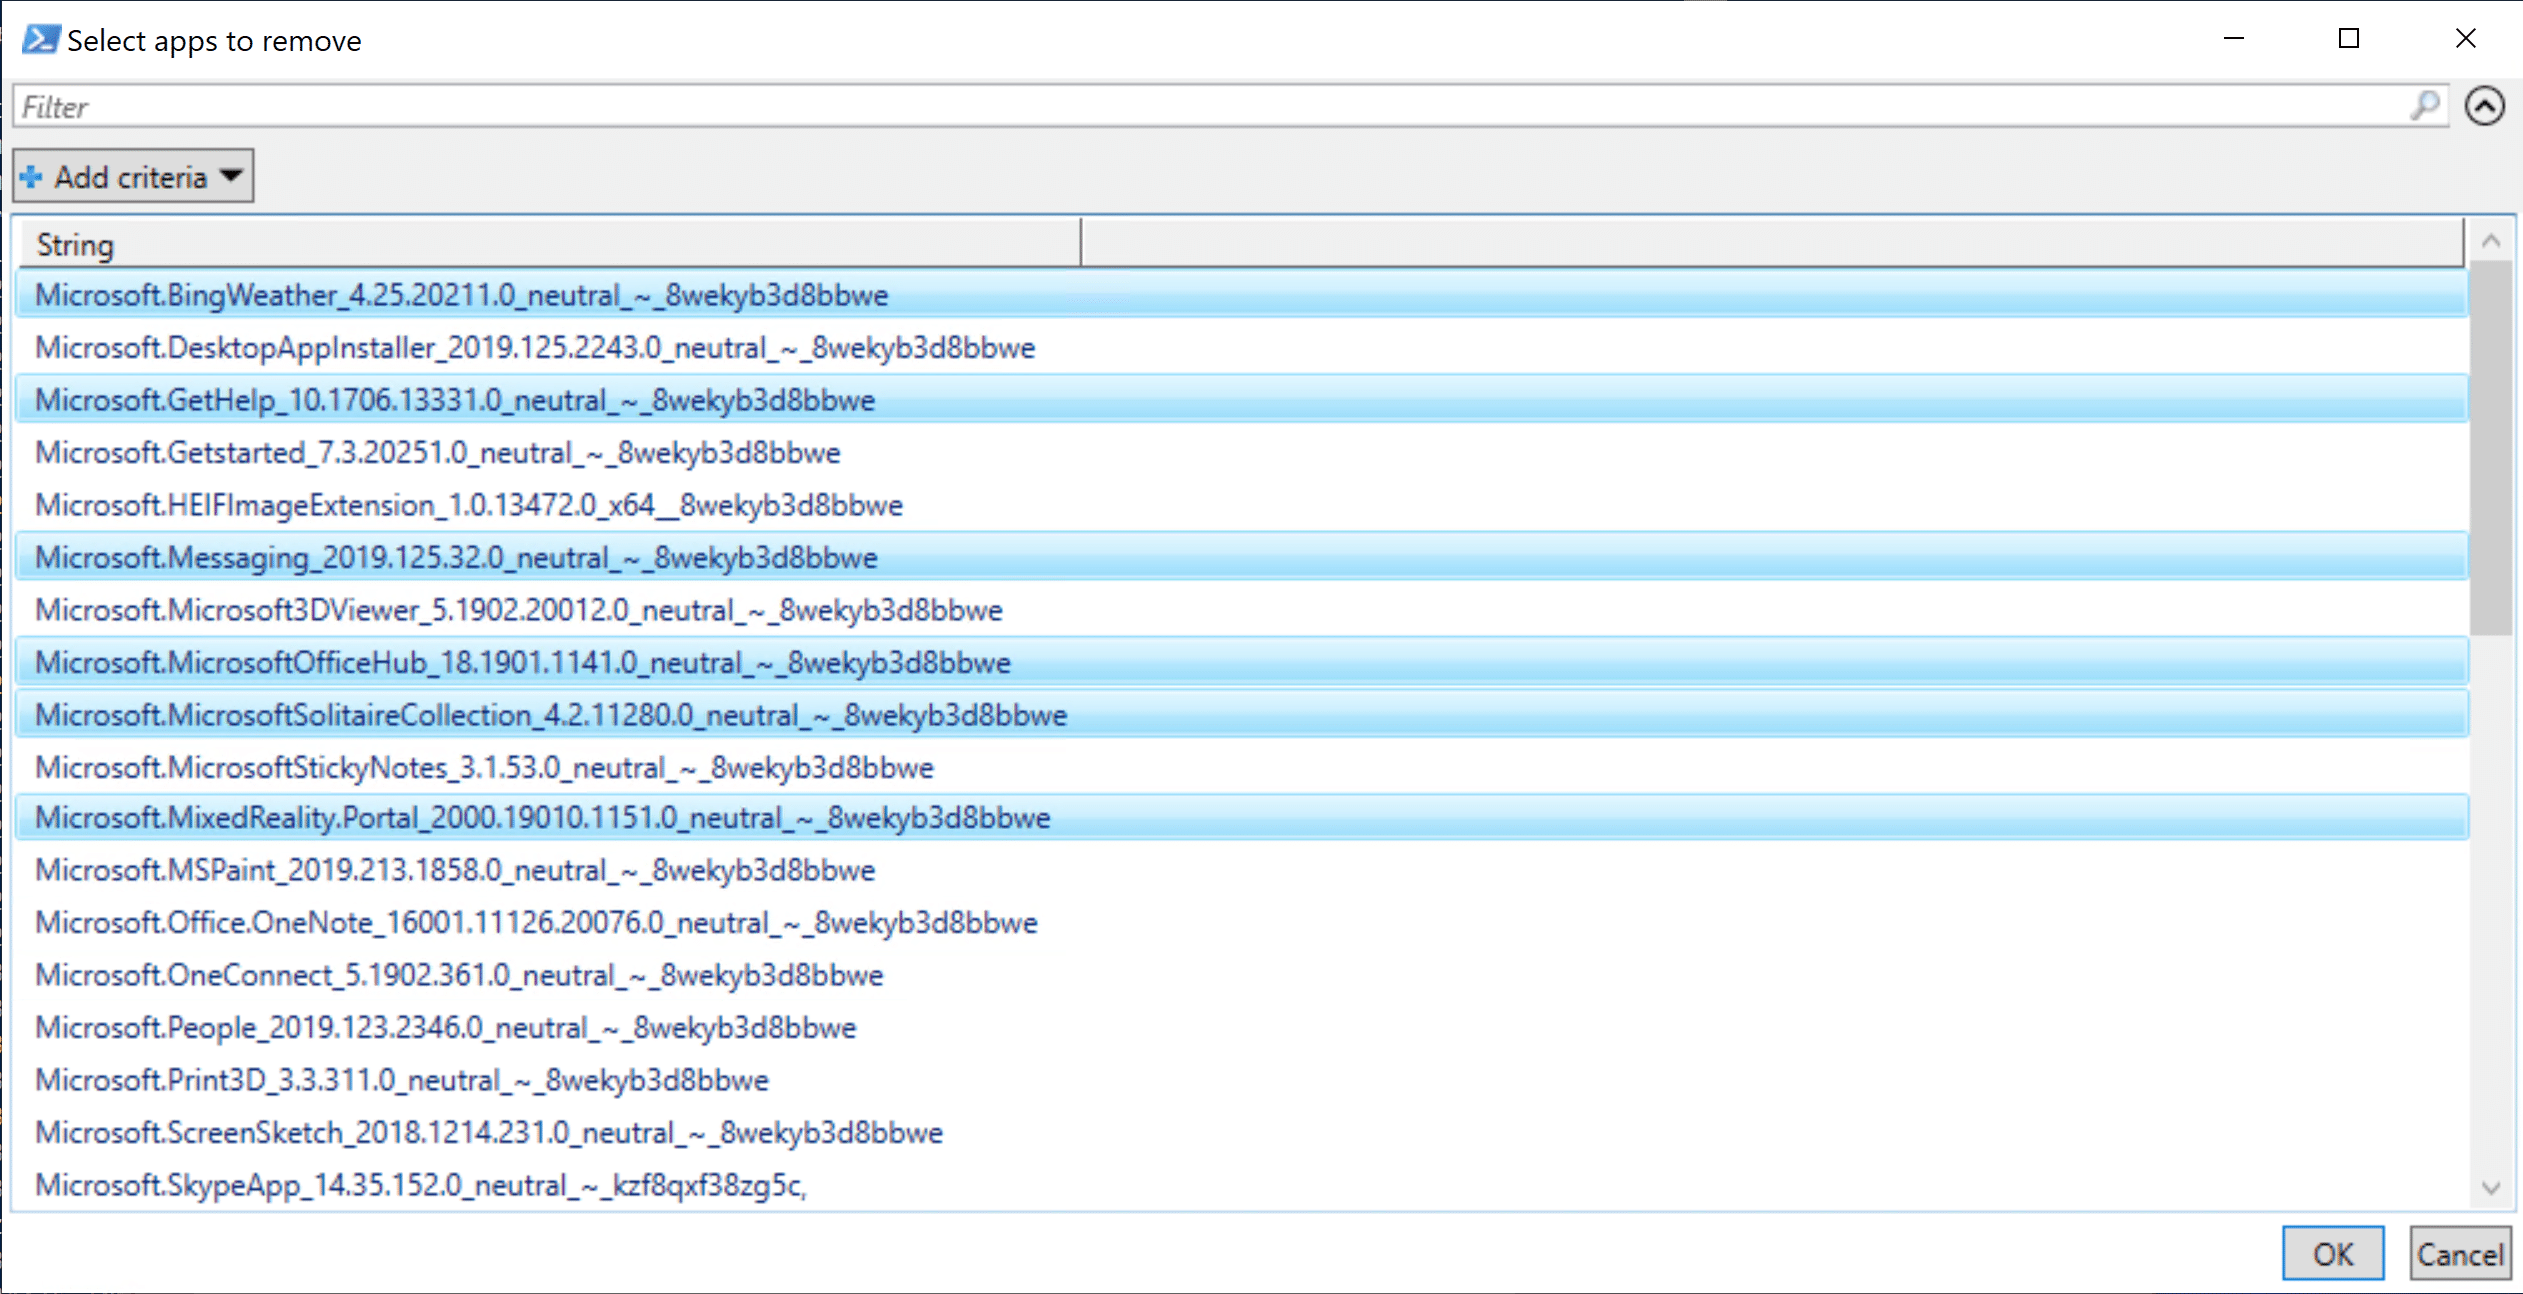
Select the apps that will be removed, then click “OK”.
Upon completion, the pane in the App Removal tab should display the apps that were selected.
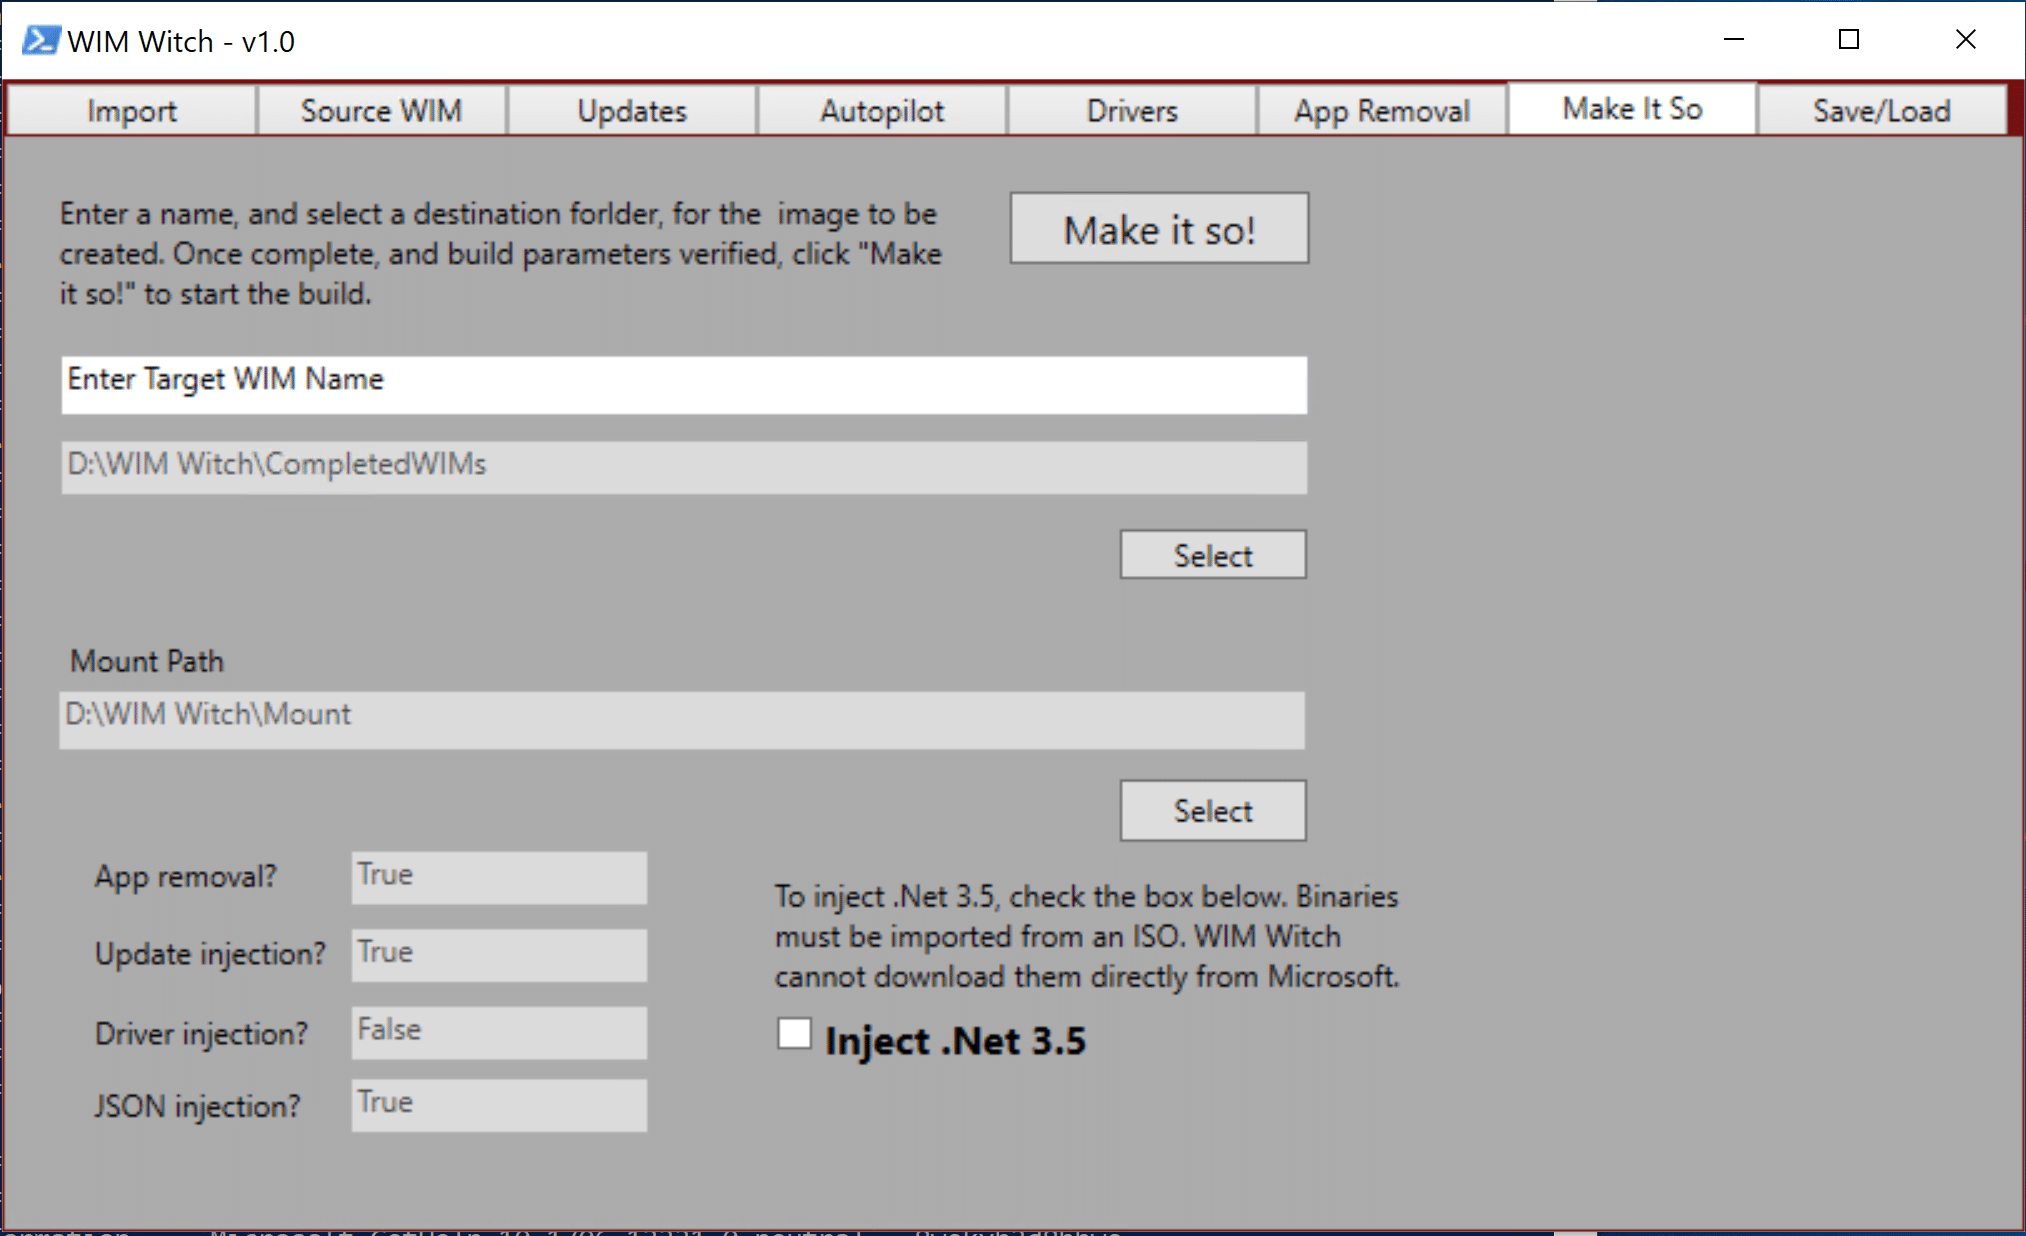
Starting the build (Make it So)
Select the Make it So tab to provide the final required information for the build.
Provide a name for the new WIM file in the field labeled “Enter Target WIM Name”. By default, WIM Witch provides a path to the CompletedWIMs folder in the WIM Witch installation directory. This path can be changed by clicking the “Select” button below the path.
The Mount Path is also populated to a default directory under the WIM Witch installation path. This can be changed as well by clicking the “Select” button. During a preflight check, the mount path will be checked to see if it contains files and if it is an active mount point. WIM Witch will attempt to purge any files and discard any mounted image if it determines that either of those cases are true. If this remediation step is unsuccessful, select a new path or manually clean the path.
The App removal, driver, update, and json injection fields in the bottom left portion of the screen provide a confirmation of what optimizations were selected for the build and are not interact-able.
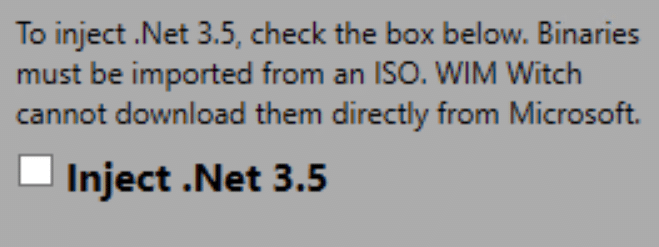
.Net 3.5 Injection (Make It So Tab)
Enabling .Net 3.5 is as simple as checking the checkbox labeled “Inject .Net 3.5”. In order for this function to work, the binaries must have already been imported. WIM Witch will detect which version of Windows has been selected and will check the “imports\WIM” folder for the required content.
Once all fields have been populated correctly, simply click “Make It So” to start the build process. Depending on the customization selected, as well the resources available to WIM Witch, the build process can take some time to complete. Once it has completed successfully, “Job’s Done” should be stated in the PowerShell window.
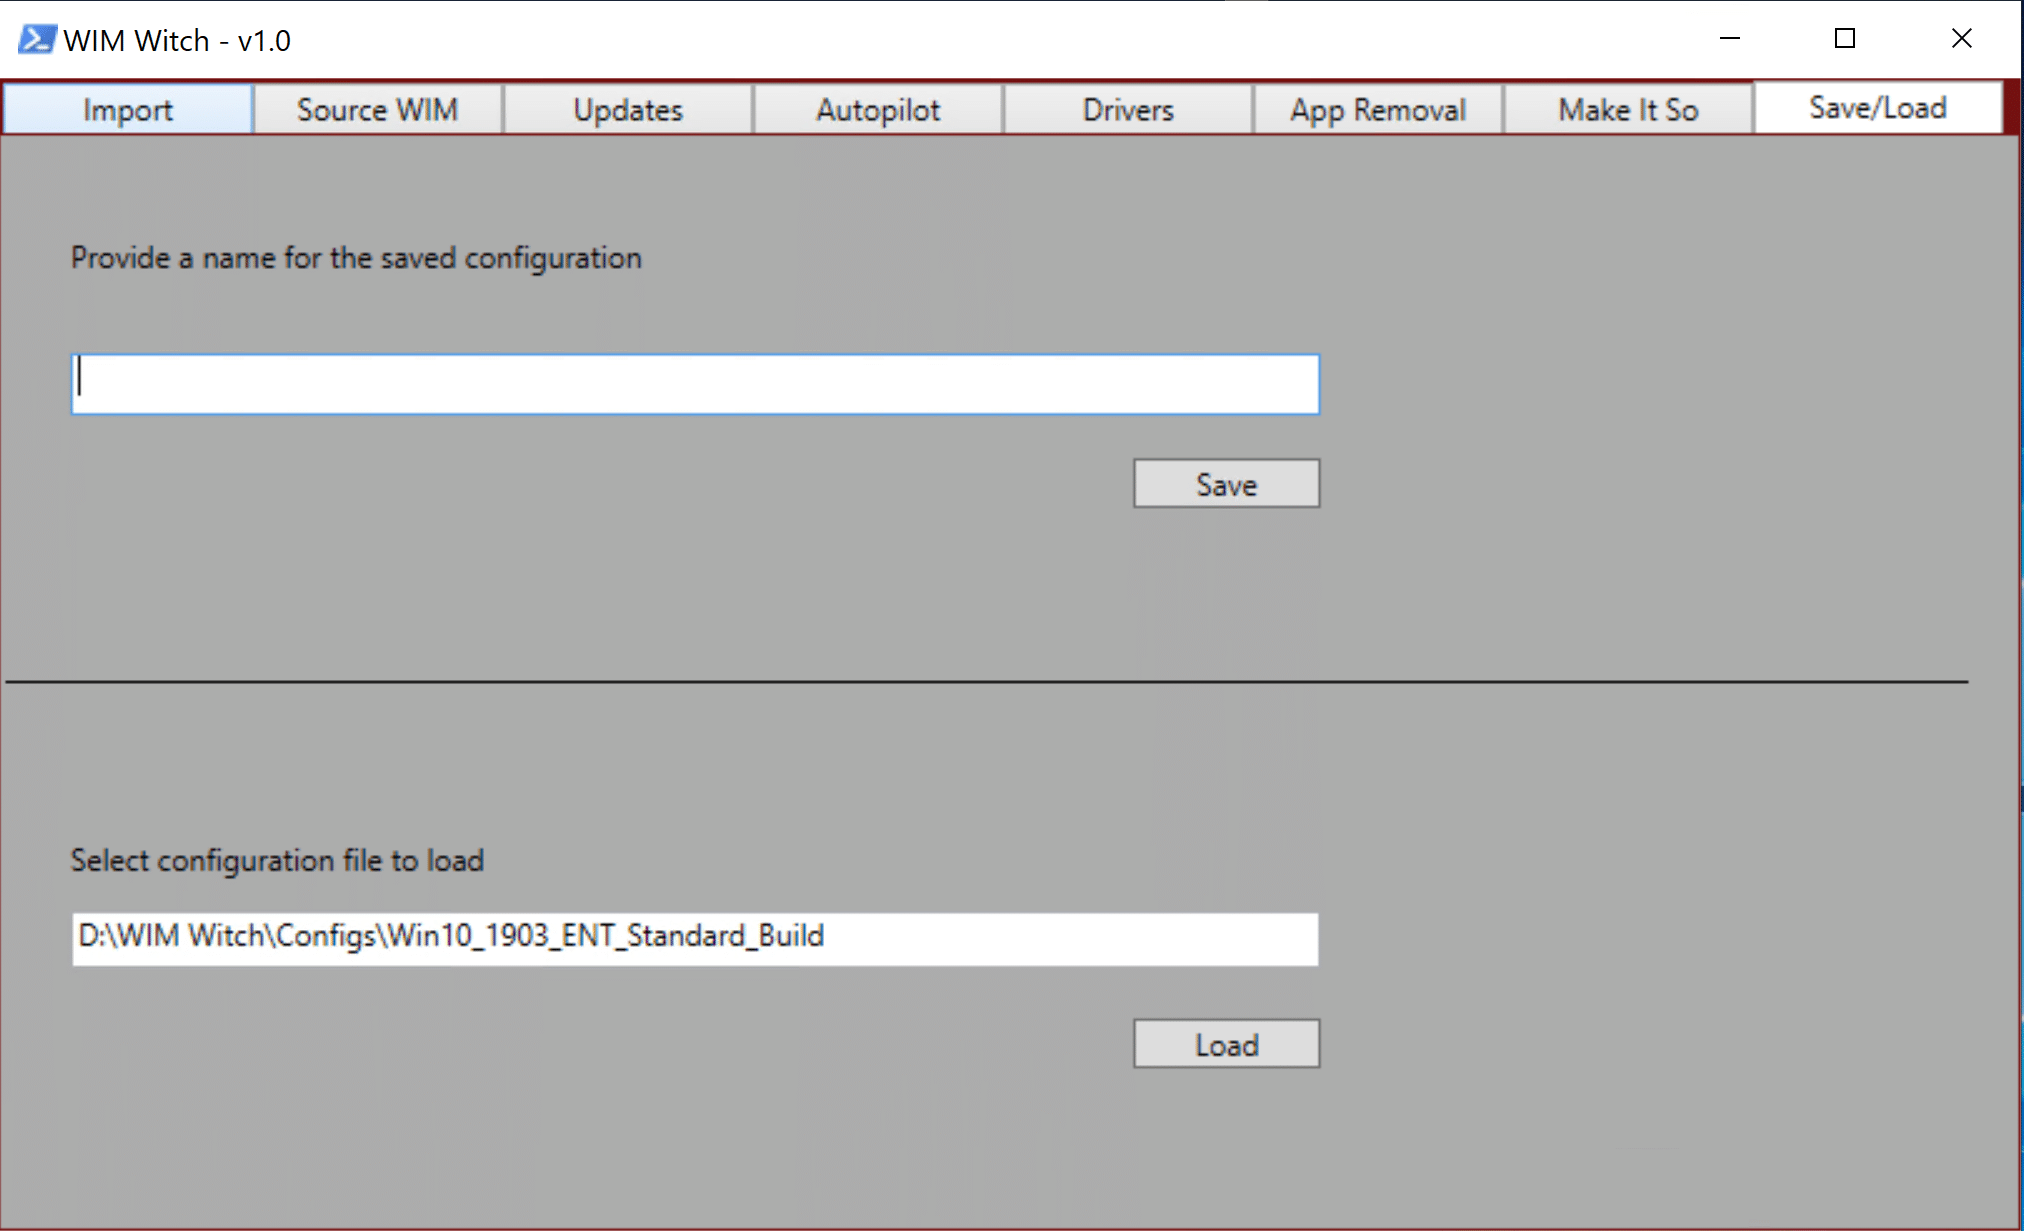
Saving configurations
To save a configuration that can be loaded later, configure the WIM Witch build with the required source WIM and configurations. Do not click “Make It So”. Once complete, select the “Save/Load” tab and enter a name in the “Saved Configuration” field. Then click “Save”.
This will place a file in the “Configs” folder in the WIM Witch installation path.
Loading configurations – GUI
To load a configuration, select the “Save/Load” tab, then click “Load” under Load configurations. This will bring up a window to find the config file to be loaded.
Once selected, WIM Witch will process the config file.
Once the Config file has been loaded successfully, select the “Make It So” tab, then click the “Make It So” button to start building the WIM file.
Loading configurations – Command Line
From the PowerShell terminal, type in the following:
.\WIMWitch.ps1 -auto yes -autofile [path to and name of config file]
The “-autofile” parameter should be the path and file name of the config file that should be run.
Loading multiple configurations
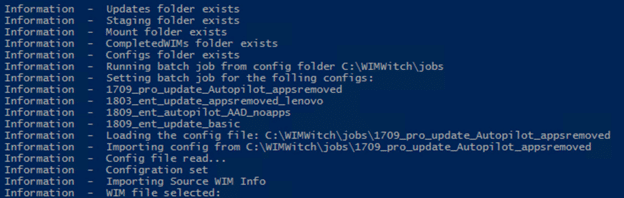
If the user would like to run a series of config files in a batch job, WIM Witch supports this functionality. Enter the following command:
Replace the parameter after “-autopath” to a folder that contains all the config files that should be run. These config files will need to be manually copied to the “job” folder from the “configs” folder.
The PowerShell window will output each file found before starting the first build:
Downloading and Maintaining the software update catalog – GUI
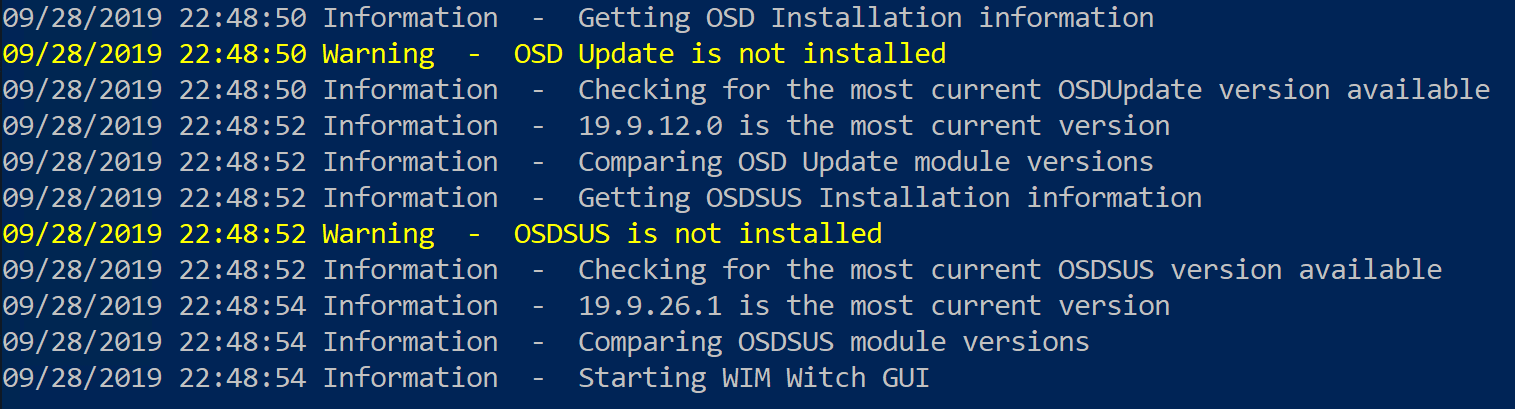
If this is the first time WIM Witch has been run, WIM Witch may detect that OSDUpdate and OSDSUS have not been installed. It will also check to see what the latest version available is.
WIM Witch uses David Segura’s OSDUpdate and OSDSUS modules to handle updates downloading and superseding. These modules will need to be kept up to date to ensure access to new software updates.
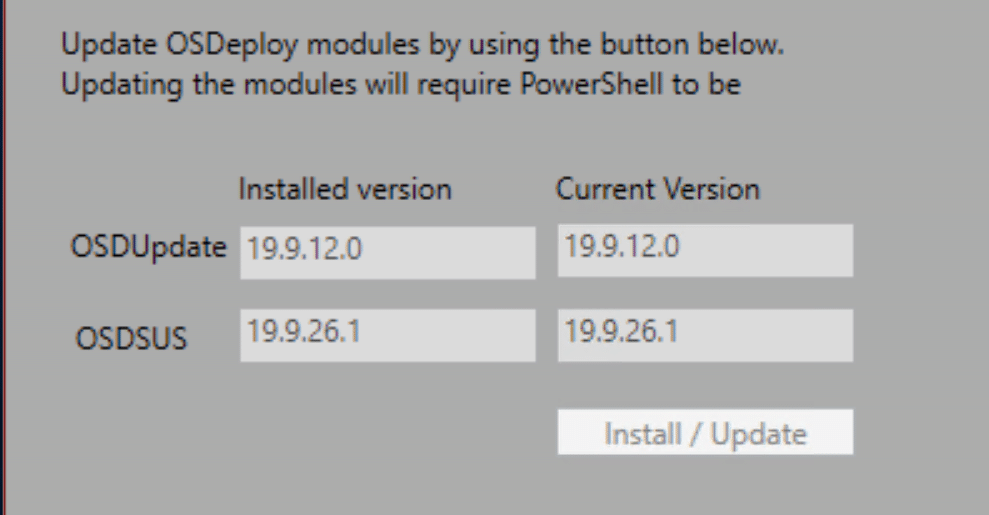
Once WIM Witch’s GUI loads, click on the “Updates” tab. If the modules have not been installed previously, “Not Installed” should be in the “Installed Version” fields.
Click “Install / Update” to install the OSDUpdate and OSDSUS modules from the PowerShell Gallery.
The following should display in the PowerShell window:
The same message will also display in the Updates tab of the GUI. Do as it asks and close it all, then reopen.
When WIM Witch starts, it will see the installed version and list it as current.
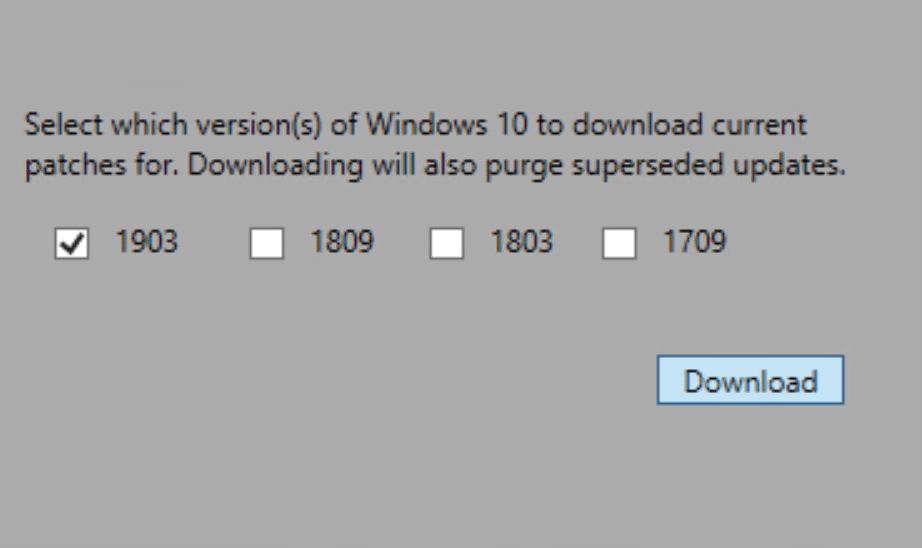
To download updates, select the “Updates” tab and select the checkbox “Enable Updates”.
On the right side of the pane, select which version of Windows 10 to download updates for. Once checked, click the “Update” button.
The Update process will evaluate all downloaded updates to see if they have been superseded. Any update evaluated to be superseded will be deleted from the local store.
*NOTE* This functionality will be modified for simplicity in future versions of WIM Witch
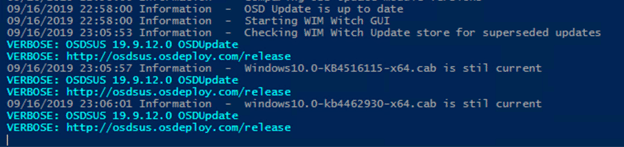
Once the download process has completed, the version of Windows selected will have the most current updates.
It is important to update the source regularly, ideally after any update to OSDUpdate or OSDSUS has occurred because that is indicative of new patches being released.
Downloading and Maintaining the software update catalog – Command Line
The following arguments can be passed to the script from command line in order to maintain the WIM Witch software update catalog.
Example: .\WIMWitch.ps1 -updates yes -OSDSUS update -Superseded delete -DownUpdates all
“-updates”
Parameter accepted: “yes”
When set, it allows the other parameters to function
“-OSDSUS”
Parameter accepted: “update”
This allows the OSD Update module to be updated if it is detected to be obsolete
“-Superseded”
Parameters accepted:
“audit” – This checks for superseded updates but takes no action against them
“delete” – This checks for superseded updates and deletes them if found
“-DownUpdates”
Parameters accepted: 1709, 1803, 1809, 1903, all (these are the windows version that should be downloaded)
For a modern workplace these days, Microsoft is enabling provisioning of devices without the need of managing the image that resides on the devices. With this new way of managing devices from a provisioning perspective, previous methods that administrators used to leverage to get a device into a desired state become obsolete. For provisioning a device today with the help of Windows Autopilot and have it being managed by Microsoft Intune supports two types of join scenarios, Azure AD join and Hybrid Azure AD join. The latter being recently added as a supported method to provision a device directly from a out of the box state and have it joined to an existing Active Directory domain but also registered in Azure AD at the same time, enabling all the benefits that comes along with such a hybrid scenario. Even though that an Azure AD joined device provides better management of new capabilities and features such as Windows Hello for Business or silently encrypting the hard disk on a device for standard users (users that are not a local administrator), not all organizations are able to make the switch to only Azure AD joined devices today for various reasons.
For whatever reason an organization decides to make use of a Hybrid Azure AD joined device provisioned using Windows Autopilot in their environment when moving away from traditional imaging based management, a huge disadvantage with this scenario is that there’s currently no way, as of today when writing this post, to silently enable BitLocker on the operating system volume. However, this is supported for standard users when you Azure AD join the device, and can easily be configured in an Endpoint Protection device configuration policy assigned to Autopilot enabled devices, as shown in the image below:
Standard users on a Hybrid Azure AD joined device would instead be prompted after they’ve logged on to start the encryption of the drive, which to some may be good enough, but for others won’t be an acceptable approach. For the past few years, many in the community have shared different approaches to solve this issue, or more specifically the issue of silently encrypt a volume with BitLocker when the device is managed by Microsoft Intune.
Solution overview
This post will provide all necessary information required to silently enable BitLocker for Hybrid Azure AD joined devices provisioned through Windows Autopilot. The solution is based on a PowerShell script that’s been created to perform the necessary actions such as enabling BitLocker on the current operating system drive with two key protectors (TPM and Recovery Password), escrowing the recovery password to the Azure AD device object, all being delivered as a Win32 application. Below is a high-level description of the steps this blog post will outline in order to accomplish the desired end result:
Configure PowerShell script with desired encryption options
Package the PowerShell script as a Win32 application
Create the Win32 application in Microsoft Intune
Configure Enrollment Status Page to track the Win32 application
Let’s dig into how we can configure all of this. But before that, grab the required PowerShell scripts for this solution from our GitHub repository:
Enable-BitLockerEncryption.ps1 script is the main script that will enable BitLocker and configure desired key protectors. This script will also wait for encryption to complete, once it has successfully been started. All of the main functions within this script is being logged to a file named Enable-BitLockerEncryption.log located in the C:\Windows\Temp folder.
Get-BitLockerEncryptionDetection.ps1 is a rather simple PowerShell script that’s going to tell the Intune Management Extension that the Win32 application was installed successfully or not. Since there’s no file being left on the system after the Enable-BitLockerEncryption.ps1 script has executed, or folders for that matter, not even a registry key being created to be used as a detection method, the detection script simply checks if the VolumeStatus property returned from Get-BitLockerVolume cmdlet is set as FullyEncrypted and if two key protectors (TPM and recovery password) are present.
Prepare PowerShell script before packaging
As the first task in this solution, the Enable-BitLockerEncryption.ps1 script needs some simply preparation. It’s been design to work without passing any parameters on the command, but it’s recommended that you make a decision if you want the script to enable BitLocker using the XTS-AES 256 encryption method, as that’s the default selection, or if you wish to use another method. These are the supported encryption methods that you can choose from:
AES 128
AES 256
XTS-AES 128
XTS-AES 256
Modify the param block of the script in a preferred editor, specifically the $EncryptionMethod parameter’s value, as shown below:
Save the script and with that there’s no further changes are required.
Package the script as content for a Win32 application
If this is the first time packaging a Win32 application, don’t worry, all steps required will be covered and the overall process if fairly simple. First of all, ensure that you have the latest version of the IntuneWinAppUtil.exe application, as that is the tool that will prepare the Win32 application package. You can grab the tool from the following URL:
Secondly, with the tool downloaded, create the following folder structure in a folder called IntuneWinAppUtil placed e.g. under C:\Tools. After that create two folder inside of the IntuneWinAppUtil folder named Source and Output. At this point the following file and folder structure should now have been created:
Place the downloaded and perhaps also the modified version of the Enable-BitLockerEncryption.ps1 script inside the Source folder. After that, open up an elevated command prompt and run the following command:
Once the tool completes the content packaging, something similar to the following is shown:
Inside the Output folder, a new Enable-BitLockerEncryption.intunewim file has now been generated. This is the file that should be uploaded to Microsoft Intune in the next part of this blog post when the Win32 application is created.
Create the Win32 application in Microsoft Intune
Now that the script has been downloaded, potentially modified if to fit your organizations requirements, packaged as content for a Win32 application, it’s time to create the application in Microsoft Intune.
Begin by logging into the Azure portal and locate the Intune blade.
In the Client Apps blade, select Apps, click Add and select the Windows app (Win32) as the app type.
Configure the App package file by browsing to the C:\Tools\IntuneWinAppUtil\Output folder and select the Enable-BitLockerEncryption.intunewim file.
Click OK.
Click on the App information section and configure accordingly. Enter a name, the description and publisher. A recommended name for the Win32 application would be Enable BitLocker Encryption. Optionally, locate a logo image for better aesthetics.
Click OK.
Click on the Program section and configure the following as the Install command:
For the Uninstall command, enter cmd.exe /c as we don’t really want this application to be uninstalled. Install behavior is important that it’s set as System, as a standard user will not have the required permissions to enable BitLocker when the script is executed. Configure the Device restart behavior with No specific action.
Click OK.
Click on the Requirements section and specify 64-bit as the Operating system architecture and select Windows 10 1607 as the Minimum operating system.
Click OK.
Click on the Detection rules section. This is where the second script, more specifically the Get-BitLockerEncryptionDetection.ps1, mentioned above in this blog post comes into play. Under Rules format, select Use a custom detection script and browse for the Get-BitLockerEncryptionDetection.ps1 script. Leave the two bottom configuration both set as No.
Click OK.
Click Add to complete the creation of the Win32 application.
Since this is a rather small application in terms of content size, the upload of the Enable-BitLockerEncryption.intunewim file should go fairly quick.
Before you continue to the next step in this post, remember to assign the newly created Win32 application with an assignment type of Required to your Azure AD dynamic group that contains all of your Autopilot devices.
Configure Enrollment Status Page to track the Win32 application
Next and the final required configuration for this solution to silently enable BitLocker on Hybrid Azure AD joined devices, is to configure the Enrollment Status Page so that it will track the Win32 application and not let the provisioning continue until it has been installed.
From within the Intune blade of the Azure portal, go to Device enrollment and select Windows enrollment.
Click on the Enrollment Status Page.
Depending on if you’ve created a different profile here, select your custom one, but if not select the Default profile associated with All users and all devices.
Select Settings and ensure that Block device use until these required apps are installed if they’re assigned to the user/device is configured with Selected.
Click the Select apps button and select the Enable BitLocker Encryption application.
Save the configuration changes.
Summary
Let’s recap what we’ve actually gone through in this blog post. The goal was to silently enable BitLocker on Hybrid Azure AD joined devices provisioned using Windows Autopilot. This is accomplished by using a script named Enable-BitLockerEncryption.ps1 that was packaged as a content file for a Win32 application to be deployed to Autopilot registered devices from Microsoft Intune.
Now that’s all sweet, but how would I know that this solution has worked as expected and how can it be verified? Locally on each device that was provisioned and targeted for the Win32 application created in this blog post, a log file is created. This has already been mentioned, but the contents of this log file should resemble something similar to this when this solution has successfully enabled BitLocker:
Hopefully this method of enabling BitLocker for standard users in the Hybrid Azure AD joined device scenario will not be required in the future, but as for now, there’s a solution available that gets the job done.
In the last part of this blog post I wrote about the beginning of my passwordless journey and which keys I had available.
In this second part I will conclude with the overall experiences that I had with security keys from the vendors that I have had a chance to test with.
A few new keys, that I have been sent from various vendors will get added in a third part within a few weeks.
The experiences with each key
Generally the whole process of adding a security key through aka.ms/MFASetup is rather easy, but there are some bumps and I did get some scratches!
A fact that is true for each key is: The key only needs to be inserted at time of authentication, so don’t just leave it in there all day.
The keys experiences are listed in no specific order.
Solokeys Solo Tap USB-A (NFC)
This key might be good for Google or Facebook use, but it was not a pleasant experience for Azure AD use.
Unfortunately, the pre-loaded firmware did not allow me to add it to Azure AD.
And even after going through a less than pleasant firmware update process via update.solokeys.com, getting prompts every second like this gif shows.
The “mysignins” page told me that this specific key was blocked by my organisation when I tried to add it.
This was sort of a conflicting message from my point of view, because I know that we had not blocked it, but it turns out that the organisation mentioned in this case is Microsoft, and not my tenant.
So, in the end, I never managed to use this key for real, but it was fun trying to fit the red silicone cover over the “naked” key when it arrived (no, not really).
And this was even the most expensive of the keys, since I had to pay double the price because of import taxes.
Fortunately I have read that Solokeys plan on addressing all of the issues, it’s just not the right key for an enterprise to go completely passwordless with right now.
And in all fairness, it really isn’t marketed as an enterprise token for passwordless use, but I gave it a go because of the Open Source part of it appealed to me, and the fact that they state it can be used for login to Windows, which I did not get to work, and have heard the same from others.
The moral of this experience was “Go with an approved vendor”, don’t just use any FIDO2 Security Key.
Now, on to some of the approved vendors…
Yubico keys
Unboxing these was a nice experience, and they are very easy to get started with.
Overall the build quality is nice, and I had no trouble registering the keys with Azure AD.
The built-in Security Key Manager in Windows works nicely with this key.
But because is can do a lot of other auth types, most people will probably end up using the YubiKey Manager, which you can get from the Yubico website.
Side note: The YubiKey Manager is a 250MB install and has over 3500 files in it, which you need to keep in mind if you thought that it was just a quick deploy to all your users laptops. This is just my personal opinion, but I think it could be more compact for what it is.
Sign-in to Windows works as expected with this key, but as it has no biometrics, you will need to enter a personal PIN on each login, which is not really a fast experience, compared with the biometric keys that don’t have this requirement. So anyone wanting to make things smoother for the users might want to keep these extra steps in mind when comparing.
Yubico has recently announce the release of a biometrics enable key, so things are looking up, if you want to go with Yubico as your main key provider (keep in mind that you can have a mix of security keys, they are not exclusive).
One thing I really like about the Yubikey with regards to moving to a passwordless future, is the fact that you can add a static password to the key, using the YubiKey Manager.
Adding a static password means that they key will actually type a specified password whenever you long press the touch sensor on the key.
And I do mean “long press”, don’t just tap it, because that will write out the keys ID.
This is possible because the Yubikey registers itself as a HID keyboard in your system, and thus enables it to type in the static password in any legacy application that you where unable to add Single Sign On to.
Essentially this enables you to go passwordless faster, by skipping the trouble of enabling SSO on legacy applications, and just change to the static password of the security key. But you will have an added overhead of administering these static passwords or educating your users properly to manage this themselves as the password will get lost if the key gets lost.
I tried using the static password for some of my Cisco AnyConnect VPN connections to customers sites, but alas, Cisco did not support my 32 char crazy complex password, which was a bummer. I had to cut it down to 16 chars, which is still good, but not awesome.
If using the same user name on several services along with the static password, you could be in trouble if one service is compromised, so I suggest keeping it strictly for internal legacy applications.
Overall I have been happy using the Yubikeys but the lack of biometrics have kept me from using them more regularly.
I know I have not really touched upon all the other cool features of the Yubikey, but remember this is only about access to Azure AD and legacy systems on-prem. I am sure a quick search on Bing/Google will yield you a world of reviews.
eWBM keys
The eWBM keys come in a nice reusable box, which I quite like – because having a bunch of keys lying around, is easier if they come in reusable packaging.
The keys seem very robust, and the hard black casing would probably allow you to have it as a part of your regular key-chain without worrying about breakage (thought I am sure someone will prove me wrong on this).
Like with the Yubikey, the start is smooth, and there was no need to do any kind of firmware upgrade, and no software needs to be installed at all. I simply configured the key with the built’in utility in Windows 10, and then added it to my authentication mechanisms on the https://mysignings.microsoft.com portal.
Thought there is a key manager application called BioManager, I found no real use for it in my daily routines.
The software allows you to manage the fingerprints and factory reset the key, but there is no way to know which fingerprint is which, so you have to devise a system on your own.
The two eWBM keys are fitted with a super fast bio-metric finger print reader, that I quickly came to love, because it’s just so much smoother having to only insert the key and touch it, instead of having to type a PIN and then do a touch gesture on the key.
Normally I am not a fan of fingerprint reader on laptops, but this one is far superior to any that I have previously tried.
And with daily use, speed becomes a very important factor for almost any type of user.
With my most common use case being login to the Azure and Office 365 portal from a device that I don’t personally own, it’s nice that I don’t have to worry about shoulder surfers and theft of my key.
This key does not boast any other notable features that being a straight up FIDO2 key that did not succumb to feature creep.
And this is something I found quite positive, because it says to me that this company is very serious about this one thing, and their FIDO2 certificate level also proves this, as they have managed to get Level2 certified, which is probably the best level we can get our hands on now. as FIDO2 levels 3 and 3+ are probably very hard to achieve, just take a look at this requirement chart:
The end of part 2
So just to be clear – this is not a review of products or services, but basically one guys opinion out the use of some random FIDO2 security keys, and his experience as an admin and user of the keys on a daily basis.
And to be honest, I will probably prefer using Windows Hello for Business as my primary OS sign-in mechanism, as long as Face ID compatible hardware is available.
But I see great security benefits in having a company policy of only using security keys when connecting from any other device than the one you have personally been assigned.
Since starting on this article series, I have come into possession of two additional security keys from Feitan (K27) and OnlyKey .
Both keys seem very interesting, and I am excited to see if they can add some value to my decision process when suggesting keys to use in PoC’s for my customers.
Please don’t hesitate to follow and reach out on Twitter if you have experiences to share with me and others, or are curious about anything Enterprise Mobility and Security related.
At Ignite 2019 Microsoft announced BitLocker key rotation for Intune managed Windows 10 devices. It is a long awaited feature and closes the feature gaps in the cloud managed BitLocker solution. In this article we have a look how this actually works. First of all we need to configure our devices to actually perform client-driven recovery password refresh after an OS drive recovery or unlock of a fixed data drive. The OS recovery can be done either by bootmgr or via WinRE. This automatic rotation will refresh only the recovery password which was used to unlock during BitLocker recovery. Other recovery passwords will remain unchanged. The newly generated recovery password will be securely stored in Azure AD as well. In addition to the automatic rotation, Intune got the ability to trigger a BitLocker Key rotation manually from the Intune web portal. The main difference here is, that during this process all existing recovery passwords will be deleted, and a single new recovery password will be set and a backup is written to Azure AD.
How can we configure BitLocker key rotation with Intune now?
First we have some prerequisites:
Windows 10 Version 1909 or higher
Azure AD joined devices
Hybrid Azure AD joined devices
Intune managed (MDM enrolled)
If the prerequisites are fulfilled, all we need is a Windows 10 device manged by Intune and an Endpoint protection profile to configure the BitLocker settings. In the background the BitLocker CSP is utilized to provide this functionality which was enhanced with Windows 10 Version 1909.
As said the recovery password rotation works with Azure AD joined devices and with Hybrid Azure AD joined devices.
In my following example I’m using a “Key rotation enabled for Azure AD-joined devices”. Starting with the BitLocker basics first, we have to configure BitLocker settings to require encryption.
For the OS drive recovery we need to make sure the new “Client-driven recovery password rotation” is set. In my case I have chosen “Key rotation enabled for Azure AD-joined devices”.
Finally we need to make sure our device is correctly configured afterwards. I’ve checked in the Intune portal if all settings are successfully applied.
How can we test the BitLocker key rotation with Intune now?
In my case I’m using a Hyper-V Virtual Machine for testing. Hereby I make sure to have the Enrollment Status Page (ESP) turned on and the Endpoint protection profile is assigned to my device. For successful silent BitLocker encryption, we have to make sure that we un-mount the Windows 10 ISO image after installation of Windows 10, otherwise BitLocker encryption will fail. I have enrolled a Windows 10 Version 1909 Virtual Machine to my Intune tenant with an enabled ESP. The final result will look like this, a BitLocker encrypted Virtual Machine according to my settings:
The BitLocker recovery key must be stored in Azure AD as well, according to our Endpoint protection profile settings.
To easily test the OS drive recovery I added an additional startup PIN to the TPM via a custom package which you can find here.
I added the PIN to have a convenient way to boot into BitLocker recovery mode. After everything is setup we can restart into the BitLocker startup PIN dialog.
Here we hit “Esc” to get into BitLocker recovery.
We enter the BitLocker recovery password and hopefully the BitLocker key rotation policy will make sure that the recovery password will be replaced with a new one now.
And yes as expected, the BitLocker key recovery password was changed.
The new BitLocker key recovery password is also stored in Azure AD.
This is really great news and a welcome feature. It prevents BitLocker recovery password from re-usage and is something that has to be implemented in terms of good device security. In my opinion this is a major argument to upgrade to Windows 10 Version 1909. The Windows 10 feature upgrade 1909 is anyway a small update and you should not fear or hesitate to update your fleet. If you are on Windows 10 Version 1903 then the update is comparable to a monthly Quality Update. It is small and installs really fast like the monthly Cumulative Updates.
Finally we rotate the BitLocker key manually by triggering a rotation from the Intune console. We navigate to the device and click on BitLocker key rotation:
Intune will reach out to the device and trigger the BitLocker key rotation, which can be traced easily in the eventlog for BitLocker under Applications and Services Logs > Microsoft > Windows > BitLocker-API > Management
Finally, we see the new BitLocker recovery password on the device. The first entry was gathered before triggering the BitLocker key rotation from the Intune portal. The second entry is the newly generated BitLocker password.
This is a remarkable step forward in terms of BitLocker management with Intune. I can really recommend to test it out and bring your devices to Windows 10 Version 1909 to use this great feature.
If you have difficulties in getting this feature to work you might consider two things:
Don’t forget to un-mount the ISO file if you are testing in a Virtual Machine, otherwise the encryption will not start successfully
Make sure you have the correct Intune settings like shown above. Initially I forgot to set “Save BitLocker recovery information to Azure Active Directory in my policy” which resulted in the following error:
I hope you got a good understanding of the new cloud managed BitLocker capabilities. Personally I was eager to get this feature, as a lot of security departments requested such functionality.
With the release of WIM Witch v1.3.0, she now has new capabilities that were requested by the community. While there have been plenty of functional updates to WIM Witch since its release, this version brings enough change to warrant documentation. The features introduced in this release are all from user requests, and I want to thank everyone who has submitted feedback on WIM Witch.
To download WIM Witch, open PowerShell and use the following command:
save-script -name WIMWitch -path [path to save folder]
Then, simply run the script and follow the prompts.
If you are running version 1.2 or later of WIM Witch, she will automatically detect the latest version and prompt for the upgrade.
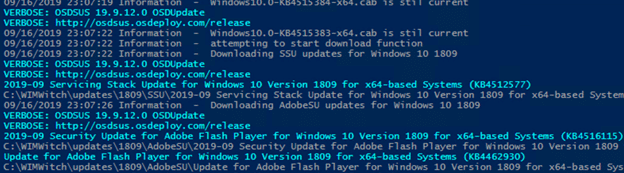
Server Updates
WIM Witch now supports Windows Server 2016 and 2019. By simply checking the required version in the “Updates” tab, Windows Server updates are downloaded and applied just like Windows 10 updates have been from the beginning.
After selecting a Server WIM file in the “Source WIM” tab, certain Tabs and functions are disabled. These disabled items are Autopilot, APPX removal, and OneDrive updating, and are disabled because they are not applicable to server operating systems.
When updating a Server Core images, WIM Witch will skip Adobe updates as they are not applicable to Server Core operating system.
WIM Witch only supports the LTSB versions of server operating and it is not advisable to attempt to update a Current Branch version of server. If there is enough demand from the community, I can add that support in a later version.
Now with server goodness!
By adding Server support, the underlying folder structure of the updates had to change. In previous releases, the updates folder contained subfolders that were labeled with the release version of Windows 10. Now, the first sub-folders are named after the major operating system.
What the updates folder should look like after downloading updates. Please delete any numbered folders i.e 1709 or 1903
The impact is that any existing updates folder will no longer be used. These folders could be moved to a subfolder called “Windows 10”, but it is advisable to take the easy route and just delete them. Once deleted, the updates can be re-downloaded, allowing WIM Witch to store them automatically.
OneDrive
Windows 10 comes with a OneDrive installer that runs when the first user logs in. The installer is frequently out of date, and users are prompted to update this agent if it is. WIM Witch now downloads the latest OneDrive agent installer any time Windows 10 updates are downloaded. To apply the update, simply click the “Update OneDrive client” checkbox in the “Make It So” tab.
Update Supersedense
In previous versions, all updates were checked to see if they were superseded, and then deleted if found to be. Now, only the updates of the operating system version that is being downloaded will be checked. This allows administrators to keep older updates for other OS’s while updating only the ones they wish to update.
Additionally, the -Superseded command line option has been deprecated because of how supersedense is now handled.
Command Line Functions
CLI functions have been overhauled to make them easier to use, and to support the new Windows Server functionality.
-auto
This switch enables WIM Witch to run a saved file, or a batch of saved files.
-autofile
This switch tells WIM Witch to run a specific saved configuration by providing the name and location of a file. It will not work if the -auto parameter is not provided.
This switch tells WIM Witch to run every found saved configuration in a give path. This is useful if multiple images need to be created. It will not work if the -auto parameter was not provided.
This switch tells WIM Witch to update the OSDUPATE and OSDSUS modules if they are found to be outdated. Updating the modules will require PowerShell to be restarted, so this switch is not recommended for fully automated tasks.
Example: WIMWitch.ps1 -UpdatePoShModules
-DownloadUpdates
This switch allows WIM Witch to check for, and download, new updates for a given operating system. The operating system version must be supplied.
Specifying which versions of Windows to download updates for
-Server2016
This switch tells WIM Witch to download updates for Server 2016.
-Server 2019
This switch tells WIM Witch to download updates for Server 2019.
-Win10Version
This switch tells WIM Witch to download updates for Windows 10, and requires the version to be specified. The options are All, 1709, 1803, 1809, 1803, 1909. All tells WIM Witch to download for every supported version of Windows 10.
Thank you again for using WIM Witch. The reception it has received from the community has made undertaking this project worth the time I have invested. Please let me know what you think!
Another blog post on the subject of Hybrid Azure AD joined devices that have been provisioned using Windows Autopilot. As you may have figured by now, this scenario even though it’s not in preview any longer, it sure feels like it some times. A while back I wrote a blog post that demonstrated how you can silently enable BitLocker on devices provisioned under this scenario, since the current implementation of the Endpoint Protection policy for BitLocker in Intune doesn’t support it. Another obstacle that you need tackle when hybrid joining your devices is device certificates. Certificates and BitLocker encryption are two fairly common enterprise configurations, hence my previous statement that it feels like it’s not really out of preview yet. Even though this scenario works well for provisioning a device and configure it mostly according to your desire, Microsoft still has a few things to figure out before hybrid joined devices are working as well as if you’d have simply Azure AD joined them.
Why SCEP certificate distribution needs an improvement
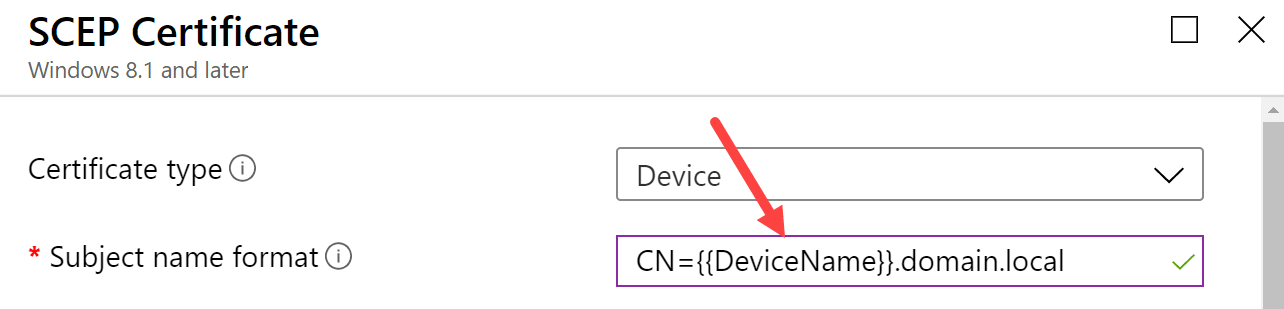
The issue is not that SCEP certificate distribution simply doesn’t work for Hybrid Azure AD joined devices, because it does. If you provision a device and have a functioning NDES/PKI infrastructure in place to deliver the certificate to the device, you’ll and up with a device based certificate on your machine in the end. Why does this then need to be improved? Generally, a device certificate should contain the Fully Qualified Domain Name (FQDN) or the host name or the device as its subject name. In most cases, the SCEP certificate profile is configured with subject name be constructed using {{DeviceName}} to such as below:
For a device that’s provisioned using Windows Autopilot and setup as Hybrid Azure AD joined, the computer name handling is a bit different from a device setup as Azure AD joined. An Azure AD joined device gets the computer name configuration directly from the Autopilot deployment profile (if configured, otherwise the default name is kept, but let’s assume that the profile contains a computer naming standard) and the computer name is set fairly early during the provisioning of the device. However, for a Hybrid Azure AD joined device, the Autopilot deployment profile does not contain the same computer naming configuration capabilities, this is controlled with a different profile named the Domain Join profile, a Device Configuration profile type. Since the computer naming functionality is split out from the Autopilot deployment profile, the computer name is not set as early in the provisioning as it would have for an Azure AD joined device.
If we take a step back for a second, remember how the MDM policies are processed on a device when it first contacts Intune after is has been enrolled. Depending on your environment of course, but in general however, the device would end up with a payload of policies that it’ll attempt to apply. As of writing this blog post, there’s currently no means for administrators to control in which order any of these policies would be applied. We can with certainty say that it’s going to be random for each device. This brings us to the dilemma and the reason for writing this blog post. To setup a device as Hybrid Azure AD joined, we’ve mentioned that we need to configure a Domain Join profile, to control the computer naming among organizational unit placement. Also, to distribute a device certificate we need to have a SCEP Certificate profile as well. That gives us two profiles that will be added to the initial payload of policies the device receives after enrollment.
As you’ve probably figured out by now, the device being provisioned and targeted with both a Domain Join profile and a SCEP certificate profile, could potentially end up with the incorrect subject name, the computer name, in the certificate if the SCEP certificate profile is applied before the Domain Join profile is applied and have set a new computer name. Can we do anything about this problem? With native configuration options, there’s no way to ensure the certificate will contain the correct computer name as the subject name, however with a little bit of knowledge of the SCEP certificate distribution process and PowerShell, we can improve this and ensure our device ends up with the properly configured device certificate.
Solution overview
This post will provide all the necessary information required to improve the distribution of a device certificate for Hybrid Azure AD joined devices. The solution is based on a PowerShell script packaged as a Win32 application (so it’s possible to track it’s progress and have the Enrollment Status Page wait for it to complete) performs the following task in order:
Check for device certificate where subject name matches either DESKTOP or LAPTOP, loops until certificate is found
Wait for event id 39 in the DeviceManagement-Enterprise-Diagnostics-Provider/Admin event log (means a SCEP certificate has been installed), loops until event has occurred
Check the new device certificate is subject name matches desired prefix, e.g. CN=CORP, loop from triggering manual MDM policy sync if subject name did not match
If subject name matches desired prefix, exit script with success
This describes the high-level steps that’s provided in the script for this solution. There’s one requirement though for this solution to function as expected, and that is that your computer naming standard contains a prefix (e.g. a country code or company name abbreviation). Without this prefix, the solution as it’s currently implemented would not work. However, if you wanted it’s possible to re-write the part of the script that handles the final validation to check if the subject name of the certificate contains DESKTOP or LAPTOP.
Let’s dig into how we can configure all of this. But before that, grab the required PowerShell scripts for this solution from our GitHub repository:
As mentioned earlier in this post, the scripts in this solution requires a computer naming standard prefix that can be matched against the subject name property of the device certificate. The scripts have been built so that they support multiple prefix, to allow for various computer naming standards out there in the wild. Perform the following changes to comply with your requirements in your environment.
It’s important that you configure both scripts below to match for the same prefixes.
Update-SCEPCertificate.ps1
This is the script that’s responsible for updating the device certificate until it matches the desired prefixes. Add the necessary prefixes for the $SubjectNames variable beginning each item with CN= followed by e.g. a country code or suitable abbreviation for your environment. Logging output from this script can be found in the C:\Windows\Temp\SCEPCertificateUpdate.log file.
Get-SCEPCertificateDetection.ps1
This is the script used as a custom script based detection method for the Win32 application that will be created later in this post. Add the necessary prefixes for the $SubjectNames variable beginning each item with CN= followed by e.g. a country code or suitable abbreviation for your environment. In addition to the prefix changes, you’re also required to change the $TemplateName variable to match the name of the certificate template used when issuing the certificate to the device.
Package script content for Win32 application
If this is the first time packaging a Win32 application, don’t worry, all steps required will be covered and the overall process if fairly simple. First of all, ensure that you have the latest version of the IntuneWinAppUtil.exe application, as that is the tool that will prepare the Win32 application package. You can grab the tool from the following URL:
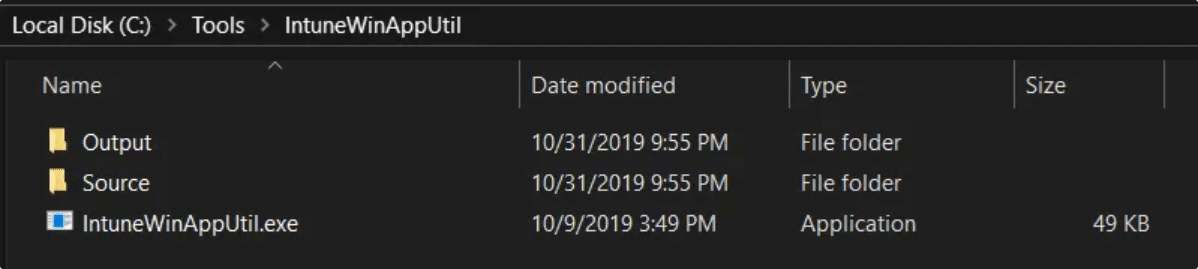
Secondly, with the tool downloaded, create the following folder structure in a folder called IntuneWinAppUtil placed e.g. under C:\Tools. After that create two folder inside of the IntuneWinAppUtil folder named Source and Output. At this point the following file and folder structure should now have been created:
Place the modified version of the Update-SCEPCertificate.ps1 script inside the Source folder. After that, open up an elevated command prompt and run the following command:
Once the tool completes the content packaging you should see a green progress bar that states 100% completed. Inside the Output folder, a new Update-SCEPCertificate.intunewim file has now been generated. This is the file that should be uploaded to Microsoft Intune in the next part of this blog post when the Win32 application is created.
Create the Win32 application in Microsoft Intune
Now that the Update-SCEPCertificate.ps1 has been downloaded and modified to fit your organizations requirements, packaged as content for a Win32 application, it’s time to create the application in Microsoft Intune.
Begin by logging into the Azure portal and locate the Intune blade.
In the Client Apps blade, select Apps, click Add and select the Windows app (Win32) as the app type.
Configure the App package file by browsing to the C:\Tools\IntuneWinAppUtil\Output folder and select the Update-SCEPCertificate.intunewim file.
Click OK.
Click on the App information section and configure accordingly. Enter a name, the description and publisher. A recommended name for the Win32 application would be Update SCEP Certificate. Optionally, locate a logo image for better aesthetics.
Click OK.
Click on the Program section and configure the following as the Install command:
For the Uninstall command, enter cmd.exe /c as we don’t really want this application to be uninstalled. Install behavior is important that it’s set as System, as a standard user will not have the required permissions to update the device certificate. Configure the Device restart behavior with No specific action.
Click OK.
Click on the Requirements section and specify 64-bit as the Operating system architecture and select Windows 10 1607 as the Minimum operating system.
Click OK.
Click on the Detection rules section. This is where the second script, more specifically the Get-SCEPCertificateDetection.ps1, mentioned above in this blog post comes into play. Under Rules format, select Use a custom detection script and browse for the Get-SCEPCertificateDetection.ps1 script. Leave the two bottom configuration both set as No.
Click OK.
Click Add to complete the creation of the Win32 application.
Since this is a rather small application in terms of content size, the upload of the Update-SCEPCertificate.intunewim file should go fairly quick.
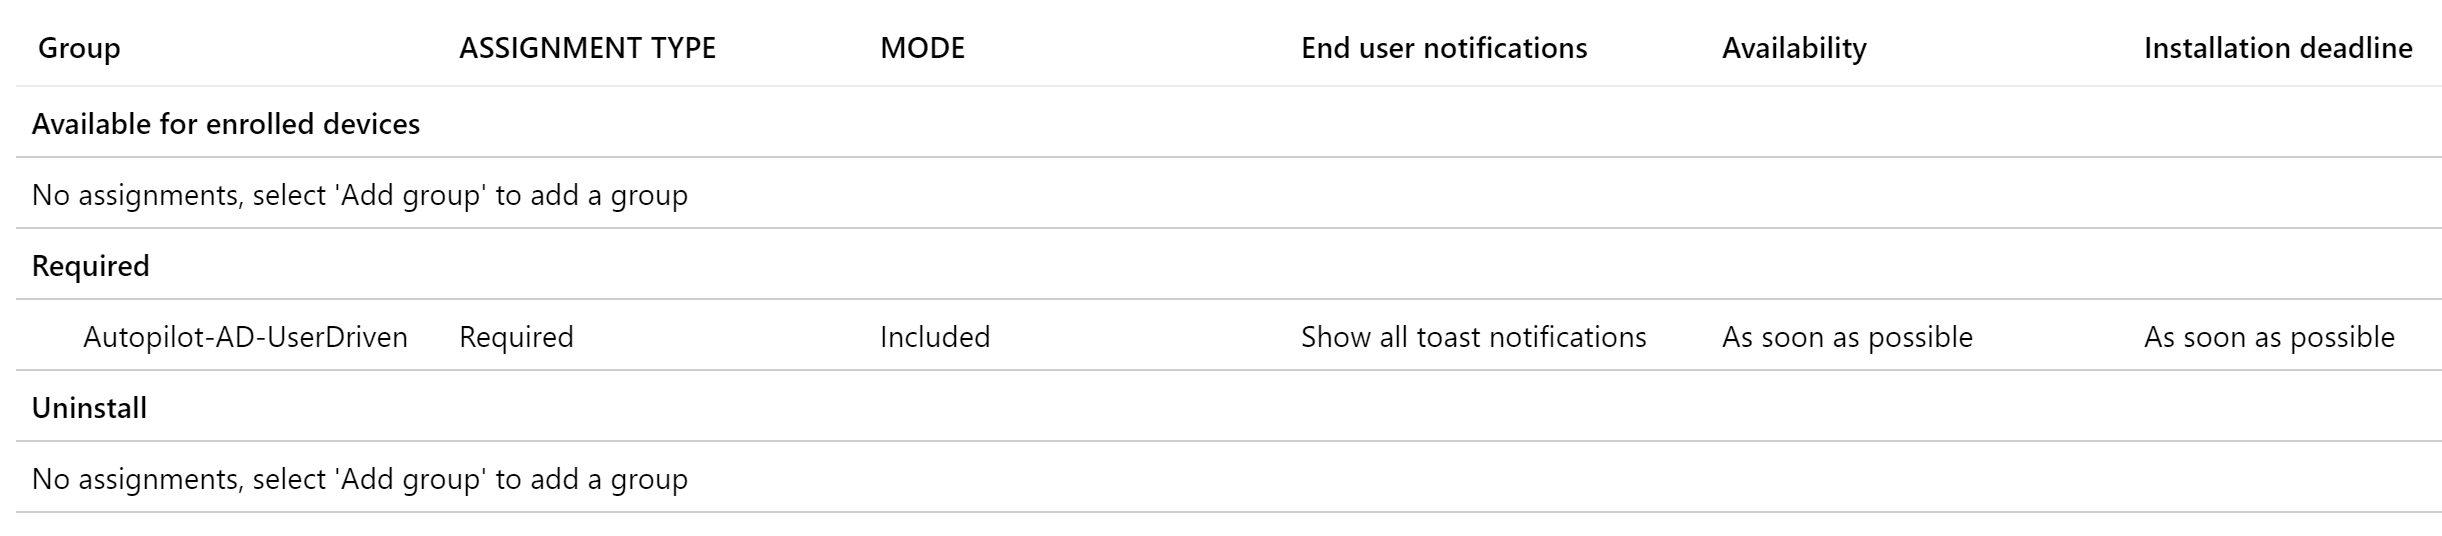
Before you continue to the next step in this post, remember to assign the newly created Win32 application with an assignment type of Required to your Azure AD dynamic group that contains all of your Hybrid Azure AD joined devices, for instance as below:
Configure Enrollment Status Page to track the Win32 application
The final required configuration for this solution to update SCEP distributed device certificates on Hybrid Azure AD joined devices, is to configure the Enrollment Status Page so that it will track the Win32 application and not let the provisioning continue until it has been successfully ensured the certificate’s subject name actually match the real computer name configured by the Domain Join profile.
From within the Intune blade of the Azure portal, go to Device enrollment and select Windows enrollment.
Click on the Enrollment Status Page.
Depending on if you’ve created a different profile here, select your custom one, but if not select the Default profile associated with All users and all devices.
Select Settings and ensure that Block device use until these required apps are installed if they’re assigned to the user/device is configured with Selected.
Click the Select apps button and select the Update SCEP Certificate application.
Save the configuration changes.
Summary and results
Let’s take a step back and recap what we’ve actually gone through in this blog post. The goal was to update the SCEP distributed device certificate subject name match the actual computer name set by the Domain Profile, for Hybrid Azure AD joined devices provisioned using Windows Autopilot. This is accomplished by using a script named Update-SCEPCertificate.ps1 that was packaged as a content file for a Win32 application to be deployed to Autopilot registered devices from Microsoft Intune.
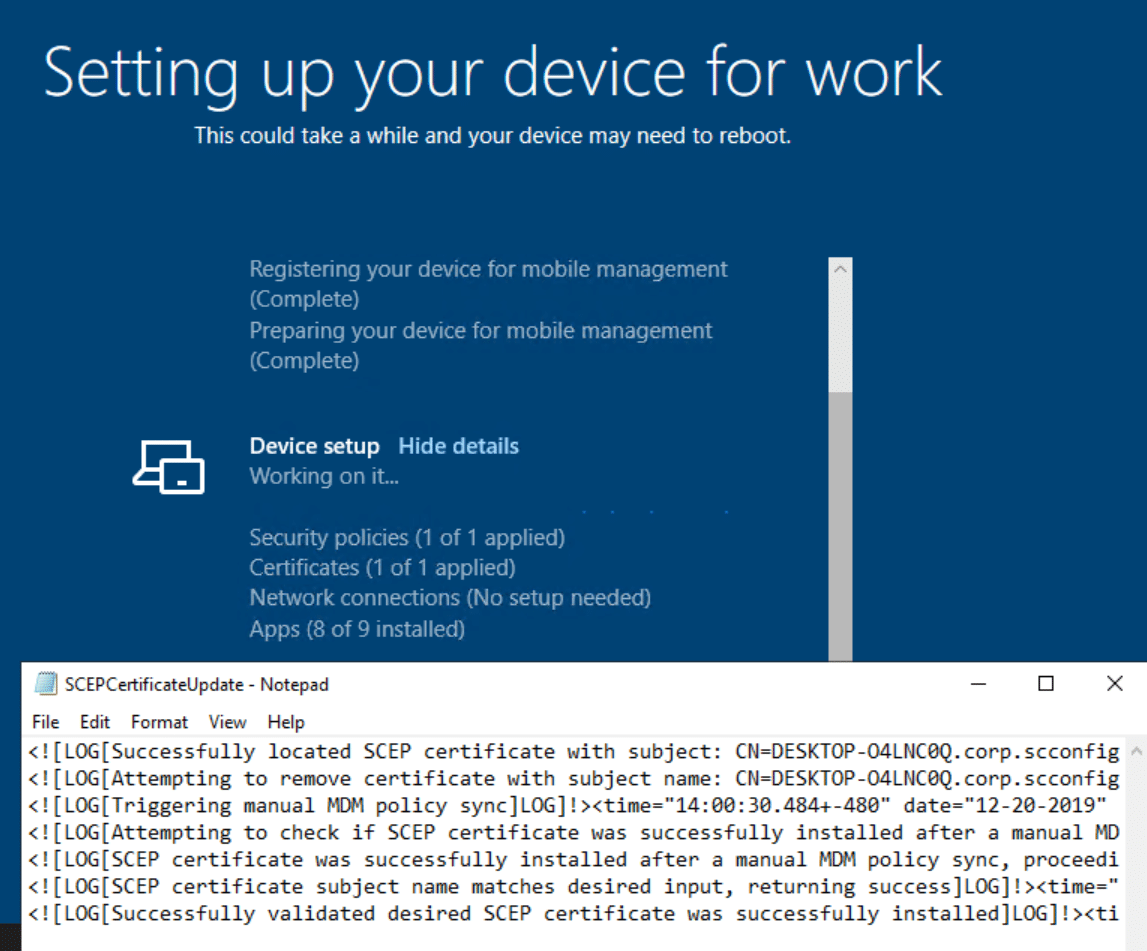
Now that’s all sweet, but how would I know that this solution has worked as expected and how can it be verified? Locally on each device that was provisioned and targeted for the Win32 application created in this blog post, a log file is created once the Win32 application starts during provisioning. If you want to keep track of it’s progress, you can hit SHIFT+F10 when the Enrollment Status Page is shown to open up a command prompt and open the log file using Notepad, as shown below:
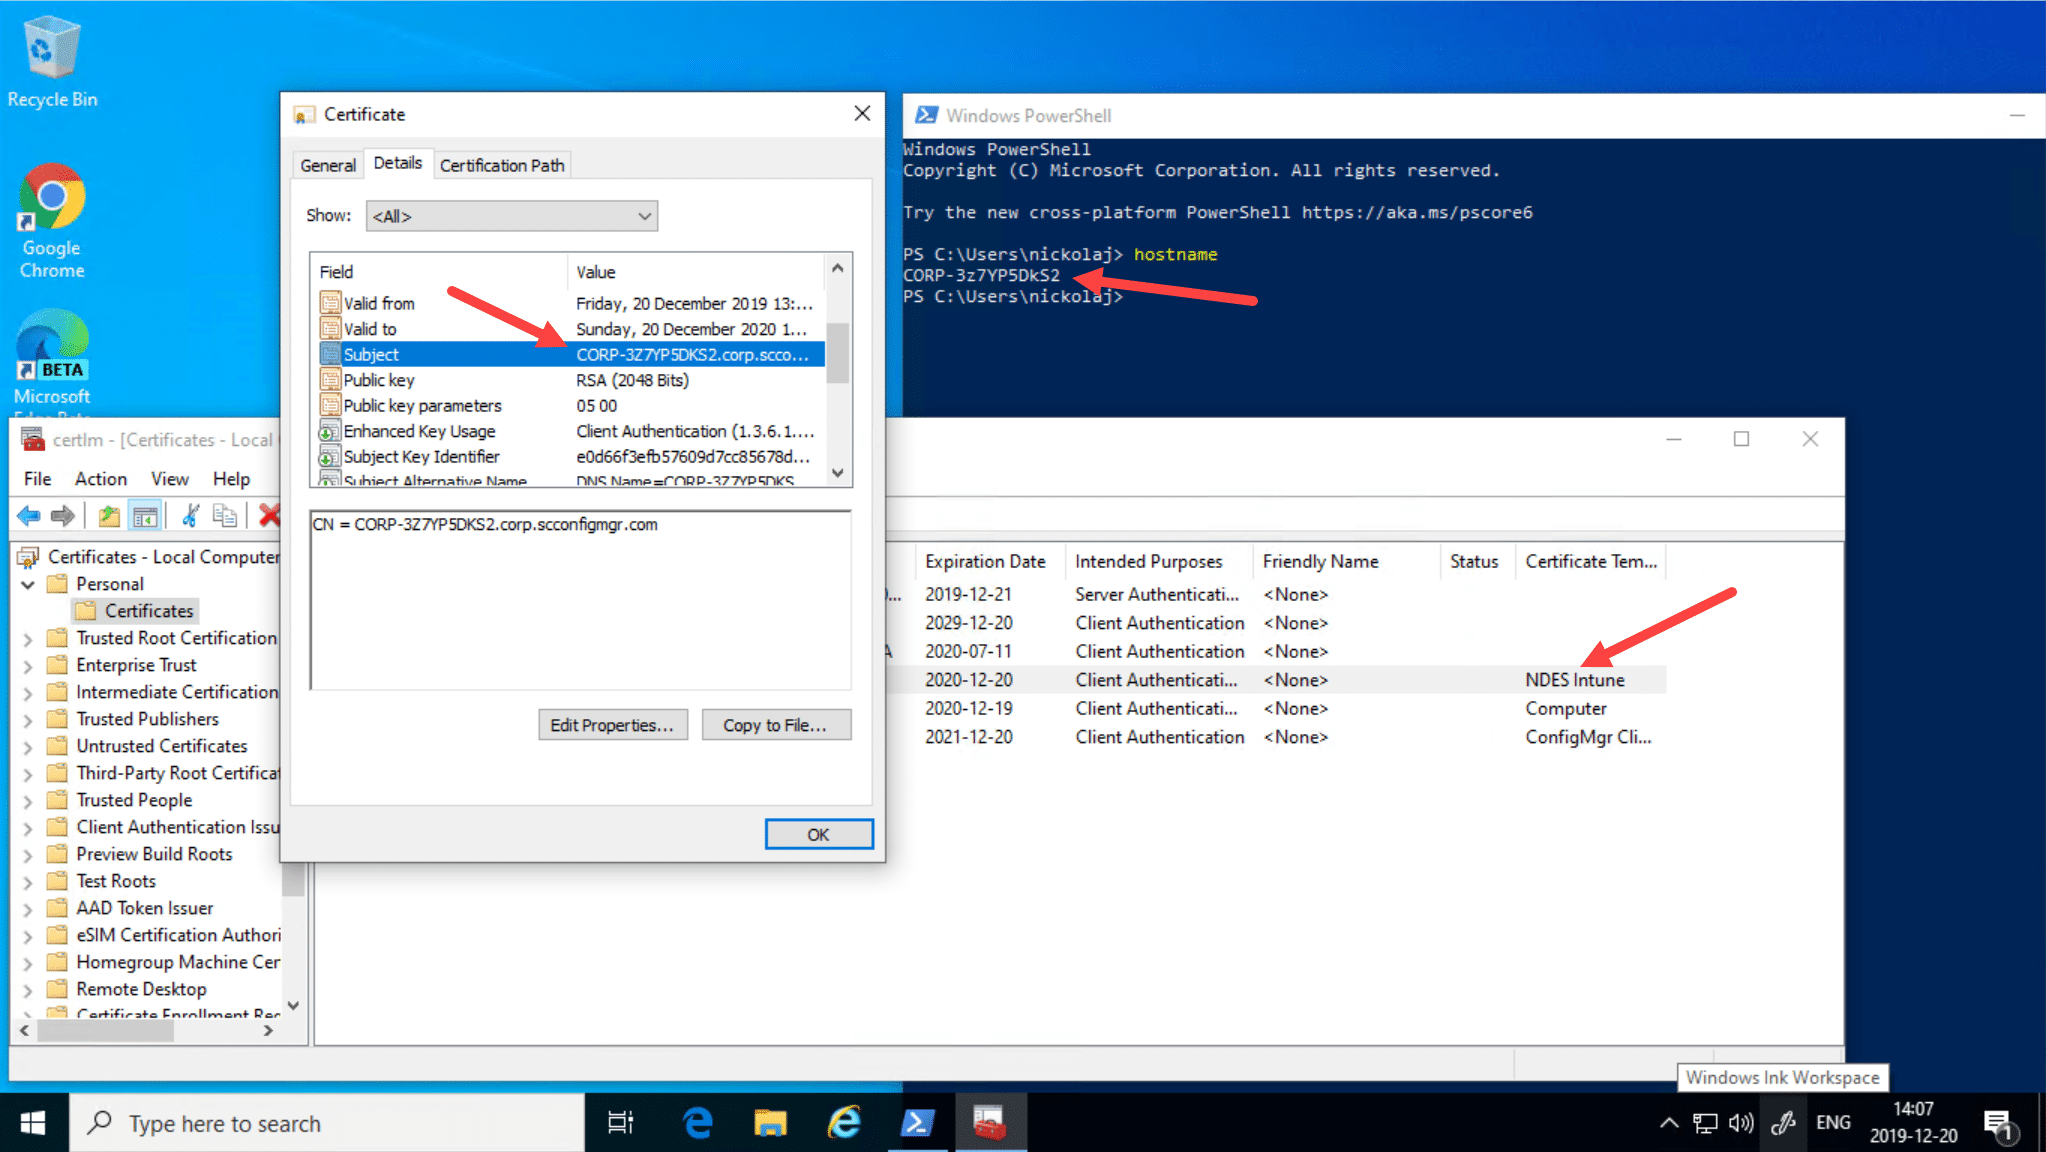
Additionally, we can of course verify that the actual device certificate on the device that was provisioning now contains the correct subject name matching the computer name. In my lab environment all of my provisioned Hybrid Azure AD joined devices gets a computer name that has CORP- as the prefix. Opening up a mmc.exe console for computer certificates, we can verify the subject name is now correct:
That completes this blog post, I hope Microsoft will fix this in the near future so that this solution is not required going forward.
With over 44 million active users, Microsoft Teams is not going away anytime soon.
It’s rise in popularity also means that old issues arise a new for a lot of tenants that have not fully utilized the Teams client in the past or have just begun the transition to Office 365 ProPlus that includes Teams.
And you might end up hearing something along these lines from your friendly Help Desk staff:
“Users keep bugging us about this annoying ‘Windows Security Alert’ that the Windows Firewall throws every time they try to share their screen in Microsoft Teams“.
And you might ask: “Can I use Microsoft Intune to silence this madness?“.
Answer:
I’m glad you asked – because Microsoft Intune can most certainly help you out!
But it requires a little PowerShell magic, as the built-in Firewall CSP is unable to handle user based path variables.
You see – as far as I can tell, the Microsoft Teams executable, requires an inbound Firewall rule, when it detects that you are on the same domain network as another party in the chat.
Teams will automatically try and create the required rules, but they require admin permissions. Which most users don’t have, so they will dismiss the prompt.
Ironically enough. Dismissing the prompt will actually leave you with two blocking Firewall rules for Teams.exe, that will force the Teams client to connect via other means. So it was able to create firewall rules anyway?! Go figure…
Things get complicated because the Teams.exe file is usually installed per-user in the users own APPDATA folder (%localappdata%\Microsoft\Teams\current\Teams.exe), so we need to create a Firewall rule for each user on the Windows 10 Device – not doable with the built-in Firewall CSP.
Now on the other hand, if you have deployed the Teams machine-wide installer, you are able to just create a single Firewall rule with Intunes built-in Firewall CSP.
But that’s no fun, so lets take a look at how you can crack this “per-user” nut with PowerShell and Microsoft Intune!
Well this new script has been designed to be deployed as an Intune PowerShell script assigned to a group of users. Which means that it will only run once per user, and it will also be able to tell who is actually signed in to the device. Thus only creating the necessary rules for the signed in user.
As an added bonus – the script also does a cleanup of any existing rules the user might have gotten by dismissing previous Firewall prompts.
Configuring a PowerShell script deployment with Intune
Let’s get you sorted out!
I hope you grabbed the PowerShell script already from GitHub (and have it handy), with the script saved as “Update-TeamsFWRules.ps1“.
Fill out the basic information with something self explanatory like:
Name: “Teams firewall prompt fix”.
Description: “Gets rid of help desk calls regarding the Microsoft Teams Windows firewall prompt”.
Click “Next“.
Leave the “Script settings” as is. And stick to just adding the script through the “Select location” option.
Choose the file you previously saved as (1-3) “Update-TeamsFWRules.ps1“.
Click “Next“.
You want the script to execute in system context, and specifically NOT the users context, as the user does not hold enough permissions for the script to complete.
Assign the script to a group of users (Not devices as that’s not what the script was designed for):
Click (1) “+ Select groups to include“.
(2) Search for the groups you would like to assign the users to.
(3) Click on the group from the search results.
Notice that it’s actually in the “Selected items” area.
Click (4) “Select“.
Click (5) “Next“.
Review the summary (1)
Click (2) “Add“
That’s it!
Now sit back and relax while the Intune backend chews on this new script…
Troubleshooting
If you followed the above instruction, what could possibly have gone wrong?
Well lots of things I’m sure, as a large testing facility and cool minions is not something I have handy.
That’s why the script has been supplied with comments, so you can figure out what’s going on.
Adding to that, a log file can be found in “%windir%\Temp\log_Update-TeamsFWRules.txt” to help you in tracing the root cause.
If no log file is found, then check Intune to see if the script has actually executed on the system, and recreate the policy if nothing runs within a few hours even after restarting the “Microsoft Intune Management Extension” service.
If the script has run without any errors, a copy is also placed in the users own Temp files “%localappdata%\Temp\log_Update-TeamsFWRules.txt“.
Intune Management Extension is required for Powershell scripts to be executed from Intune, so make sure your device is eligible for this extension.
Remember to only assign this to a group of USERS and DON’T run it in the users own context.
Conclusion
We now have a simple way of deploying Firewall rules that target programs installed in the users profile.
In the future this might come in handy for a bunch of other programs.
I hope you benefit from this solution and do me the honor of following me on Twitter (@michael_mardahl) where I will gladly try and answer your queries regarding Intune and what I blog about in general.
Back in January 2019 I wrote a series on setting up and customising MBAM (https://msendpointmgr.com/2019/01/12/step-by-step-microsoft-mbam/), a product that was part of the Microsoft Desktop Optimisation Pack, and a product that at the time was earmarked for retirement. At the time there were rumors’ that functionality would be imported into Configuration Manager, something that we learned was true with the introduction of MBAM functionality in TP 1908.
Fast forwarding to today, with the release of Microsoft Endpoint Configuration Manager build 2002, MBAM functionality has been migrated in full. In this blog post series I will step through the setup process, how to integrate the new service into your task sequence, and how to customize the self service portal.
This is actually more, Goodbye MBAM standalone, as full integration has been completed.
The Setup Experience
To start of we need to have a couple of pre-requisites out of the way;
Configuration Manager build 2002 installed
Microsoft ASP.NET MVC 4.0
Certificate Authority PKI*
Three security groups;
BitLocker Helpdesk Admins
BitLocker Reporting Users
BitLocker Admin Users
MBAM Deployment Script
Upgrading Configuration Manager
This is something we are all familiar with, but just for those new to this process, here we go
Launch the Configuration Manager console
Click on the Administration blade
Click on Updates and Servicing
You should now see Configuration Manager 2002 listed as available for install. If you do not see this, click on the “Check for Updates” button and then try again later
You will at this point need to update the Configuration Manager console, and you will be prompted to do so in order to continue
Logging back in and going to the About page, you can see the updated build information;
SQL Encryption
As you are going to store the recovery information for all BitLocker machines managed through Configuration Manager, data encryption might be a concern. If this is a requirement, then it is possible through SQL cell-level encryption, however, do note that this has the potential to cause up to a 25% performance degradation in SQL DB performance.
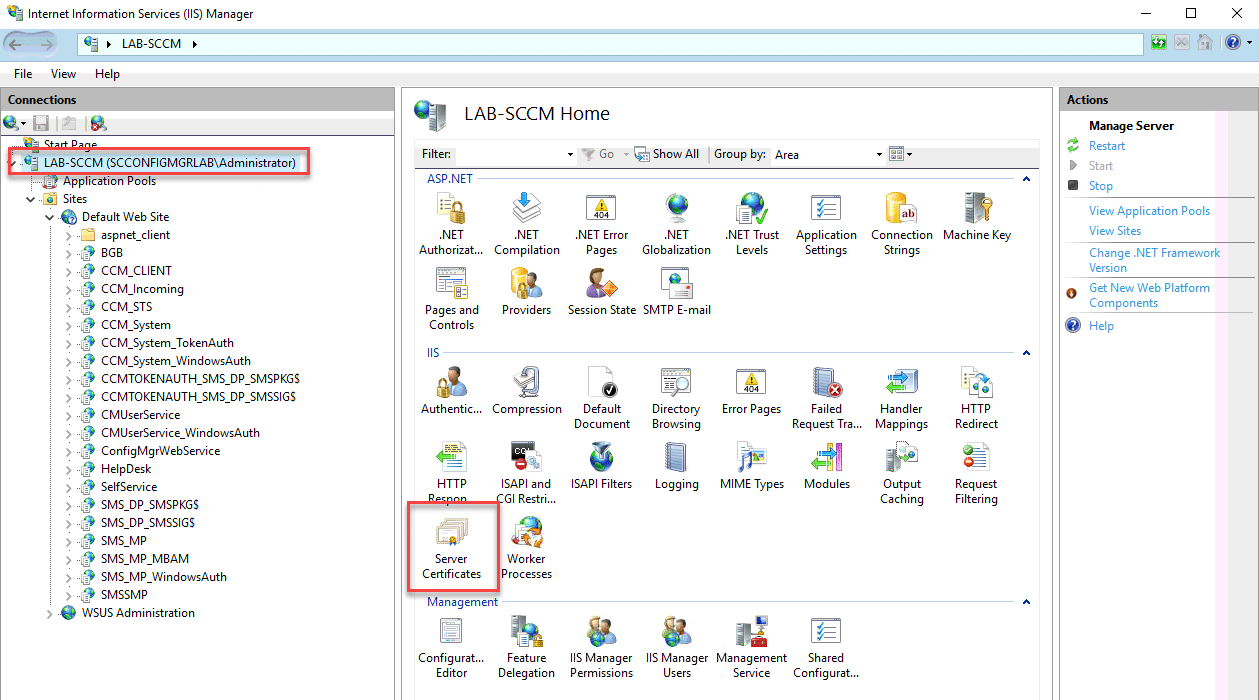
Installation of the MBAM portals (yes they are still MBAM branded, just migrated) in this example is on a single management point, which is not running SSL. In the previous 1910 release, which saw the initial availability of MBAM features, the use of HTTPS was a requirement which caused issues for those not running their infrastructure in full HTTPS mode. In the latest 2002 release however, only the associated MBAM sites need to be HTTPS enabled, meaning you no longer need to undertake a lot of pre-requisite work to push out this feature.
In this instance the MBAM portals are not actually installed as a feature, as you might imagine they would, but through a PowerShell script. So let us proceed and install the web components;
First of all we will need to download and install the Microsoft ASP.NET MVC 4.0 prerequisite for the Self Service portal to work
Launch the installer and step through the setup process;
In Active Directory, we will need to create three user groups that will be used to define access functions to the helpdesk and reporting portals; BitLocker Helpdesk Admins BitLocker Reporting Users BitLocker Admin Users
Once installed open an administrative PowerShell window and go to the following location – %PATH TO YOUR CONFIGURATION MANAGER INSTALL%\CD.Latest\SMSSetup\Bin\x64
Now run the following command; .\MBAMWebSiteInstaller.ps1 -SQServerName %YOURSQLSERVER% -SQLDatabaseName %YourDBName% -ReportWebServiceURL “https://YOURREPORTINGSERVER/ReportServer” -HelpDeskUsersGroupName “DOMAIN\BitLocker Helpdesk Users” -HelpdeskAdminsGroupName “DOMAIN\BitLocker Helpdesk Admins” -MBamReportUsersGroupName “DOMAIN\BitLocker Report Users” -SiteInstall Both -DomainName “YOURFQDN”
Below is an example of this command being run in my lab;
At the end of the script being run, you will have completion messages with the paths to the new IIS virtual directories;
At this point, going into IIS Manager, we can see the virtual directories are present;
Default Portal View
With the portals now installed, we can test functionality over HTTP and later add in HTTPS which will be required to escrow the recovery keys.
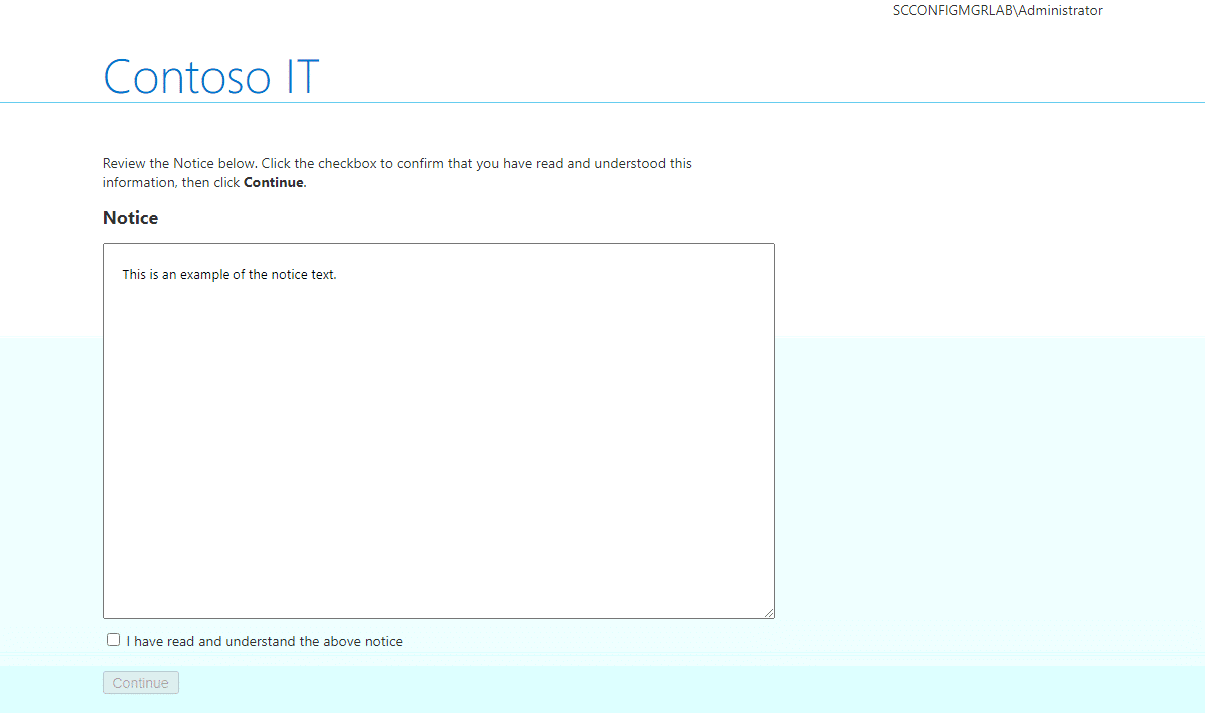
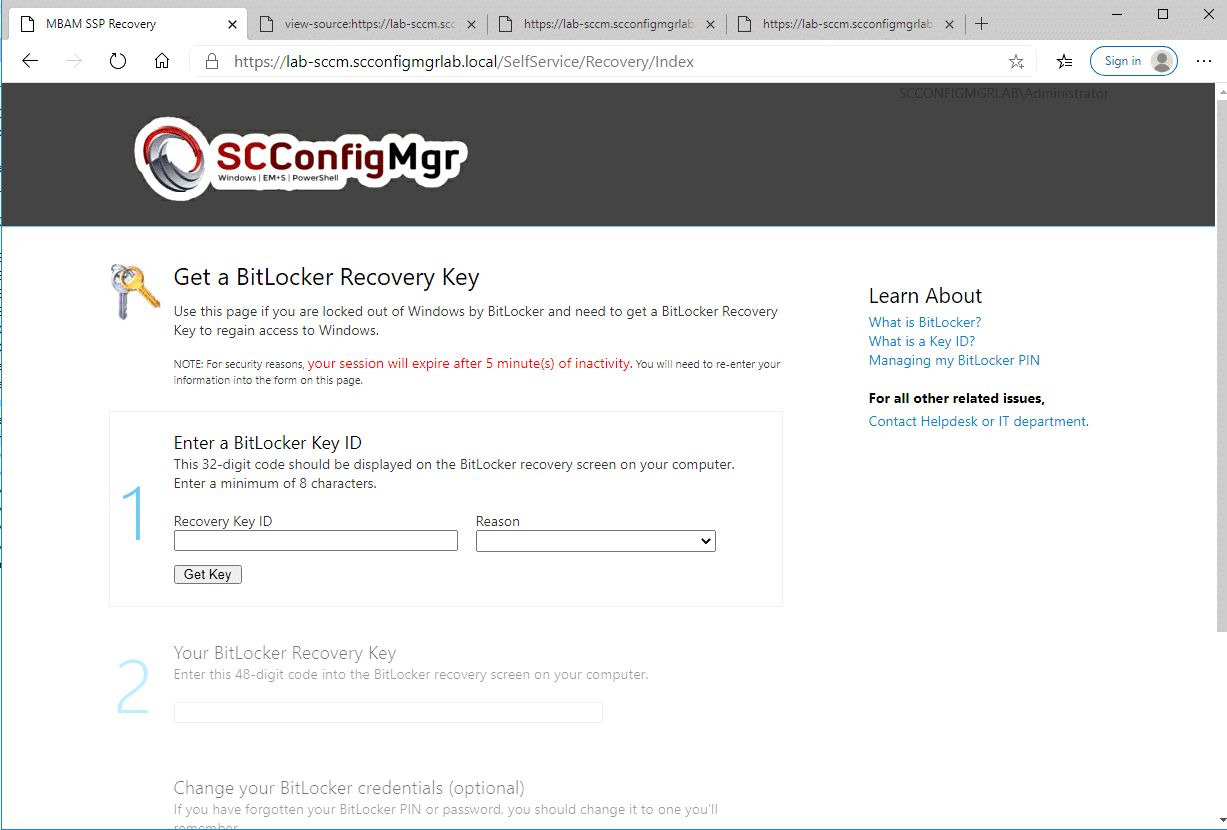
You can open the self-service portal which will be used by employees (fingers crossed) in order to recover their BitLocker keys as part of self service;
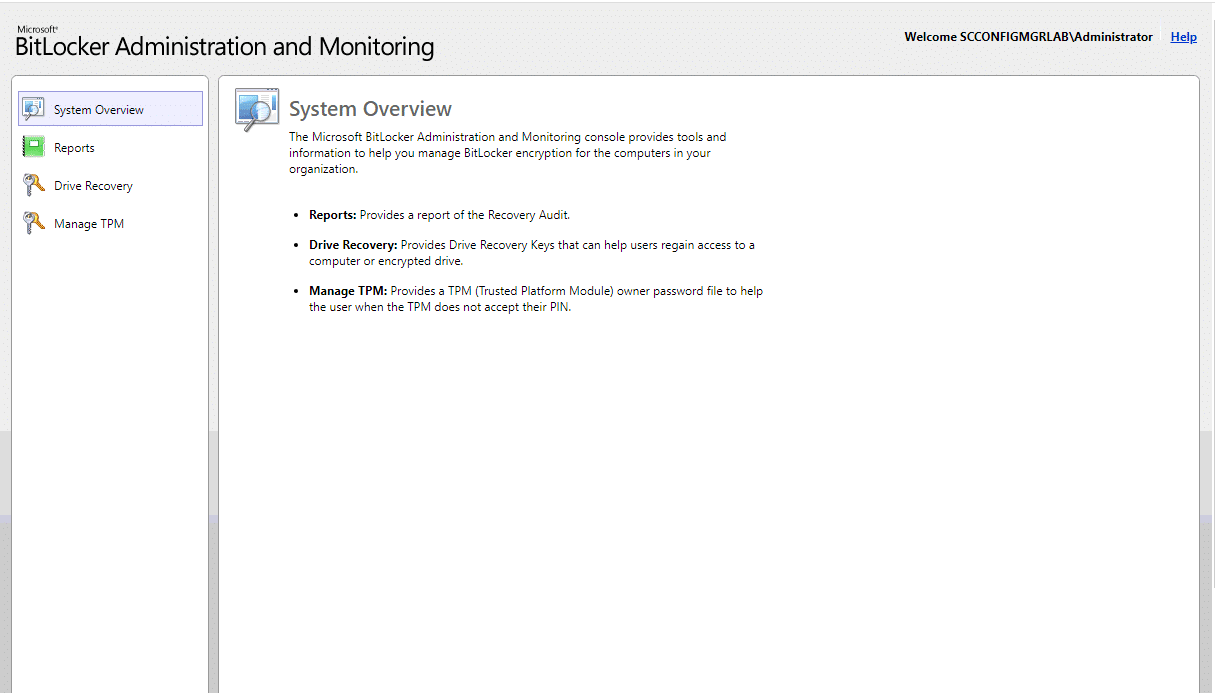
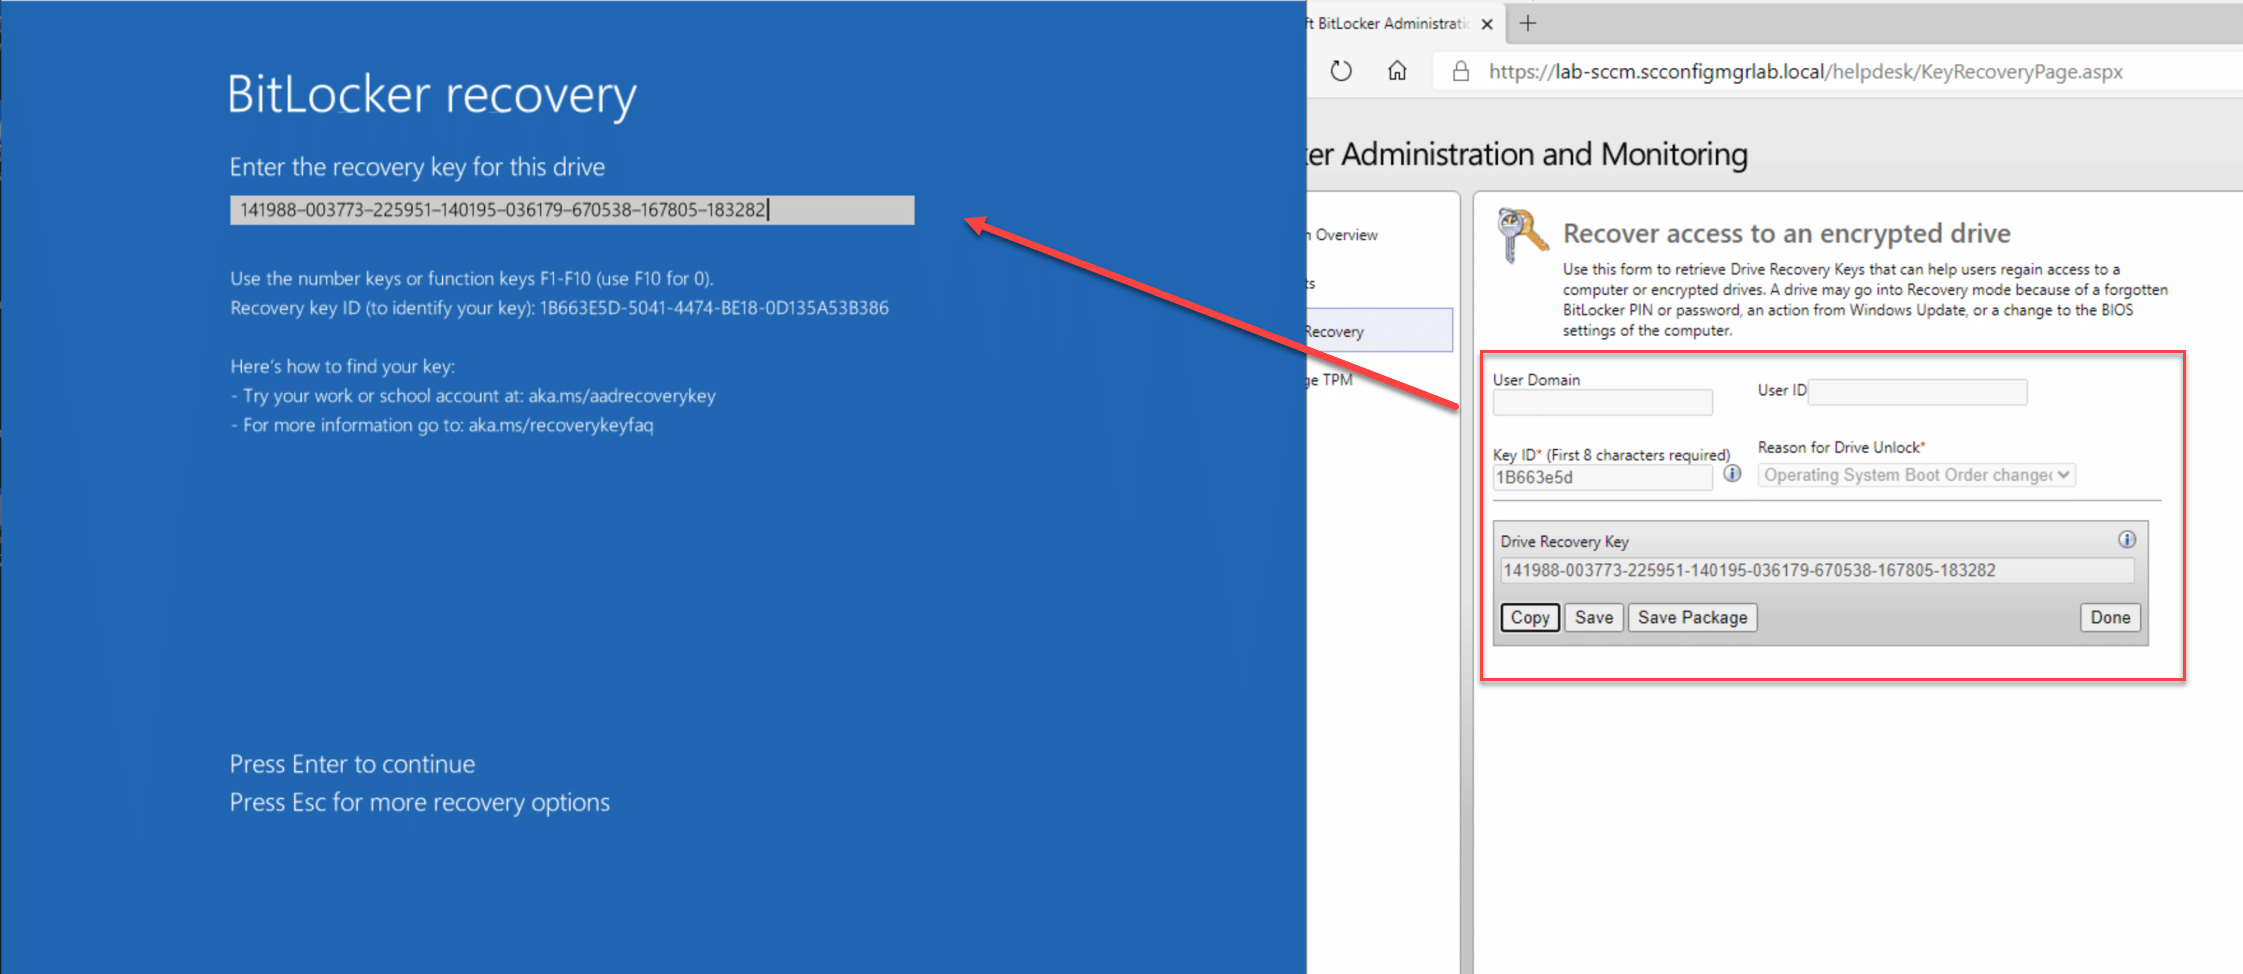
Now we can also test access to the Helpdesk portal, which obviously will be used by members of the IT Helpdesk;
For those of you who are used to MBAM, these will obviously be very familiar as they are a direct port from the product. I will run through how to customise the self service portal in part 2 of this series.
Enabling HTTPS – Cert Creation and Installation
If you are running HTTP only in your environment, we now enable SSL for these individual sites. At this stage you will need a CA signed certificate which will be bound to port 443 on your IIS instance running on your Management Points.
Note: If you have a HTTPS enabled environment, you can skip over the cert creation and installation steps.
I will step through how to create and add your SSL certificate here;
Create a new Active Directory security group and add your Management Point to the group, example;
On your Certificate Authority, right-click on Certificate Templates and go to Manage
Right-click the Web Server template and click “Duplicate Template“
Name your Certificate, in this example I have used “ConfigMgr IIS Certificate”;
On the Security tab, add the AD group you created earlier and assign the enroll permission;
Click OK
Close the Certificate Templates Console
Right-click on Certificate Templates in the Certificate Authority Console, click New, Certificate to Issue
Select the template name you created
You should now see your template is available;
Now that we have a template to use, we need to assign a certificate to the management point.
Open the IIS Management console on your management point
Highlight the server name and double-click on Server Certificates;
Click on the “Create Domain Certificate” action
Enter the required details as per the below example;
Select your internal CA and give your certificate a friendly name;
With the certificate created and listed, we can now bind it to port 443 for SSL communications.
Click on “Default Web Site” in the IIS admin portal
Click on “Bindings” in the actions pane
Double-click on “https” and select the certificate you just provisioned from the SSL certificate list;
Enabling HTTPS – Individual Sites
It is a requirement to run HTTPS for escrow of the keys, as I already mentioned. Here in the latest 2002 implementation of the BitLocker management feature, we simply need to enable this on the individual sites in IIS Manager. This can be achieved by undertaking the following actions;
Open IIS Manager
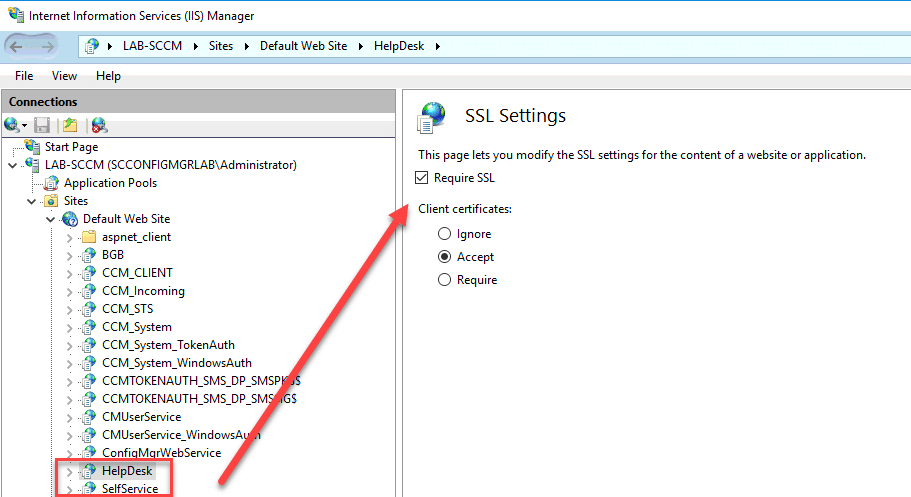
Select the HelpDesk virtual directory underneath in the “Default Web Site” list
Double-click on SSL Settings and click on the “Require SSL” checkbox, then underneath Client Certificates click “Accept“;
Repeat this process for the SelfServiceand SMS_MP_MBAM sites
Restart IIS using IISReset from an administrative command prompt or PowerShell window
You can now test accessing the sites over HTTPS;
Conclusion
At this state we have the background components enabled to support BitLocker management in Configuration Manager. In the next parts of this series we will look at customisation of the self service portal and how to deploy settings to the Windows clients, enforcing encryption in your organisation.
With the self-service portal installed, the first thing we can do is use IIS manager to edit some of the basic text displayed in the portal.
Custom HTML Work
The issue with the self service portal however, is it feels a little bit, early 2000’s. So in order to make the portal feel a bit more up to date, we can simply go down the path of editing the HTML mark up of the portal itself, including adding corporate logos.
The Self Service Portal
The self-service portal provides end-users with a quick means of recovering their BitLocker recovery password in the event of a recovery event being triggered. Let us go ahead and validate that the component was successfully installed;
Launch a web browser and browse to the following URL – https://YOURSERVER/SelfService
At this point we have the generic experience where some elements can be controlled within IIS
Open the IIS Manager console, select the SelfService virtual directory and go to Application Settings;
Now we can edit basic settings in the UI;
From here we can do things like setting the company name and deciding if we want to display a notice to users by editing the notice.txt file, or hiding the initial page by setting the DisplayNotice to False.
Fully Customising The Self Service Portal
If you wish to fully customise the portal however, you will need to edit the site master layout and the CSS file for the site. By doing this you can achieve a less generic look;
To do so, simply follow the below;
SITE Style Sheet
Browse to the following location – C:\inetpub\Microsoft BitLocker Management Solution\Self Service Website\Content
Create a backup of the Site.CSS style sheet
Open the Site.CSS style sheet
Now you can remove the gradient background by changing the following;body
{
font-family: “Segoe UI”, Verdana, sans-serif;
font-size: 14px;
color: #333;
background: #DFF2F9 url(images/BrowsersBkgd_repeat-x.jpg) top left repeat-x;
margin: 0px;
}
Next update the background colour with your preferred colour in hexadecimal format
In this example #DFF2F9 is replaced with #FFFFFF for a white background;body{
font-family: “Segoe UI”, Verdana, sans-serif;
font-size: 14px;
color: #333;
background: #FFFFFF ;
margin: 0px;
}
In order to give the header block a contrasting background, locate the following section of code;#header
{
display: block;
}
Add a background entry with your background colour again in hexadecimal format, you should then have a section like the below#header
{
display: block; background: #454442;
}
Adding A Custom Logo
In order to add an image with your organisations logo you will need obviously first of all to create and size your logo. In the example shown below I have used a pixel height of 120 and colour matched the background;
Now to insert the logo;
Save the image file to the following location;
C:\inetpub\Microsoft BitLocker Management Solution\Self Service Website\Content\Images
Browse to the following location and create a backup of the Site.Master filer;
C:\inetpub\Microsoft BitLocker Management Solution\Self Service Website\Views\Shared
Open the Site.Master in a text editor
Scroll down to the following section;<div id=”header”>
<div class=”content”>
<% Html.RenderPartial(“UserIdentityControl”); %>
<br/>
<% Html.RenderPartial(“UserLogoutControl”); %>
<h1>
<asp:Literal runat=”server” Mode=”Encode” Text=”<%$appSettings:CompanyName %>” />
</h1>
</div>
</div>
Add the HTML image tags and comment out the text company name as per the below;<div id=”header”>
<div class=”content”>
<% Html.RenderPartial(“UserIdentityControl”); %>
<br/>
<% Html.RenderPartial(“UserLogoutControl”); %> <img src=”<%= Url.Content(“https://lab-mbam.scconfigmgrlab.local/SelfService/Content/Images/SCConfigMgrBackgroundLarge.png”) %>” alt=”SCConfigrMgr Lab Environment”> <!–
<h1>
<asp:Literal runat=”server” Mode=”Encode” Text=”<%$appSettings:CompanyName %>” />
</h1> –>
</div>
</div>
Conclusion
At this point you should now have a more custom look to your self service portal. Now its time to look at how we put everything together for the Windows 10 client in part three.
As this is for the most part a straight port of the MBAM solution, we still need to deploy an MBAM client in order for the Windows 10 device to understand the settings being deployed and start the encryption process.
The first thing we need to do, is to set up a BitLocker policy as this controls the installation of the MBAM client. You will find the BitLocker policy in the Endpoint Protection settings in the Assets and Compliance blade;
So lets start with configuring a new policy
Open the BitLocker Management section in Endpoint Protection settings
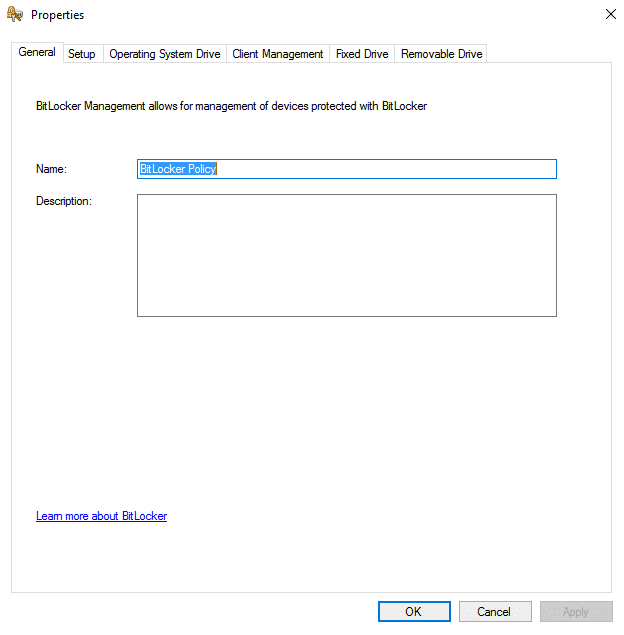
Click on New Policy
Name your Policy
Click on Operating System Drive options and specify the type of encryption you wish to use, in this example we are using TPM only and XTS-AES256 bit encryption;
Click on Client Management, then enter your BitLocker key recovery options and status frequency in minutes;
Should you wish to specify settings for additional data drives or removable drives, do so accordingly
Now we can deploy the profile
Upon assignment of the policy, the Configuration Manager client will install the MDOP MBAM agent on the targeted machines, if not already installed. The agent is actually located within the %SYSTEMROOT%\CCM folder, as part of the updated client agent;
Once the agent is installed it will look for the BitLocker policy assigned to the device through Device Collection membership, and then pull down the configuration accordingly.
We can see this process taking place within the registry, by looking for a registry key starting in HKLM:\Software\Policies\Microsoft\FVE.
Once the agent is installed, the initial registry item settings are written in, as per default values;
After a few minutes, the additional policies set within your policy should also appear in a “MDOPBitLockerManagement” subfolder;
We can also check the Configuration Manager client agent to see that the settings are targeted and if the machine is compliant, by looking at the compliance tab;
Note: MBAM policies by default will enforce encryption after 90 minutes. Should you wish to speed this process up and enforce silent encryption immediately, you can simply create the following registry entries on your device either through a group policy preference or through a Configuration Baseline;
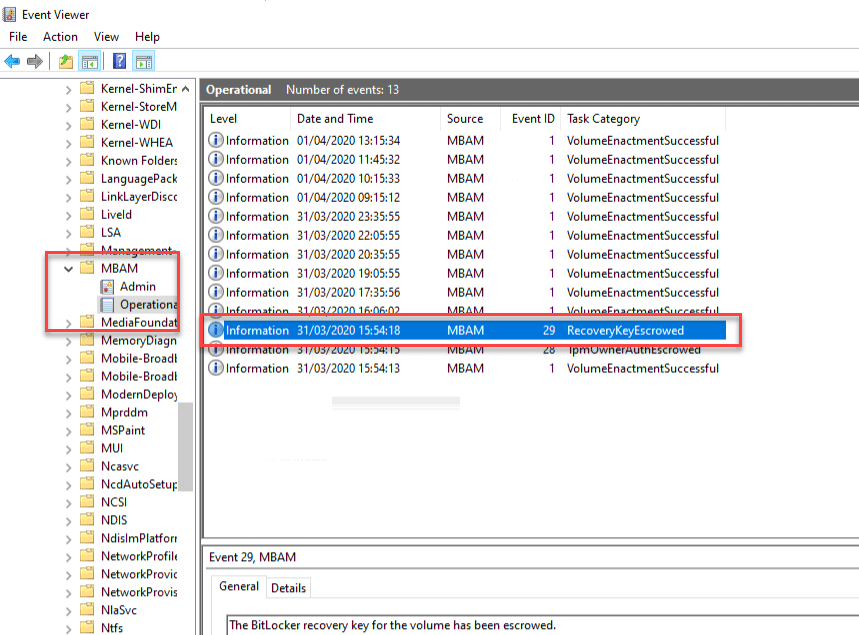
In the Applications and Services event logs we can look at the following log – Microsoft\Windows\MBAM. Here we will see the policies taking effect on the machine, along with the escrow status of the TPM and BitLocker recovery keys;
Task Sequence Deployment
For deployment of new systems, obviously we do not want to wait for device collection evaluation to run before the drive is encrypted. So the process of encryption here for those who have used MBAM, is almost identical, but for those who have not, let us step through this.
Package Up Deployment Scripts
Here we can simply leverage the Invoke-MBAMClientDeployment PowerShell script as the MBAM client itself is now installed
Extract the files contained within. We will later use two of these files to first of all persist the TPM owner and then to enforce the encryption process
Create a new Package
Give your package a name, “MBAM Deployment Scripts” for example
Distribute your package to your DP’s
The Task Sequence
With the application and script package in place, we can go ahead and add these to our task sequence.
Create or edit and existing task sequence
Create a group within the Windows PE stage and call it BitLocker Pre-Provisioning (or something similar)
Add a Run Command line step, call it “Set BitLocker XTS AES 256” and enter the following details; “reg add HKLM\SOFTWARE\Policies\Microsoft\FVE /v EncryptionMethod /t REG_DWORD /d 7 /f”
Add a new Run Command Line step, name it “Persist TPM OwnerAuth” and enter the following (this is required as we are pre-provisioning the drive and want the TPM owner persisted through to the full OS) cscript.exe “SaveWinPETpmOwnerAuth.wsf”
This step is OPTIONAL. Here we will also escrow the BitLocker recovery key to Active Directory, prior to escrowing the key;
Add a Run PowerShell Script step, enter “Invoke-MBamClientDeployment.ps1” as the script name and select the MBAM Deployment Script package. Now enter the following parameters; -RecoveryServiceEndpoint “https://%YOURSERVER%/SMS_MP_MBAM/CoreService.svc” -EncryptionMethod “XTSAES256” -EncryptAndEscrowDataVolume -IgnoreEscrowOwnerAuthFailure -IgnoreReportStatusFailure -WaitForEncryptionToComplete
Monitoring the deployment via the status messages for the deployment, we can see the key was successfully escrowed to the Configuration Manager database;
Validating The Recovery Process
With your machine now deployed or having taken control of management of the device, we can now look at ensuring the keys are present in the database. So first of all we can run the manage-bde command on our Windows 10 device to obtain the BitLocker recovery key;
Open a Command Prompt or PowerShell Window and type; Manage-BDE -Protectors -Get C:
Now we have three options to verify if the key is in the database. The first is to look at the database table – dbo.RecoveryAndHardwareCore_Keys
The second is to use the Helpdesk portal, by logging onto our server – https://%YOURSERVERHERE%/HelpDesk;
And finally the last option is to use the SelfService portal – https://%YOURSERVERHERE%/SelfService;
Optionally if you opted to escrow the keys to Active Directory, we can verify storage there;
In the above AD Computer Object screenshot you will also see that the recovery key was rolled over during testing, something which MBAM handles to ensure you can’t re-use keys.
Testing Recovery
With the recovery keys stored, we can now go about testing a recovery scenario. First of all we need to force recovery of the drive by running the following command;
Manage-BDE -ForceRecovery C:
Now we can obtain the recovery key either through the self service portal or through the helpdesk (as per this example). Using the recovery key, your machine should then boot as normal;
Migration from MBAM Standalone to Configuration Manager
The process of moving active devices from MBAM standalone to Configuration Manager can be handled in this manner;
Remove the existing MBAM group policies from the OU where the machines are located
Assign the BitLocker policy you created in Configuration Manager to a device collection containing those machines
Wait or force the policies to update both for Group Policy and the machine policy
Check the event logs and you see the machine communicating and then escrowing the keys;
Confirm the new server settings in the registry;
At this point you can confirm that the keys are located in both environments;
Conclusion
At this point you should now be able to deploy the entire solution, securing your portal via HTTPS, customising the self service portal, and of course having the ability to deploy your machines and automatically having them encrypt their drives while escrowing the recovery keys to the database. Now to go about retiring out that old MBAM server..
The Microsoft Always On VPN Solution that is pushed by Microsoft as the successor to DirectAccess, is a great tool for remote workers and admins alike because it’s always on – or is it?
But setting all the configuration issues aside for a moment… I think that anyone working with Microsoft Always On VPN infrastructure and client configuration has run into an issue where user tunnel connections don’t always auto-connect – despite having configured “AlwaysOn” in the ProfileXML or Intune configuration policy.
Some hacks to fix this, include scheduling the “rasdial <connection name>” command to re-establish the connection, but wouldn’t you rather know why it has stopped auto-connecting?
Why is it not auto connecting then?
This might have happened because the user manually disconnected the user tunnel at some point in time, or because of something that is yet to be explained.
In any case – what happens is, that this lands the VPN connection on a list in the registry called AutoTriggerDisabledProfileList which is a REG_MULTI_SZ property type that you might be interested in clearing out the Always On VPN connection name from.
Registry location of AutoTriggerDisabledProfileList
The AutoTriggerDisabledProfileList property located in HKEY_LOCAL_MACHINE\SYSTEM\CurrentControlSet\Services\RasMan\Config is a list that will maintain the profiles within the list, in a disconnected state, surviving reboots, and whatnot.
Can Intune help me fix this?
Sure! You could use PowerShell to achieve this goal in a crude fashion or even better create a .intunewin package that removes unwanted entries with a detection rule that looks for a certain value on this registry property.
I have yet to create this package, so please feel free to share in the comments, as I am sure it could save a lot of people some extra time.
Adding a fix via Intune nicely complements the fact that Intune is the preferred distribution mechanism for the Always On VPN profiles. And even though this seems like a bug, it’s a feature, and as such it might never end up on the troubleshooting page.
But I would have liked an option within Intune’s VPN CSP that disables this feature for those organizations with explicit requirements for users to be connected via VPN at all times.
Thats it for me this time – as always I hope you will do me the honor of following me on Twitter (@michael_mardahl).
Author’s note: The release of Win10 2004 came before I had this post ready. As the code was ready, I opted to release the latest build to give users the ability service the new image without providing instruction.
This release of WIM Witch brings minor functionality enhancements to the user experience, and lays the foundation for ConfigMgr integration yet to come.
Auto Fill
ConfigMgr provides two places for administrators to provide metadata about the Operating System Images, Versions and Comment (Description).
The “Version” and “Description” (Comment) fields
These fields are typically left for admins to fill out themselves. While they can be useful, generally they aren’t used. WIM Witch v2.0 allowed admins to manually populate these fields from within the WIM Witch UI, which can be handy, but v2.1 makes them useful.
Three new check boxes. The Auto Fill check boxes, plus the Enable Deployment Share check boxes are new
With v2.1, checking the boxes labeled “Auto Fill” next to “Image Version” and “Description” will automatically populate these fields with metadata about the creation of the image. Version will be populated with a timestamp of when the image was finalized by WIM Witch, which provides admins a reference for how old the image really is.
The Description Auto Fill option populates the field with a list of customizations that were selected for the image creation. While not a granular list, it will easily tell the admins if OneDrive has been update, Software Updates applied, Language Packs injected, and more. At this time, she does not show exactly which updates were applied, nor specific LP’s, but that may be coming at some point in the future. For now, we can get an automatic high-level view of the image without having to look at logs.
Showing what the “Auto Fill” options can do. Yes, there is a typo.
Enable Deployment Share
By checking this box, every Distribution Point that has the image distributed will also add a Deployment Share for the content. While this feature may not be widely used, there were requests for it and it was a worthwhile deep-dive into the bowels of WMI to figure out how to make it work. Look for the option to name the deployment share in a future release.
Windows 2004 Support
Microsoft released Windows 10 2004 late in May, and WIM Witch v2.1 adds support for this new version. While everything should work, this version of Windows 10 is still new, so it’s possible that a few bugs need to be worked out. If bugs are encountered, please let me know. WIM Witch is nothing without her users, especially those that provide feedback!
The Prelude to Greatness
For those who have already tried out v2.1, the best feature is not obvious to discern. There are no check boxes, fields, or configurable items to give it away. Besides the mentioned features above, there is nothing new in the WIM Witch UI.
V2.1 introduces an automatic function that catalogs every configuration selected when building a new or updating an existing ConfigMgr OS Image. After either a new CM image is created or an existing one updated, a folder will be created in the WIM Witch folder structure.
The new folder lives between “CompletedWIMs” and “Configs”. See if you can find it…
In this folder, a file is saved that is named after the Package ID of the image. This file will now be automatically loaded when an image is chosen for updating, so long as WIM Witch has already created or updated said image. If the image file with the Package ID has not yet been created, the old default behavior will take precedence.
This means that admins who are using CM integration no longer have to select a Source WIM, choose customizations, or select items each time they wish to update an image. Every chosen option from the previous build will be loaded automatically. Any changes made to the customizations will automatically be saved when the new build is completed.
In effect, admins just need to select the image to update and hit “Make It So”.
The Hidden Agenda
So besides saving the average Admin 5-10 mouse clicks, why is WIM Witch remembering the selected customizations so exciting? This functionality lays the groundwork for ConfigMgr console integration.
Coming soon to a WIM Witch near you
All that will need to happen from the console is to select an image, and have the as-of-yet-unwritten plugin pass the Package ID to WIM Witch as a command-line parameter. She’ll know exactly what to do. Granted, this is easier said than done. I need to figure out how to write a console plugin first, and that is likely to take some time. But like everything else in WIM Witch, I didn’t know how to make it happen until it was written, and this challenge is just the same. And its a challenge I have been waiting to tackle since I started writing her.
This version, while small on new features for the admin today, has paved the way for excellence in the future. I am excited that I have brought her this far, and I can’t wait to have her fully CM integrated in the near future.
This is a short post, but it took me some time to test it out and make sure it works, hope this is useful.
I often see questions about “Does AppLocker work in Windows 10 Pro?”, “Can we manage AppLocker in Windows 10 Pro”? The simple answer is YES! In this post, I will tell you how.
You can use the AppLocker CSPto configure AppLocker policies on any edition of Windows 10 supported by Mobile Device Management (MDM). You can only manage AppLocker with Group Policy on devices running Windows 10 Enterprise, Windows 10 Education, and Windows Server 2016.
Being said, you cannot use Group Policy configure AppLocker for Windows 10 Pro, but it doesn’t mean that AppLocker doesn’t support Windows 10 Pro. If you use Group Policy, you will see a warning from AppLocker event log, that AppLocker component not available on this SKU.
From MDM Configuration Service Provider Reference, AppLocker CSP does support almost all Windows versions, except Business, you can use Intune OMA-URL configure AppLocker settings, there are lots of good blog posts about this. So the question is, if you are not managing your devices with Microsoft Intune or Co-Management, how to configure AppLocker for Windows 10 Pro?
The answer is fairly simple: Use PowerShell with the WMI Bridge Provider
CSPs are similar to Group Policy client-side extensions in that they provide an interface to read, set, modify, or delete configuration settings for a given feature. Typically, these settings map to registry keys, files, or permissions.
The WMI-to-CSP Bridge is a component allowing configuration of Windows 10 CSPs using scripts and traditional enterprise management software, such as Configuration Manager using WMI. The bridge is responsible for reading WMI commands and through a component called the common device configurator pass them to a CSP for application on the device.
Take AppLocker EXE rules for example, it’s MDM Bridge WMI Class is located in MDM_AppLocker_ApplicationLaunchRestrictions01_EXE03. This is a device setting, for all device settings, the WMI Bridge client must be executed under local system. Here is how we do it:
Step 2: unzip pxexec tool, run psexec.exe /i /s PowerShell_ISE.exe from an elevated admin command prompt
Step 3: Type whoami, you should see this is now running as nt authority\system
Step 4: Now you can run the following script as example, you can change $GroupName as your wish and configure your own AppLocker RuleCollections.
Now you should able to see this settings from WMI Explorer or with PowerShell (also need use psexec.exe /i /s)
And you will also find your settings in C:\Windows\System32\AppLocker\MDM folder .
And again, you will not find these AppLocker rules in GPO, because it is not using GPO.
Verification
When I now log in as a standard user, tried open cmd.exe, I will get this notification, that this app has been blocked by your system administrator
There was discussion in Twitter, that I should use WinDbg with !Token output listing appid:// to prove AppLocker works in Windows 10 Pro. Here it is, a screenshot of !exts.Token output (!Token command didn’t give me any results), systeninfo shows this is Windows 10 Pro, PowerShell get-service shows AppIDSvc is running, AppLocker event logs shows what apps are allow to run.
Scripts for update and delete AppLocker settings can be found in my GitHub
 For earlier posts, please find them here: Passwordless journey with FIDO2 – Part 1 – Getting started with Security keys In the last part of this blog post I wrote about the beginning of my passwordless journey and which keys I had available. In this second part I will conclude with the overall experiences that […]
 At Ignite 2019 Microsoft announced BitLocker key rotation for Intune managed Windows 10 devices. It is a long awaited feature and closes the feature gaps in the cloud managed BitLocker solution. In this article we have a look how this actually works. First of all we need to configure our devices to actually perform client-driven […]
 With the release of WIM Witch v1.3.0, she now has new capabilities that were requested by the community. While there have been plenty of functional updates to WIM Witch since its release, this version brings enough change to warrant documentation. The features introduced in this release are all from user requests, and I want to […]
 Another blog post on the subject of Hybrid Azure AD joined devices that have been provisioned using Windows Autopilot. As you may have figured by now, this scenario even though it’s not in preview any longer, it sure feels like it some times. A while back I wrote a blog post that demonstrated how you […]
 Internet browsers have become more than just a means of accessing lines of HTML, JavaScript and CSS over the years. Today we use browsers to control core functions of our business, through portals into technologies including Azure, Office 365, AWS, Google Gsuite and many, many more. The one thing that has become apparent though over […]
 So a couple of days ago I posted a post on how to bulk rename devices in Intune using the Graph API (https://www.scconfigmgr.com/2020/03/02/how-to-rename-windows-10-devices-in-intune-using-powershell/), today though marks the availability of something very cleaver indeed, with the addition of bulk actions from within the Endpoint Manager portal. This is a feature that Intune admins around the globe […]
 With over 44 million active users, Microsoft Teams is not going away anytime soon. It’s rise in popularity also means that old issues arise a new for a lot of tenants that have not fully utilized the Teams client in the past or have just begun the transition to Office 365 ProPlus that includes Teams. […]